Full image processing (pre-processed with scripts)
This tutorial explains step-by-step how to process raw deep-sky images using, at first, the automatic processing capabilities of Siril scripts up to the stacking of the images, then the image improvement features of Siril to produce a final image for Web publication for example. It was made with version 0.99.8.1, the current stable version in February 2021 (download
). The pictures show how to do it with Microsoft Windows, but the specific parts for this operating system are about copying files, so it should be easy to adapt to your operating system. Other scripts, not provided with the installer, can be found here
.
Since version 0.99.x, new universal scripts can process both DSLR RAW images and astronomy camera FITS images. Several scripts are provided and can be used for your image colour type, for example there is a script for colour-filtered sensors (OSC - on sensor colour), one for monochrome sensors, and two for colour-filtered sensors used with narrow-band filters like H-alpha and a dual H-alpha and O-III band.
There are three parts in the tutorial. First part, (below this introduction ), will feature:
- Pre-requisites to start with Siril
- Activating Windows developer mode
- Explanations for file types used by the scripts (bias, darks, flats and lights)
The second part (here ) will show how scripts are used to preprocess images:
- Copying the images at the correct location
- Preparing Siril and launching the script
- Opening the stacked image
- Changing display mode
The third part (here ) will show how the script result, the stacked image, can be processed with Siril tools to provide a final image, ready for publication:
- Cropping the image
- Background gradient extraction
- Photometric colour calibration
- Deconvoluting the image
- Stretching the histrogram
- Removing the green tint
- Modifying colour saturation
- Saving as
FITS,TIFF,JPEGorPNG.
READ THIS BEFORE STARTING: #
- If you don’t see the Scripts menu in Siril, or if you don’t see new scripts, follow this procedure .
- If you have changed Siril’s default working directory (the user’s Pictures directory), check that the four directories
biases,darks,flats,lightsare there. - Versions 1.2.0 may use symbolic links to avoid duplicating FITS files on the disk for nothing in the conversion process, but on Windows this requires enabling the developer mode:
- Open the Windows menu (clicking on the icon or pressing the keyboad Windows key), then click on
Settings(the toothed wheel)
- Click on
Update & Security
- Click on
For developers, and select theDeveloper mode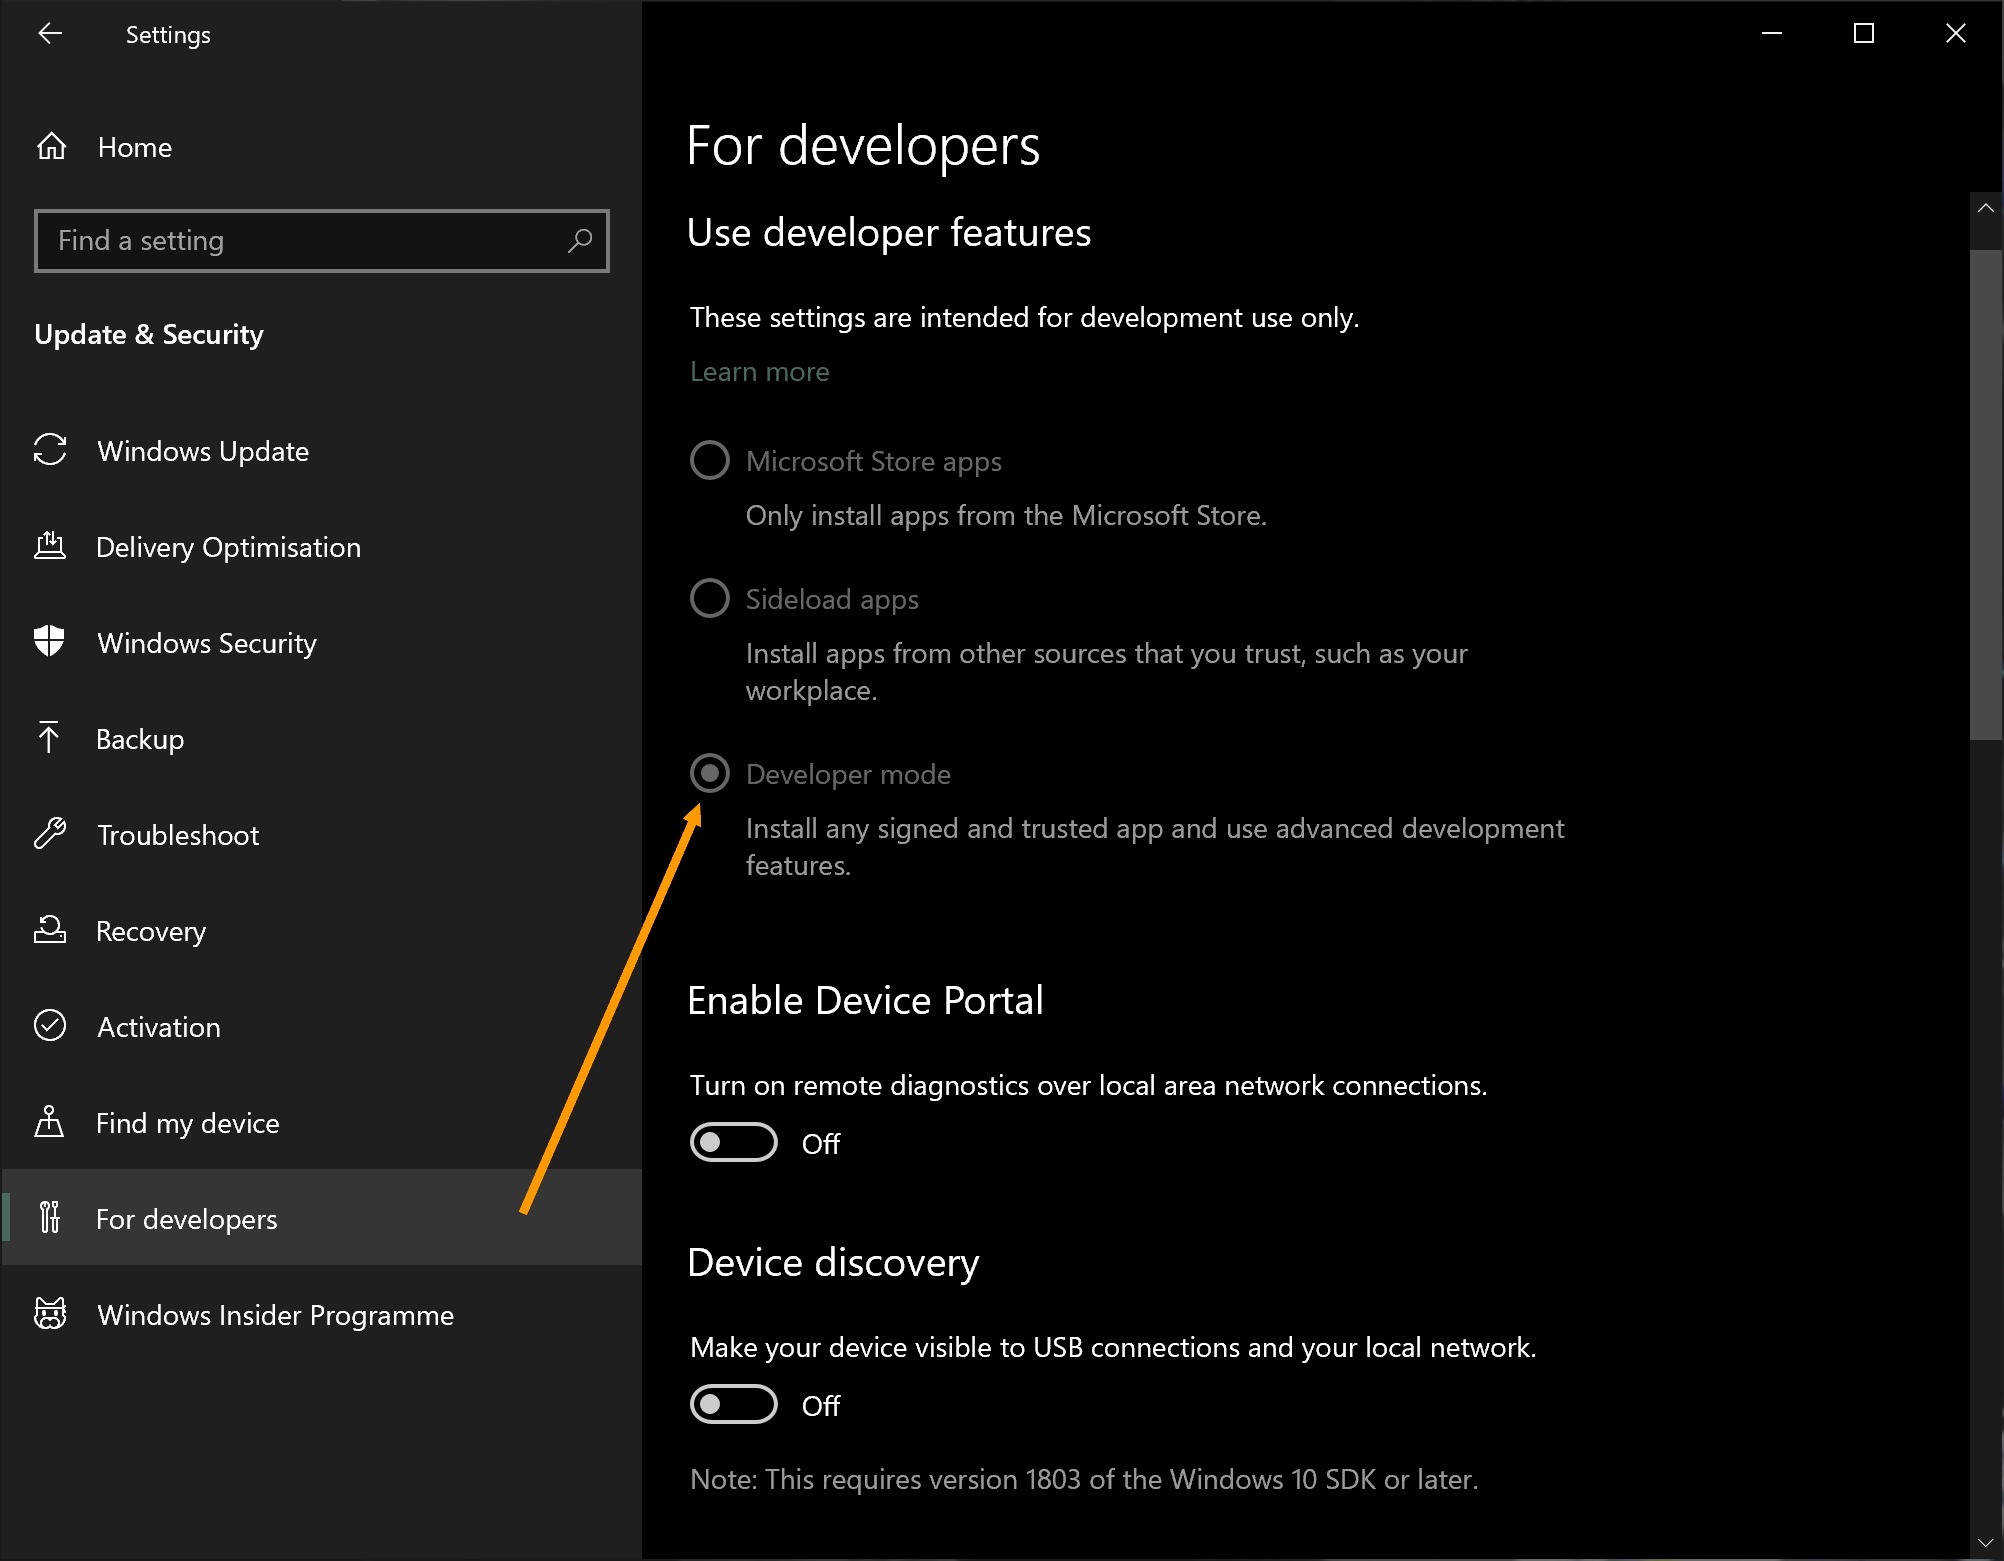
- It is done, you can leave it like that forever, it will not alter Windows behaviour otherwise.
- Open the Windows menu (clicking on the icon or pressing the keyboad Windows key), then click on
Are you ready? #
Wait a second, first, let’s talk about the acquisition. Before processing the images in the next section, you should have:
- Some
lightimages, taken either with a DSLR (RAW files like ARW for Sony, CR2 for Canon and so on), or an astronomy camera (FITS files). - Between 10 and 100
darkimages (RAW or FITS as well), taken in the absolute dark, with the same exposure and ISO or Gain as thelights - Between 10 and 20
flatimages (RAW or FITS as well), capturing uniform light field, in daylight or with a flat screen or whichever technique you like, ideally with the lowest ISO or Gain to minimise noise in the images - Between 10 and 100
biasimages (RAW or FITS as well), taken in the absolute dark at shorter exposure.
In this tutorial, the following hardware was used:
- A 106mm diameter refractor telescope with 388mm of focal length (f/3.7)
- An equatorial mount with 2 axis motorization
- An optical divider with a guiding camera (ASI290 mini)
- A
ZWO ASI 2600MCcamera, with Gain set to 100 - An anti-light pollution filter Optolong L-Pro (even if it was far from cities, the target was close to the horizon where cities are)
- And the
ZWO ASIAIR PRO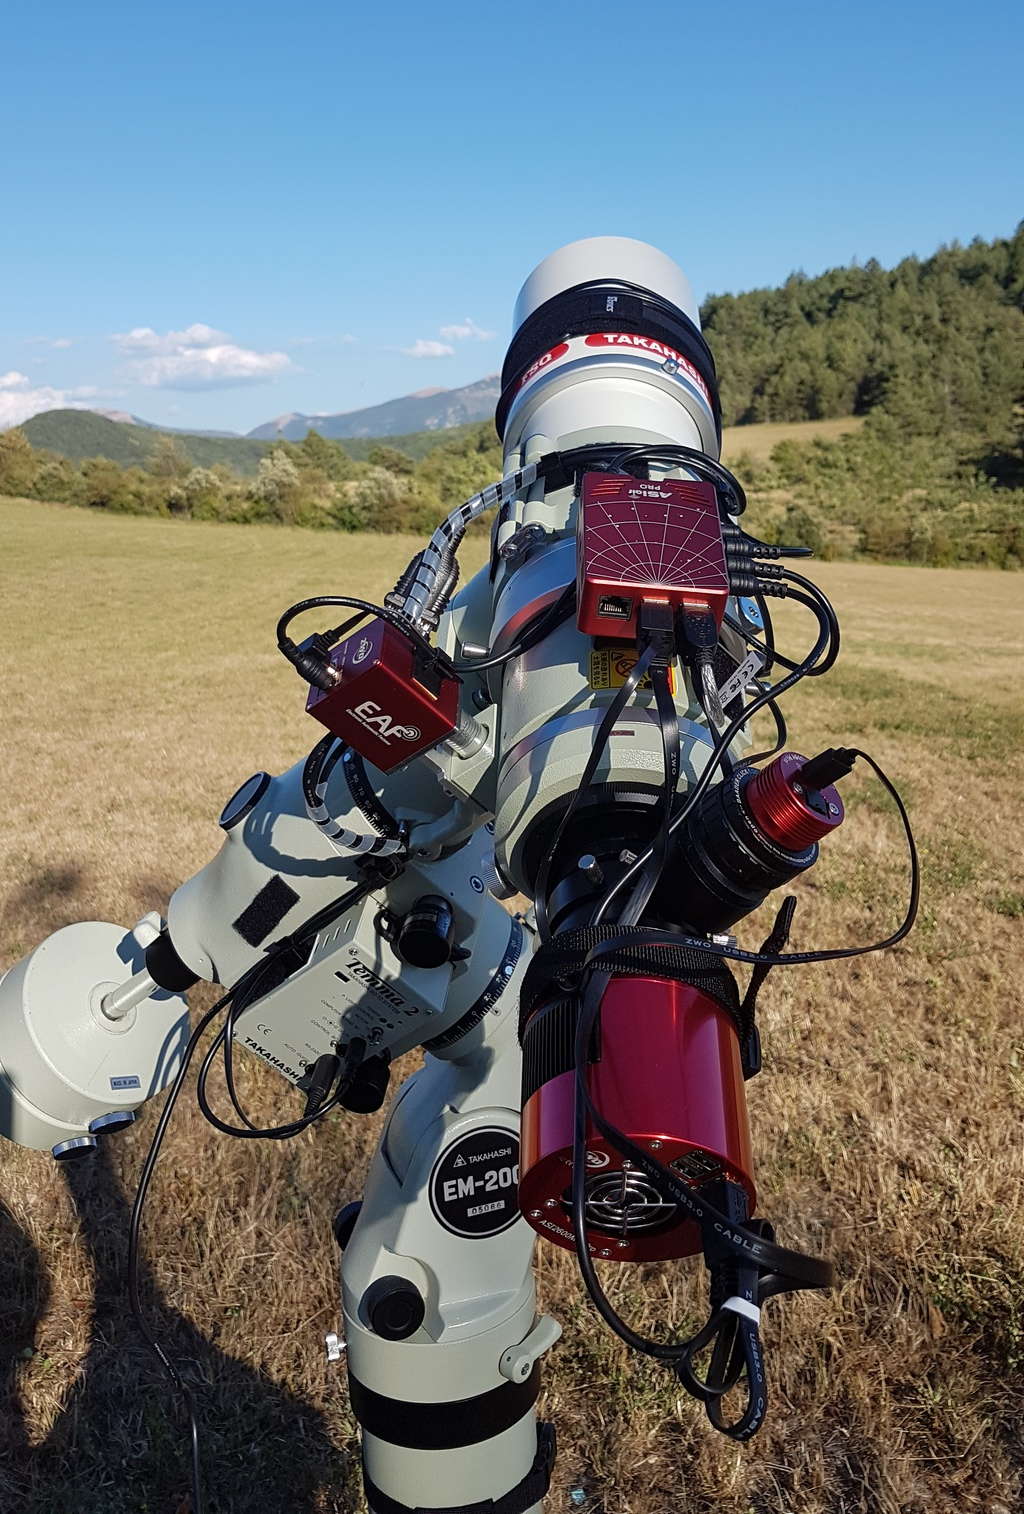
and the following images were acquired:
- 15
lightsof 180 seconds exposure, Gain of 100, on the M8 and M20 nebulae - 15
darksof 180 seconds exposure, Gain of 100 - 15
flatsof 3 seconds exposure, Gain of 100 - 15
biasof 3 seconds exposure, Gain of 100 (so it’s more adarkforflathere)
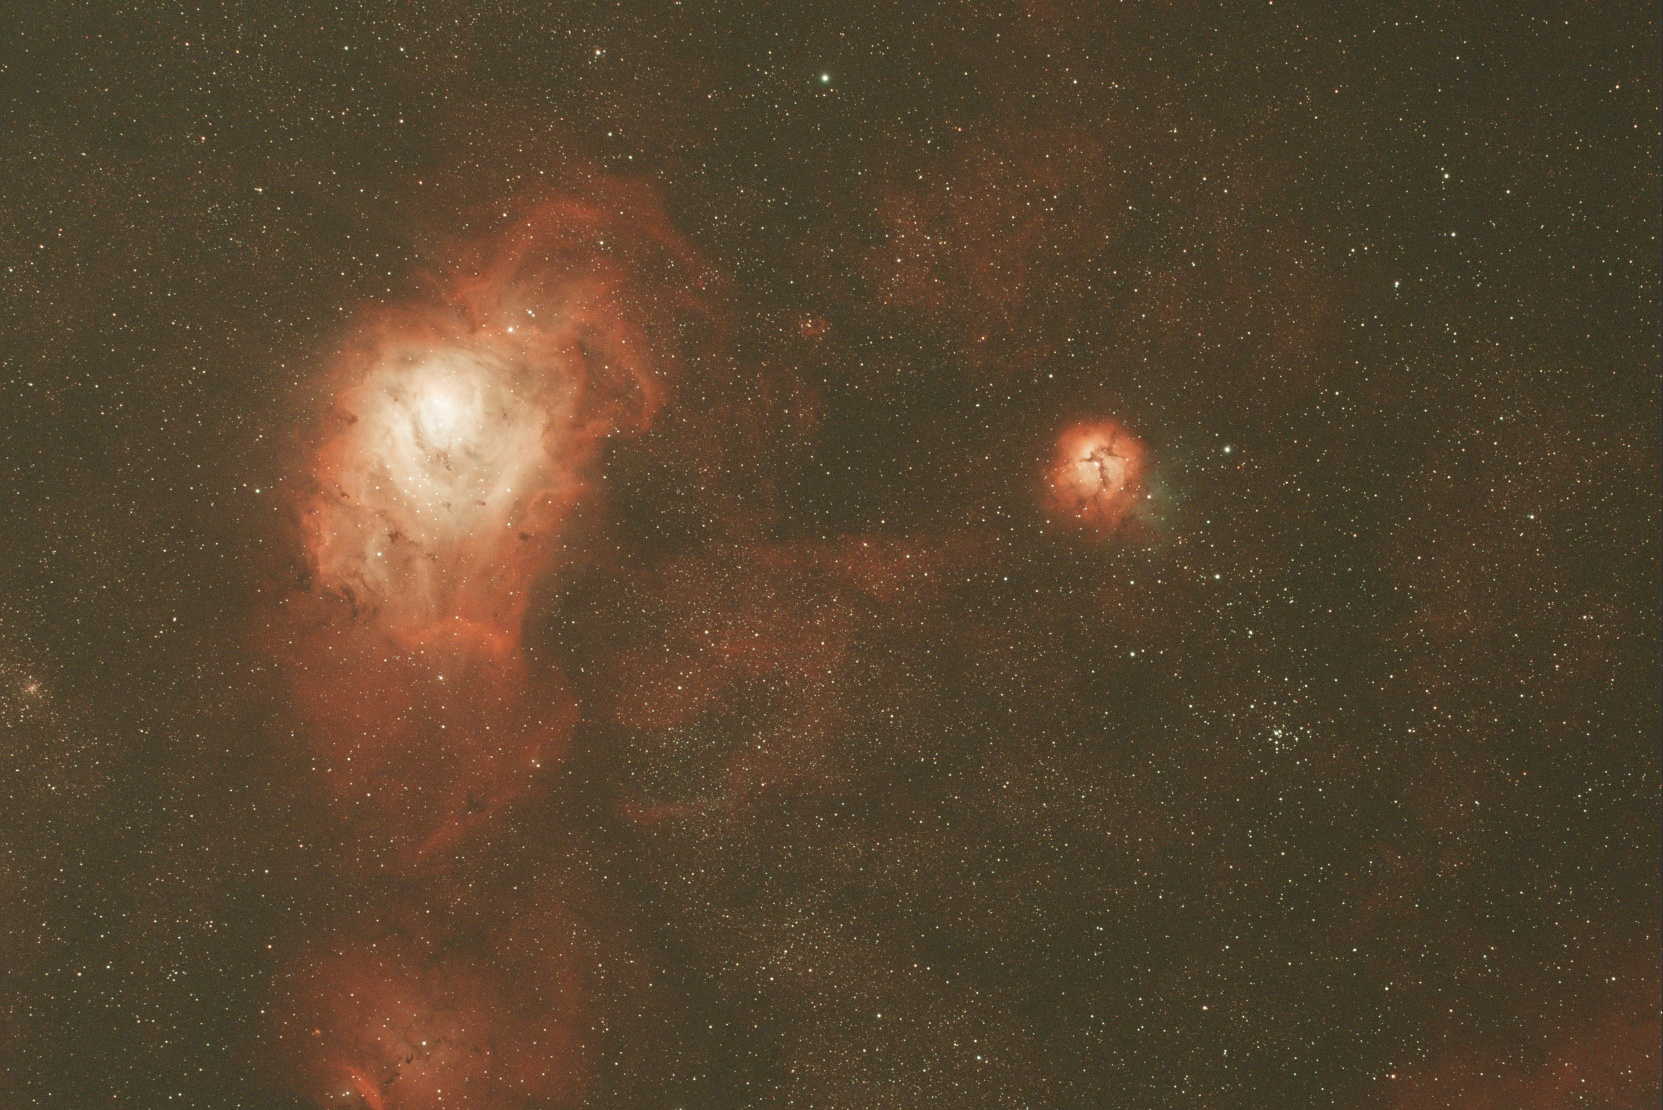
Here is what a single raw image looks like, to compare with the final result:
So let’s start… by putting the files at the expected location. #
To help you learn, a zip archive of all the images is provided here
.
- Create a directory where you want to process your images. It will have to be on a disk with enough free space to contain several times the original images.
- Copy your images in the corresponding subdirectories of this directory (copy indeed, not move, you should always keep a backup somewhere, you never know what can happen):
- Copy the light images in the
lightsdirectory - Copy the dark images in the
darksdirectory - Copy the bias images in the
biasesdirectory - Copy the flat images in the
flatsdirectory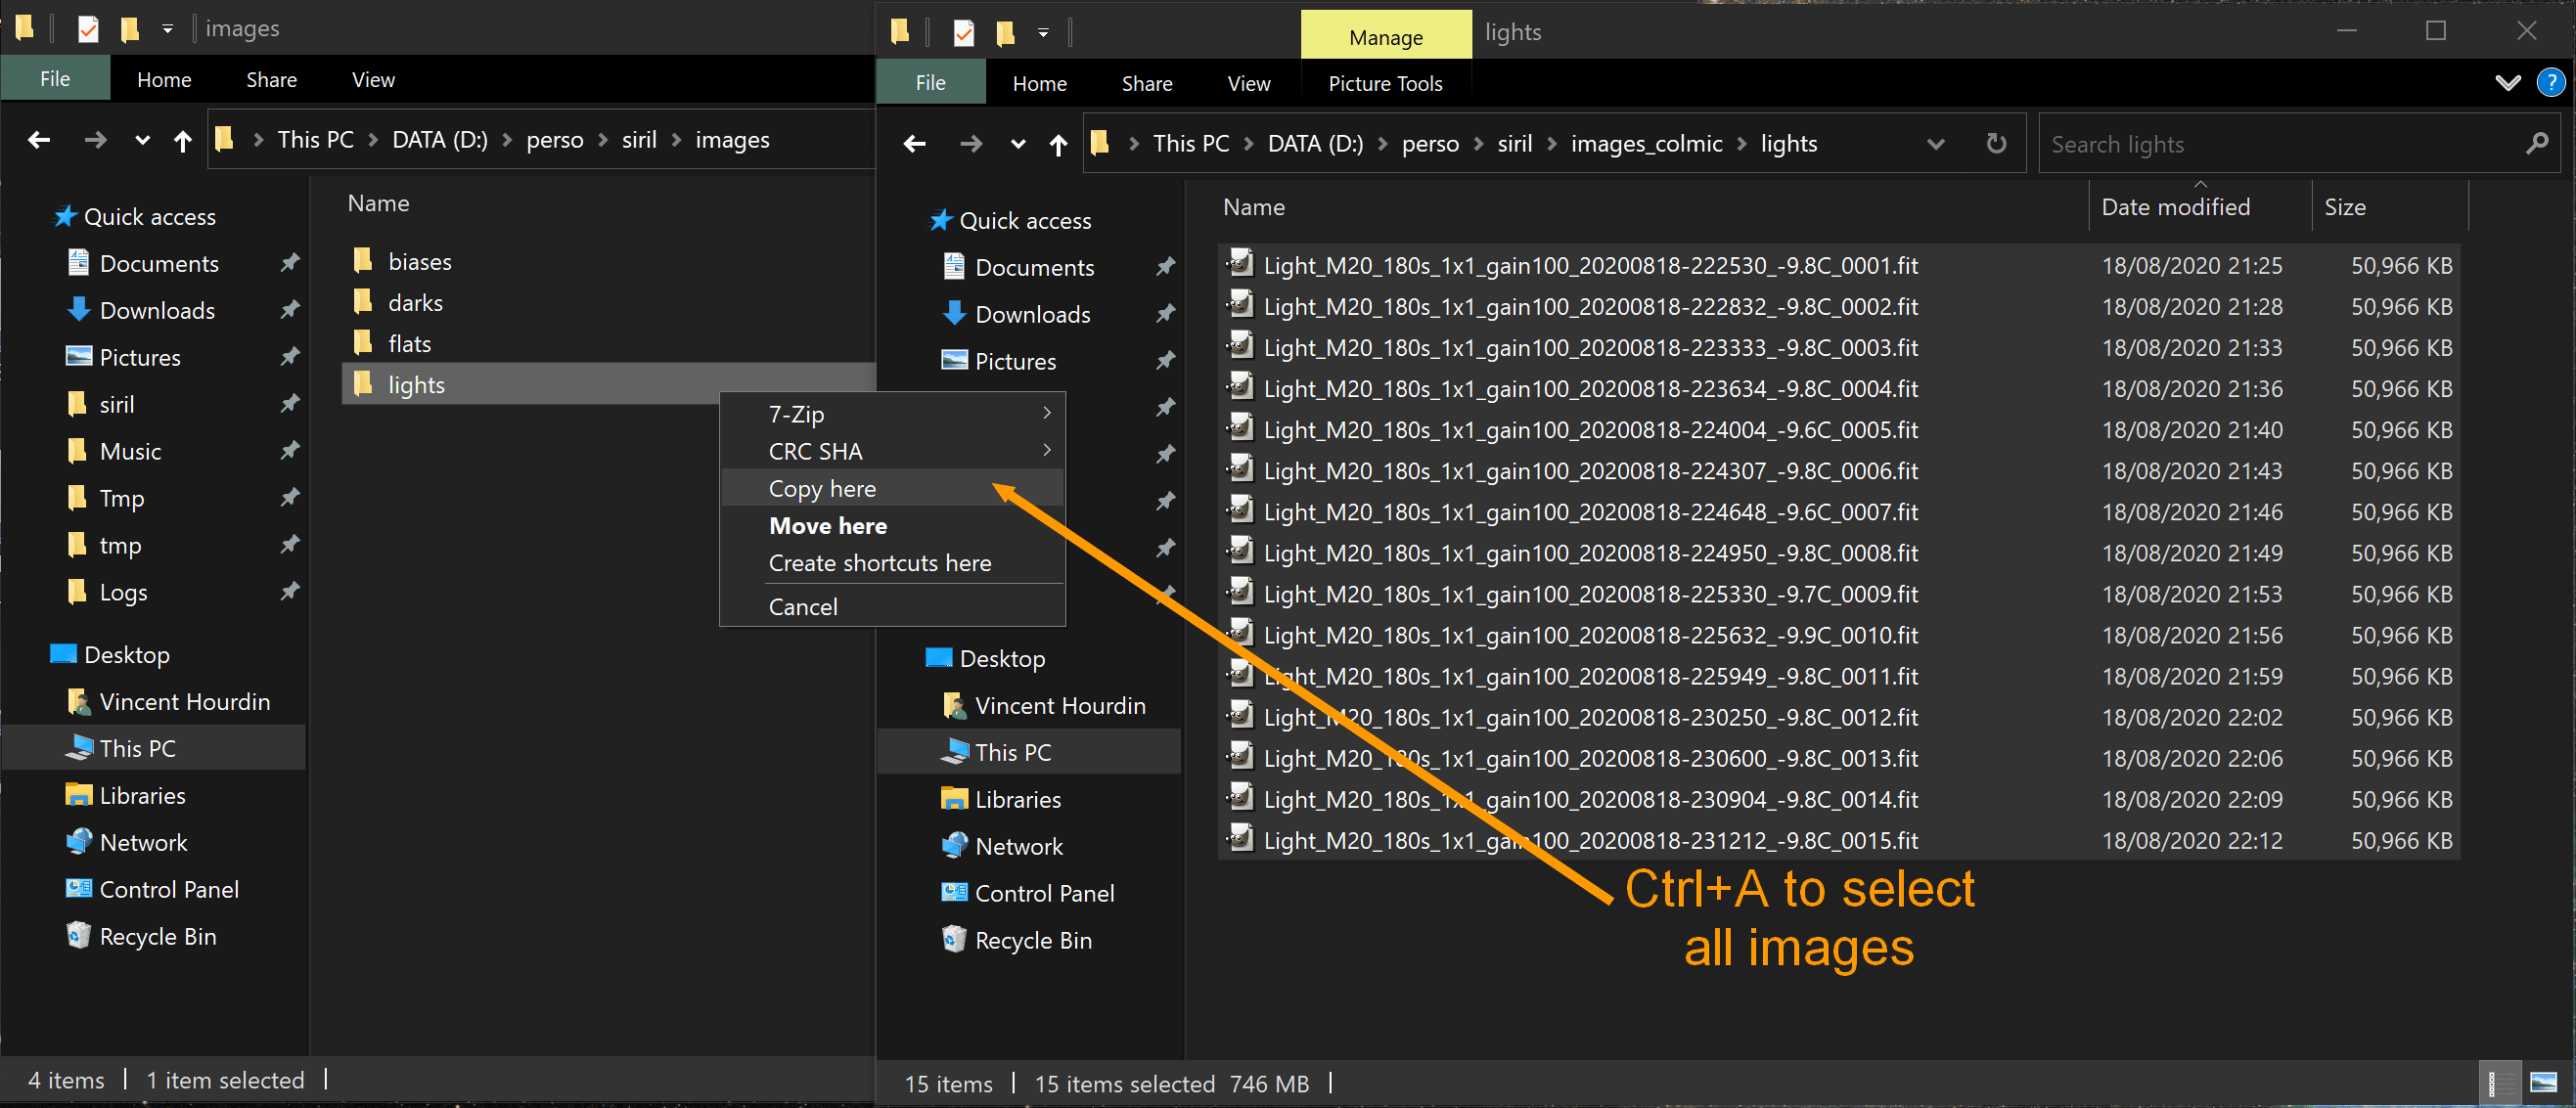
- Copy the light images in the
- Since Siril 0.99.x a new directory appeared:
process. All intermediate files created by the scripts will be put in this directory, which means that once you are done processing your final image, you can delete this directory and it will save all the diskspace. It is also a good idea to delete it before starting a script processing, to avoid some conflicts between the files that will appear in the directory.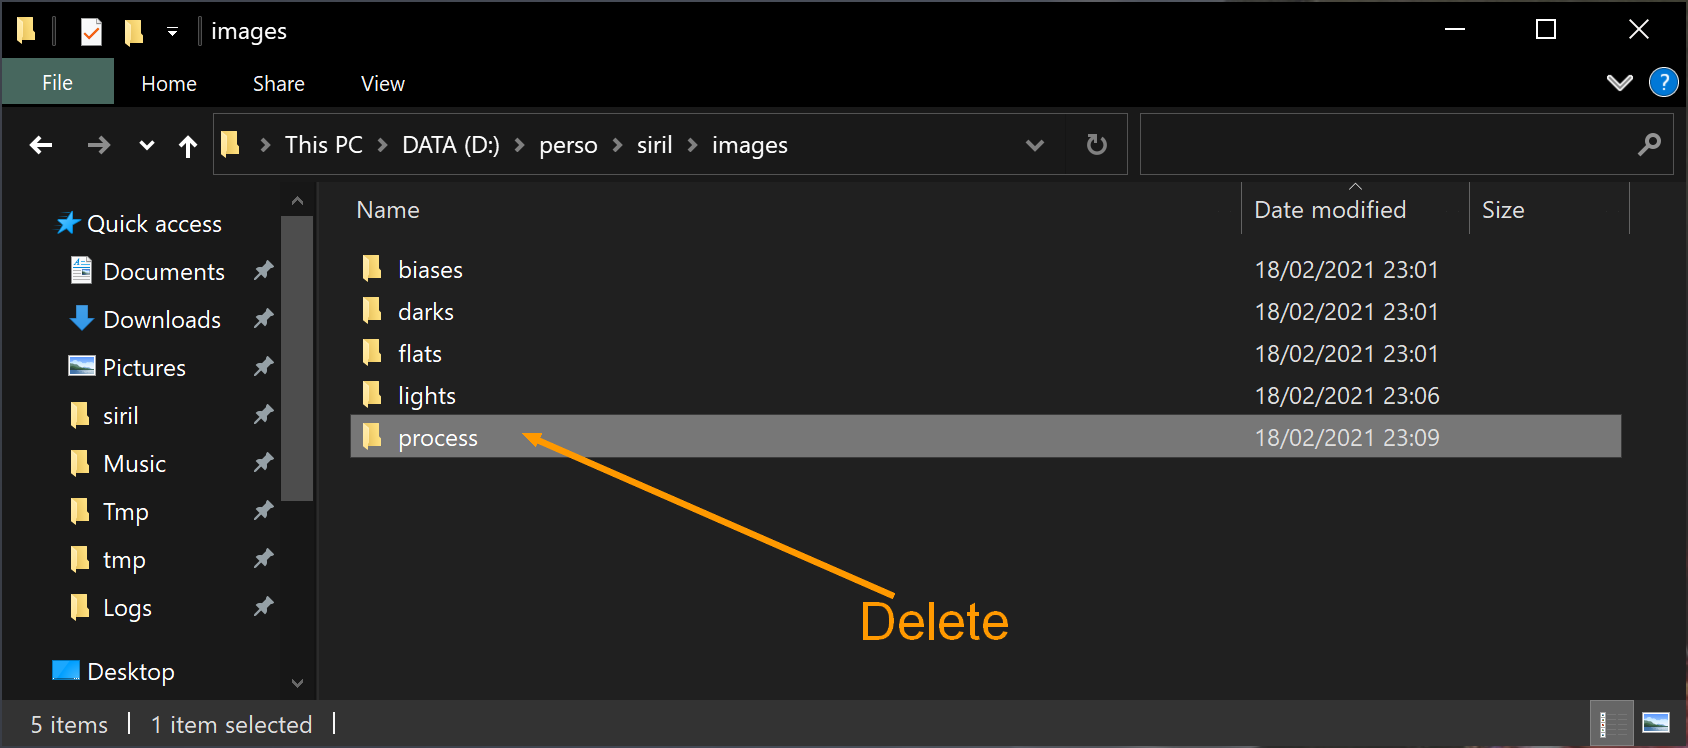
Then we can start the images preprocessing script with Siril (calibration, registration, stacking) #
- Start Siril (you should have an icon on the desktop on Windows)
- Always check, before starting a script, that the current working directory is correctly set to the directory that contains the four subdirectories in which the files were copied. Sometimes, the directory can change if a script failed to process or if you opened an unrelated image in Siril.
- To change it, click on the
Homeicon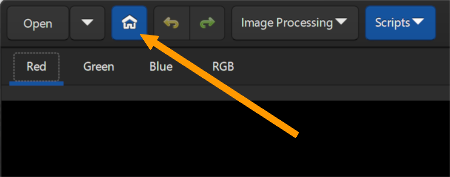
- Then select the working directory, the one that contains the four subdirectories of the image types, and click on
Open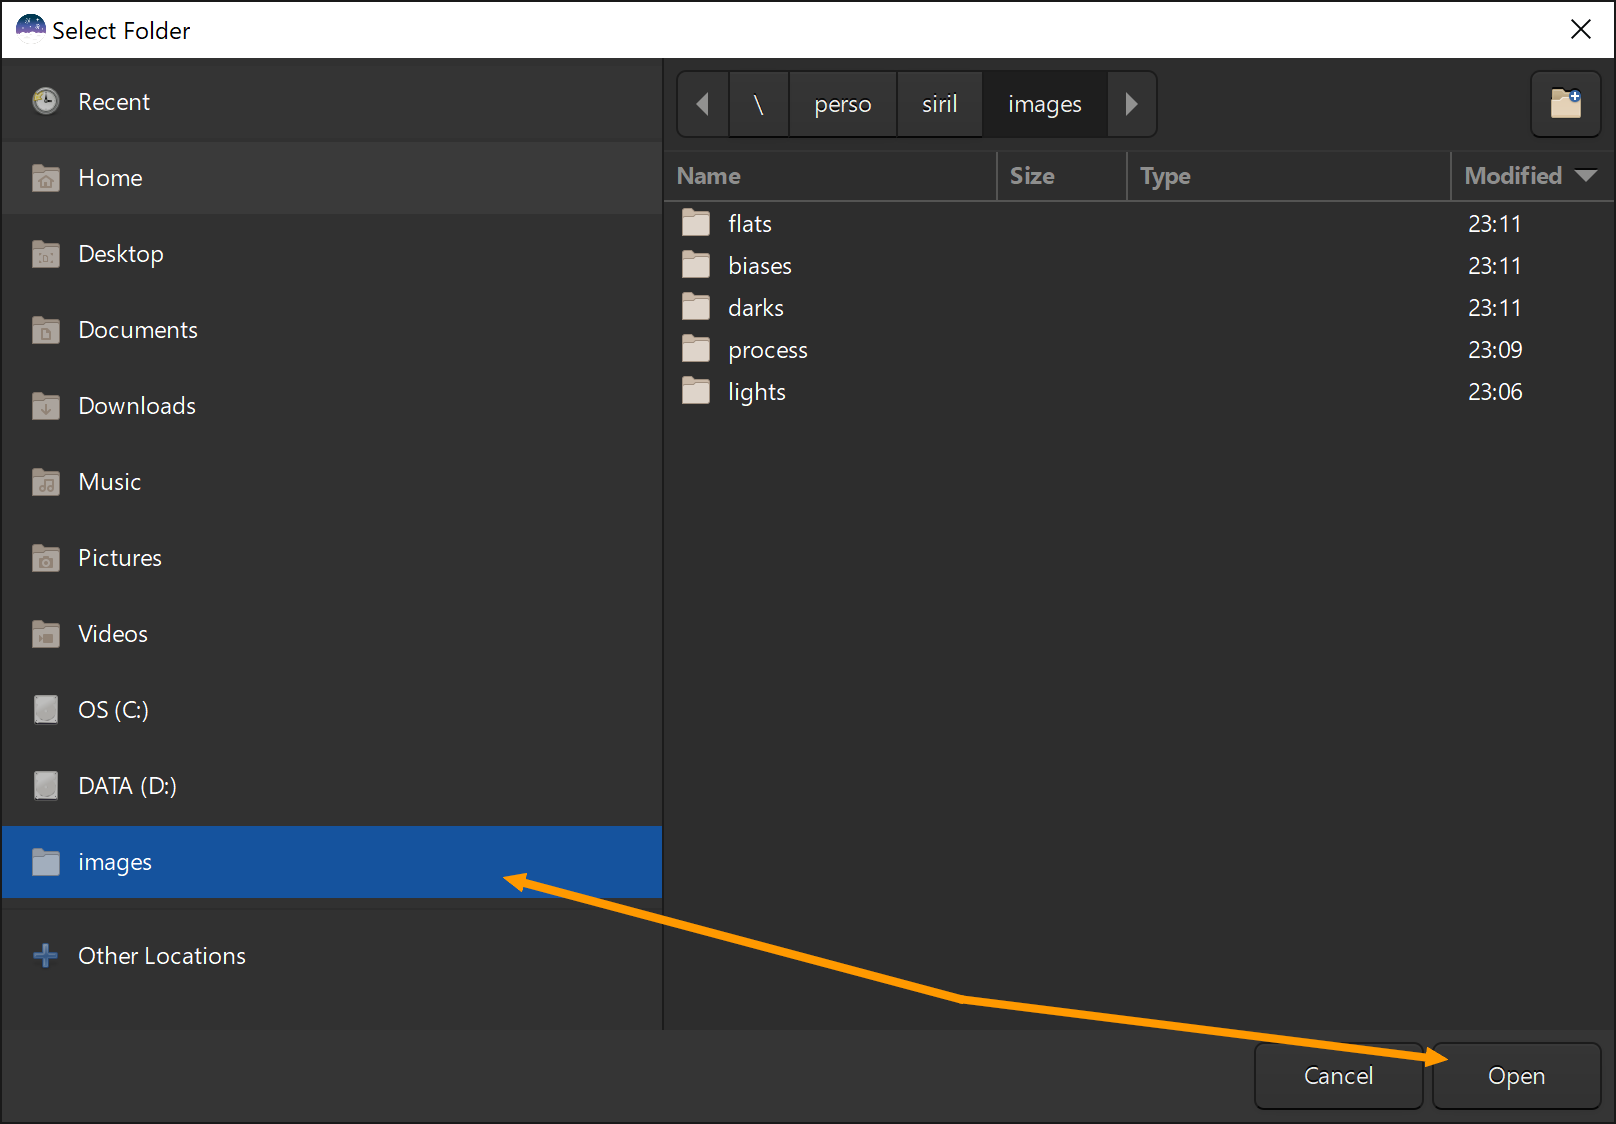
- To change it, click on the
- Click on the
Scriptsmenu then on theOSC_Preprocessingscript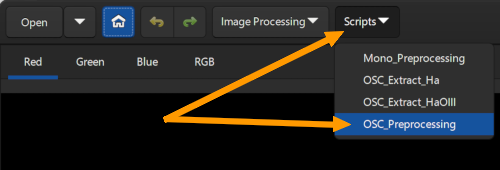
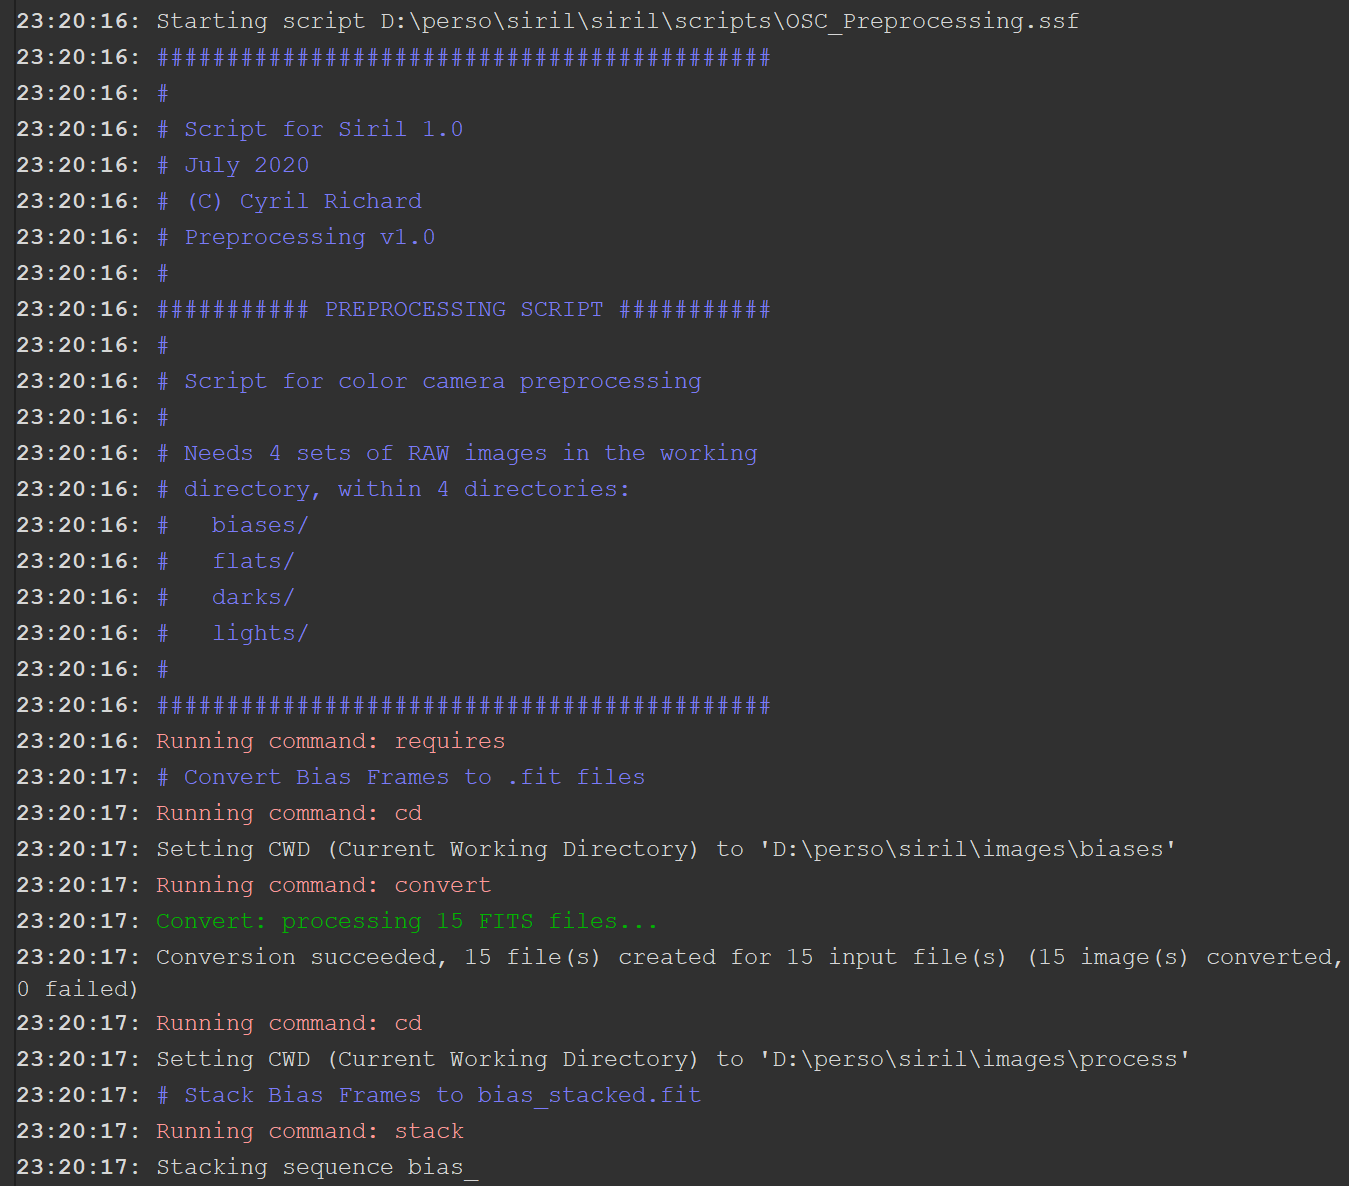
The script is processing the images
The duration of the processing will depend on:
- the capability of your computer to handle large tasks (processor power, memory, hard drive speed (SSD is highly recommended))
- the size of your input files, of course the more pixels they have the more time it will take, but also the fact that they are colour image or monochrome, colour takes 3 times longer to process
- the amount of files to be processed
- the optional up-scaling for sub-pixel alignment (called simplified drizzle x2)
- and your operating system to some extent
For the provided files, with a rather powerful computer, the script takes about 2 minutes. 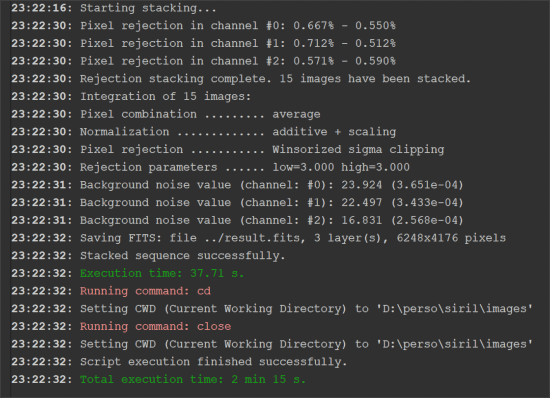
Now let’s see the result! #
- Click on the
Openmenu,
- Double-click on the file
result_xxx.fit(xxx beeing the total intégration time of your stack)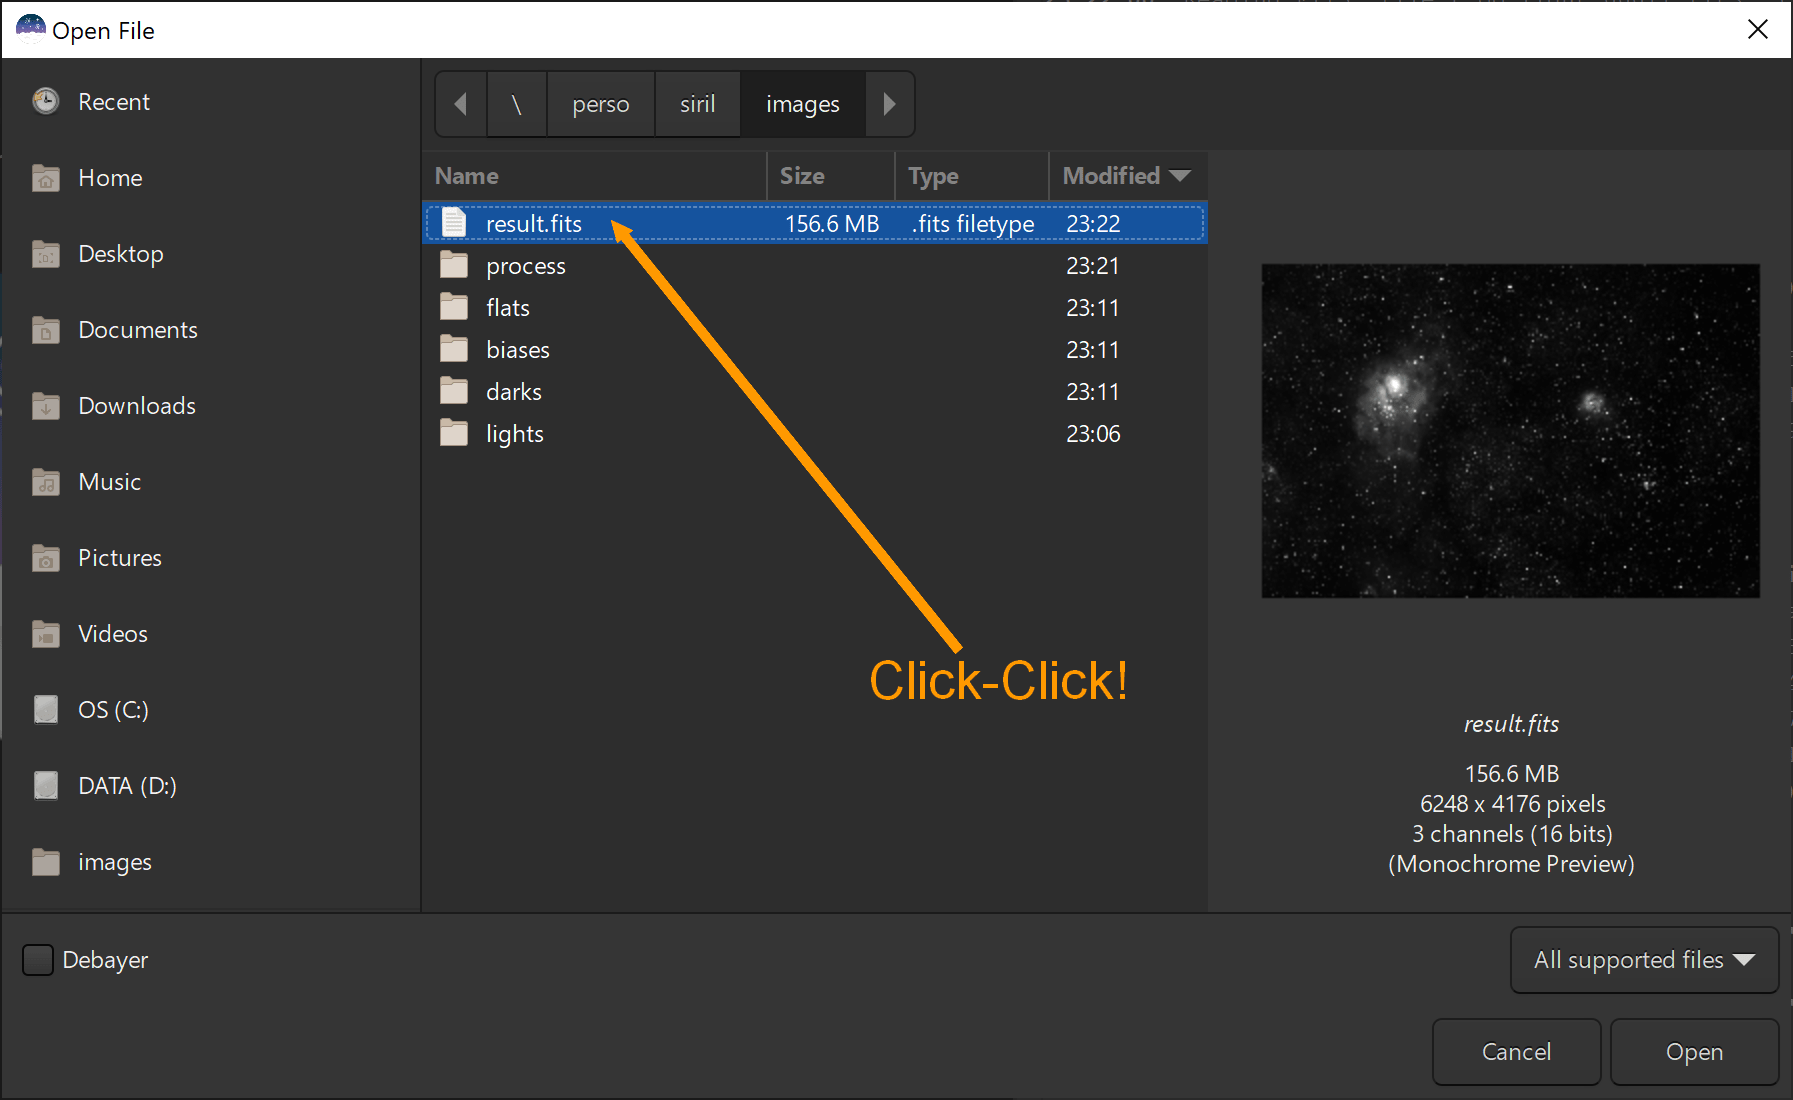
- The image should be displaying in the area on the left hand, first as black and white, on the Red channel. It is normal to see an almost completely black image at this step as the rendering mode is linear by default
- Change the rendering mode to
AutostretchfromLinearat the bottom of the window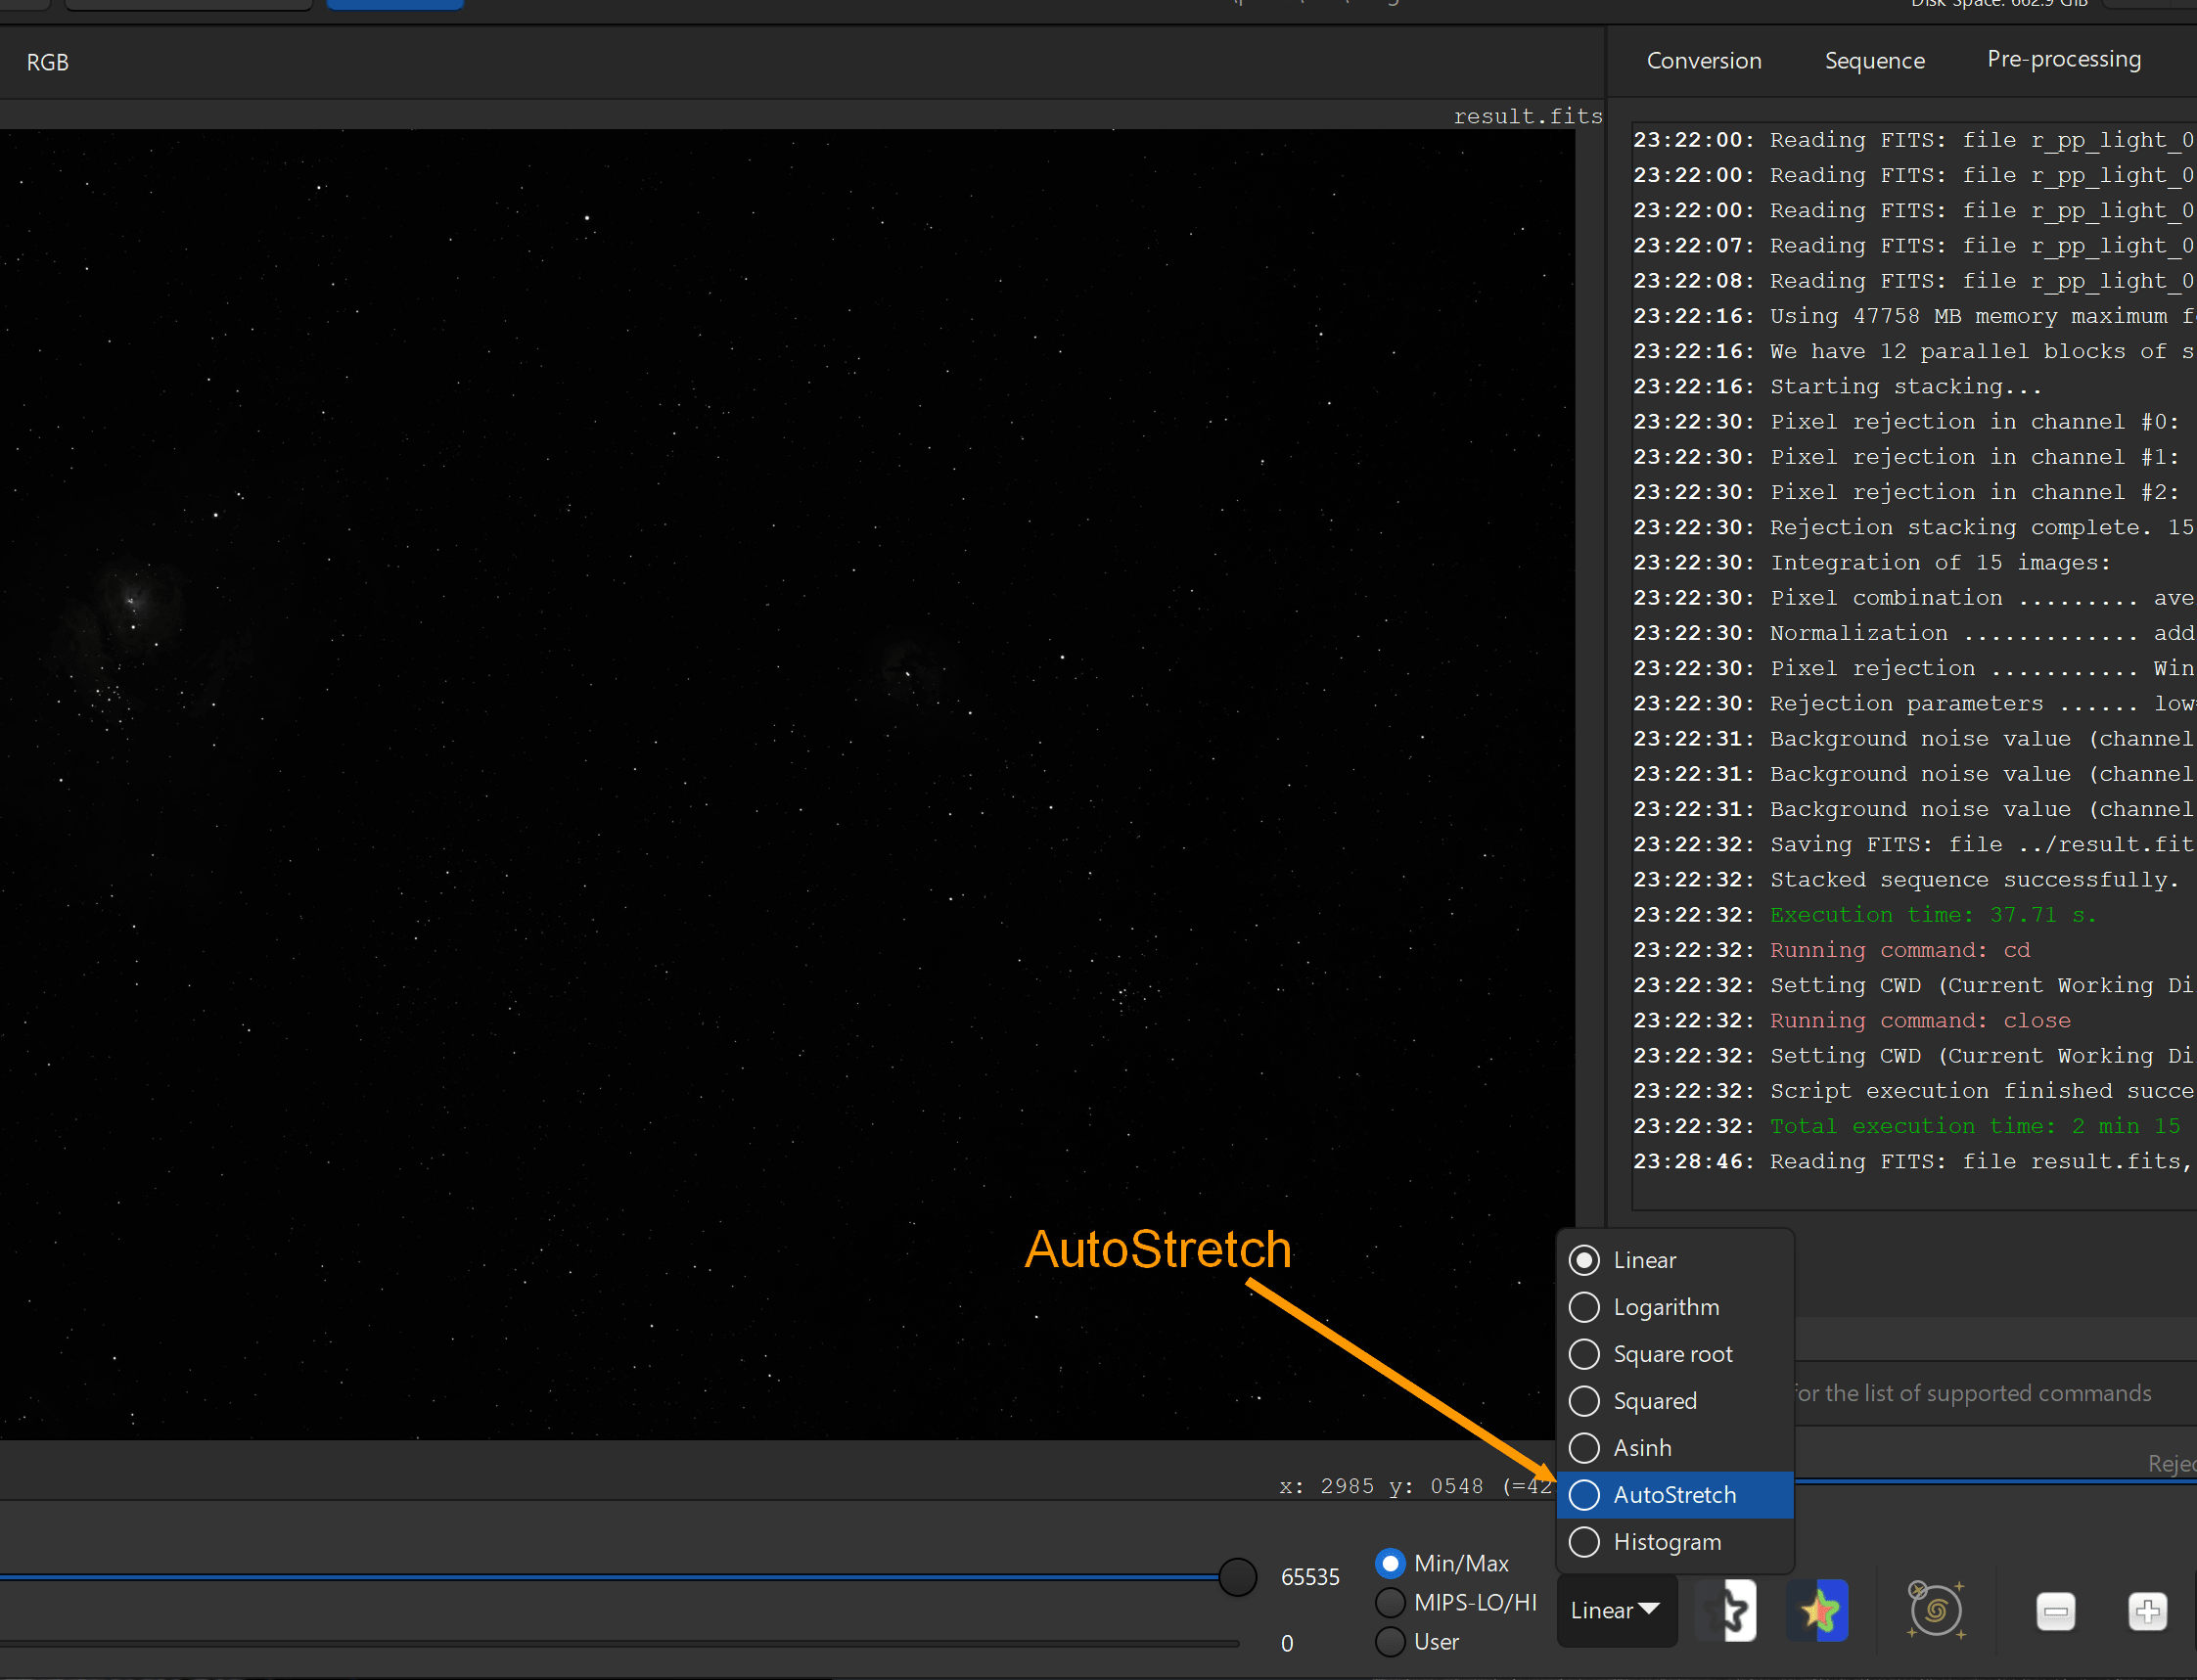
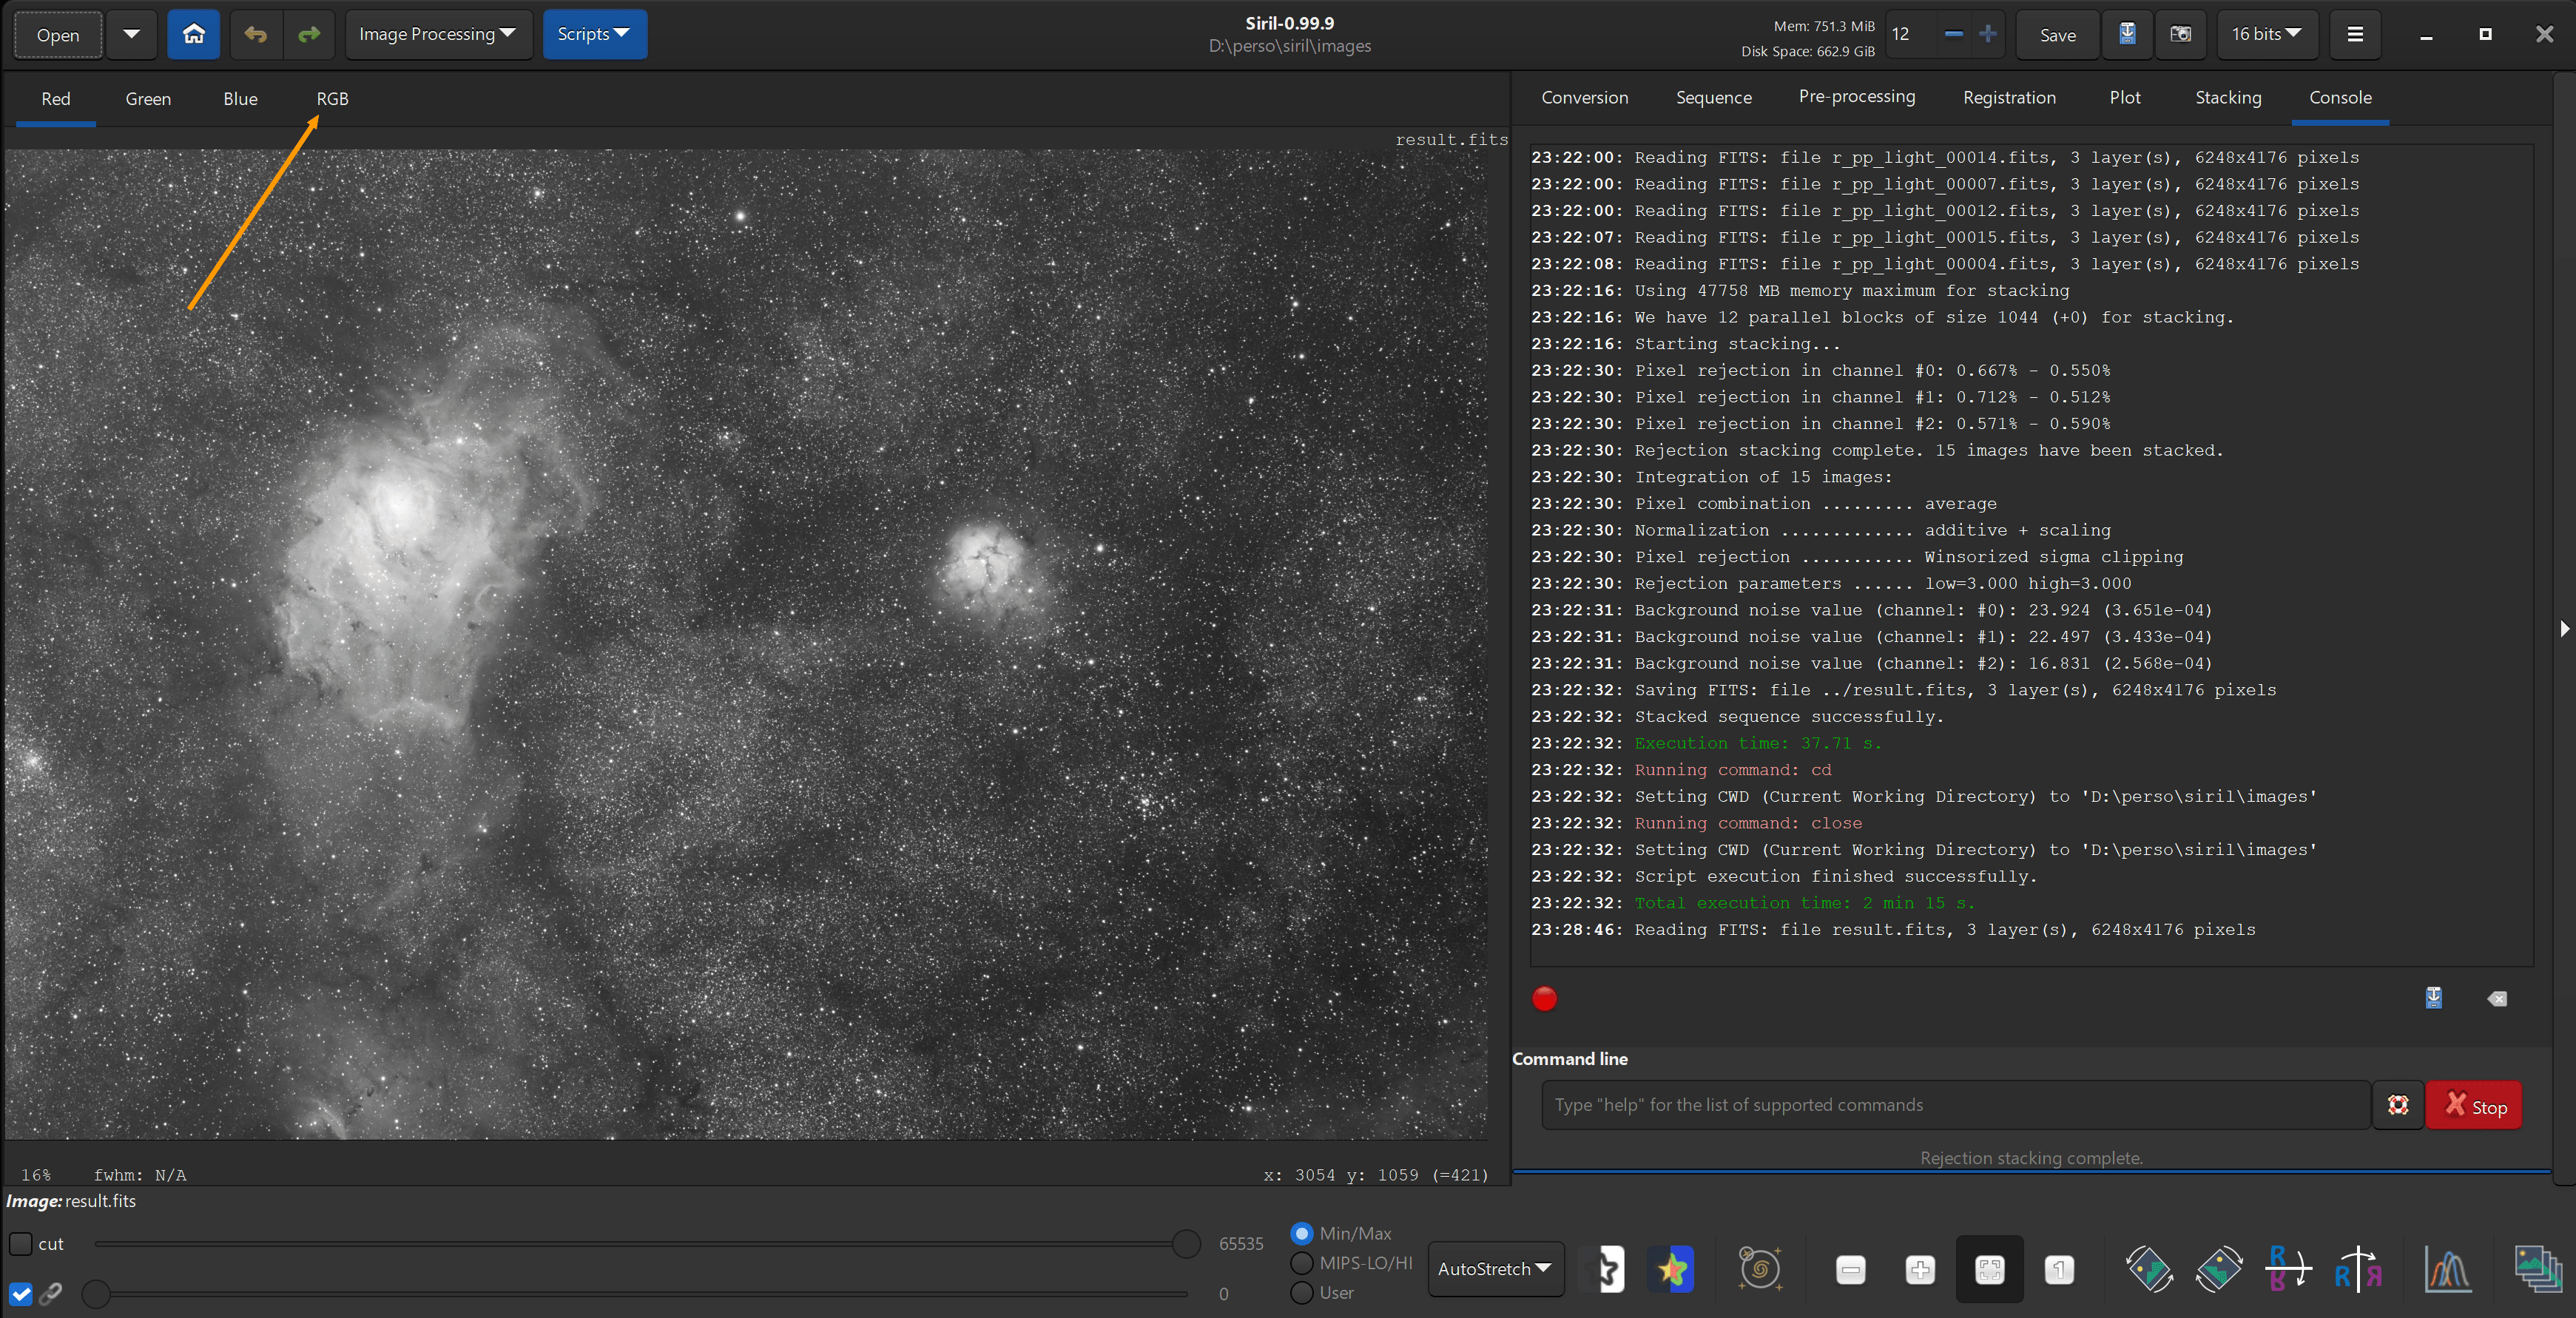
- It should look better now, but still monochrome. Click on the RGB tab to visualize the coloured mix
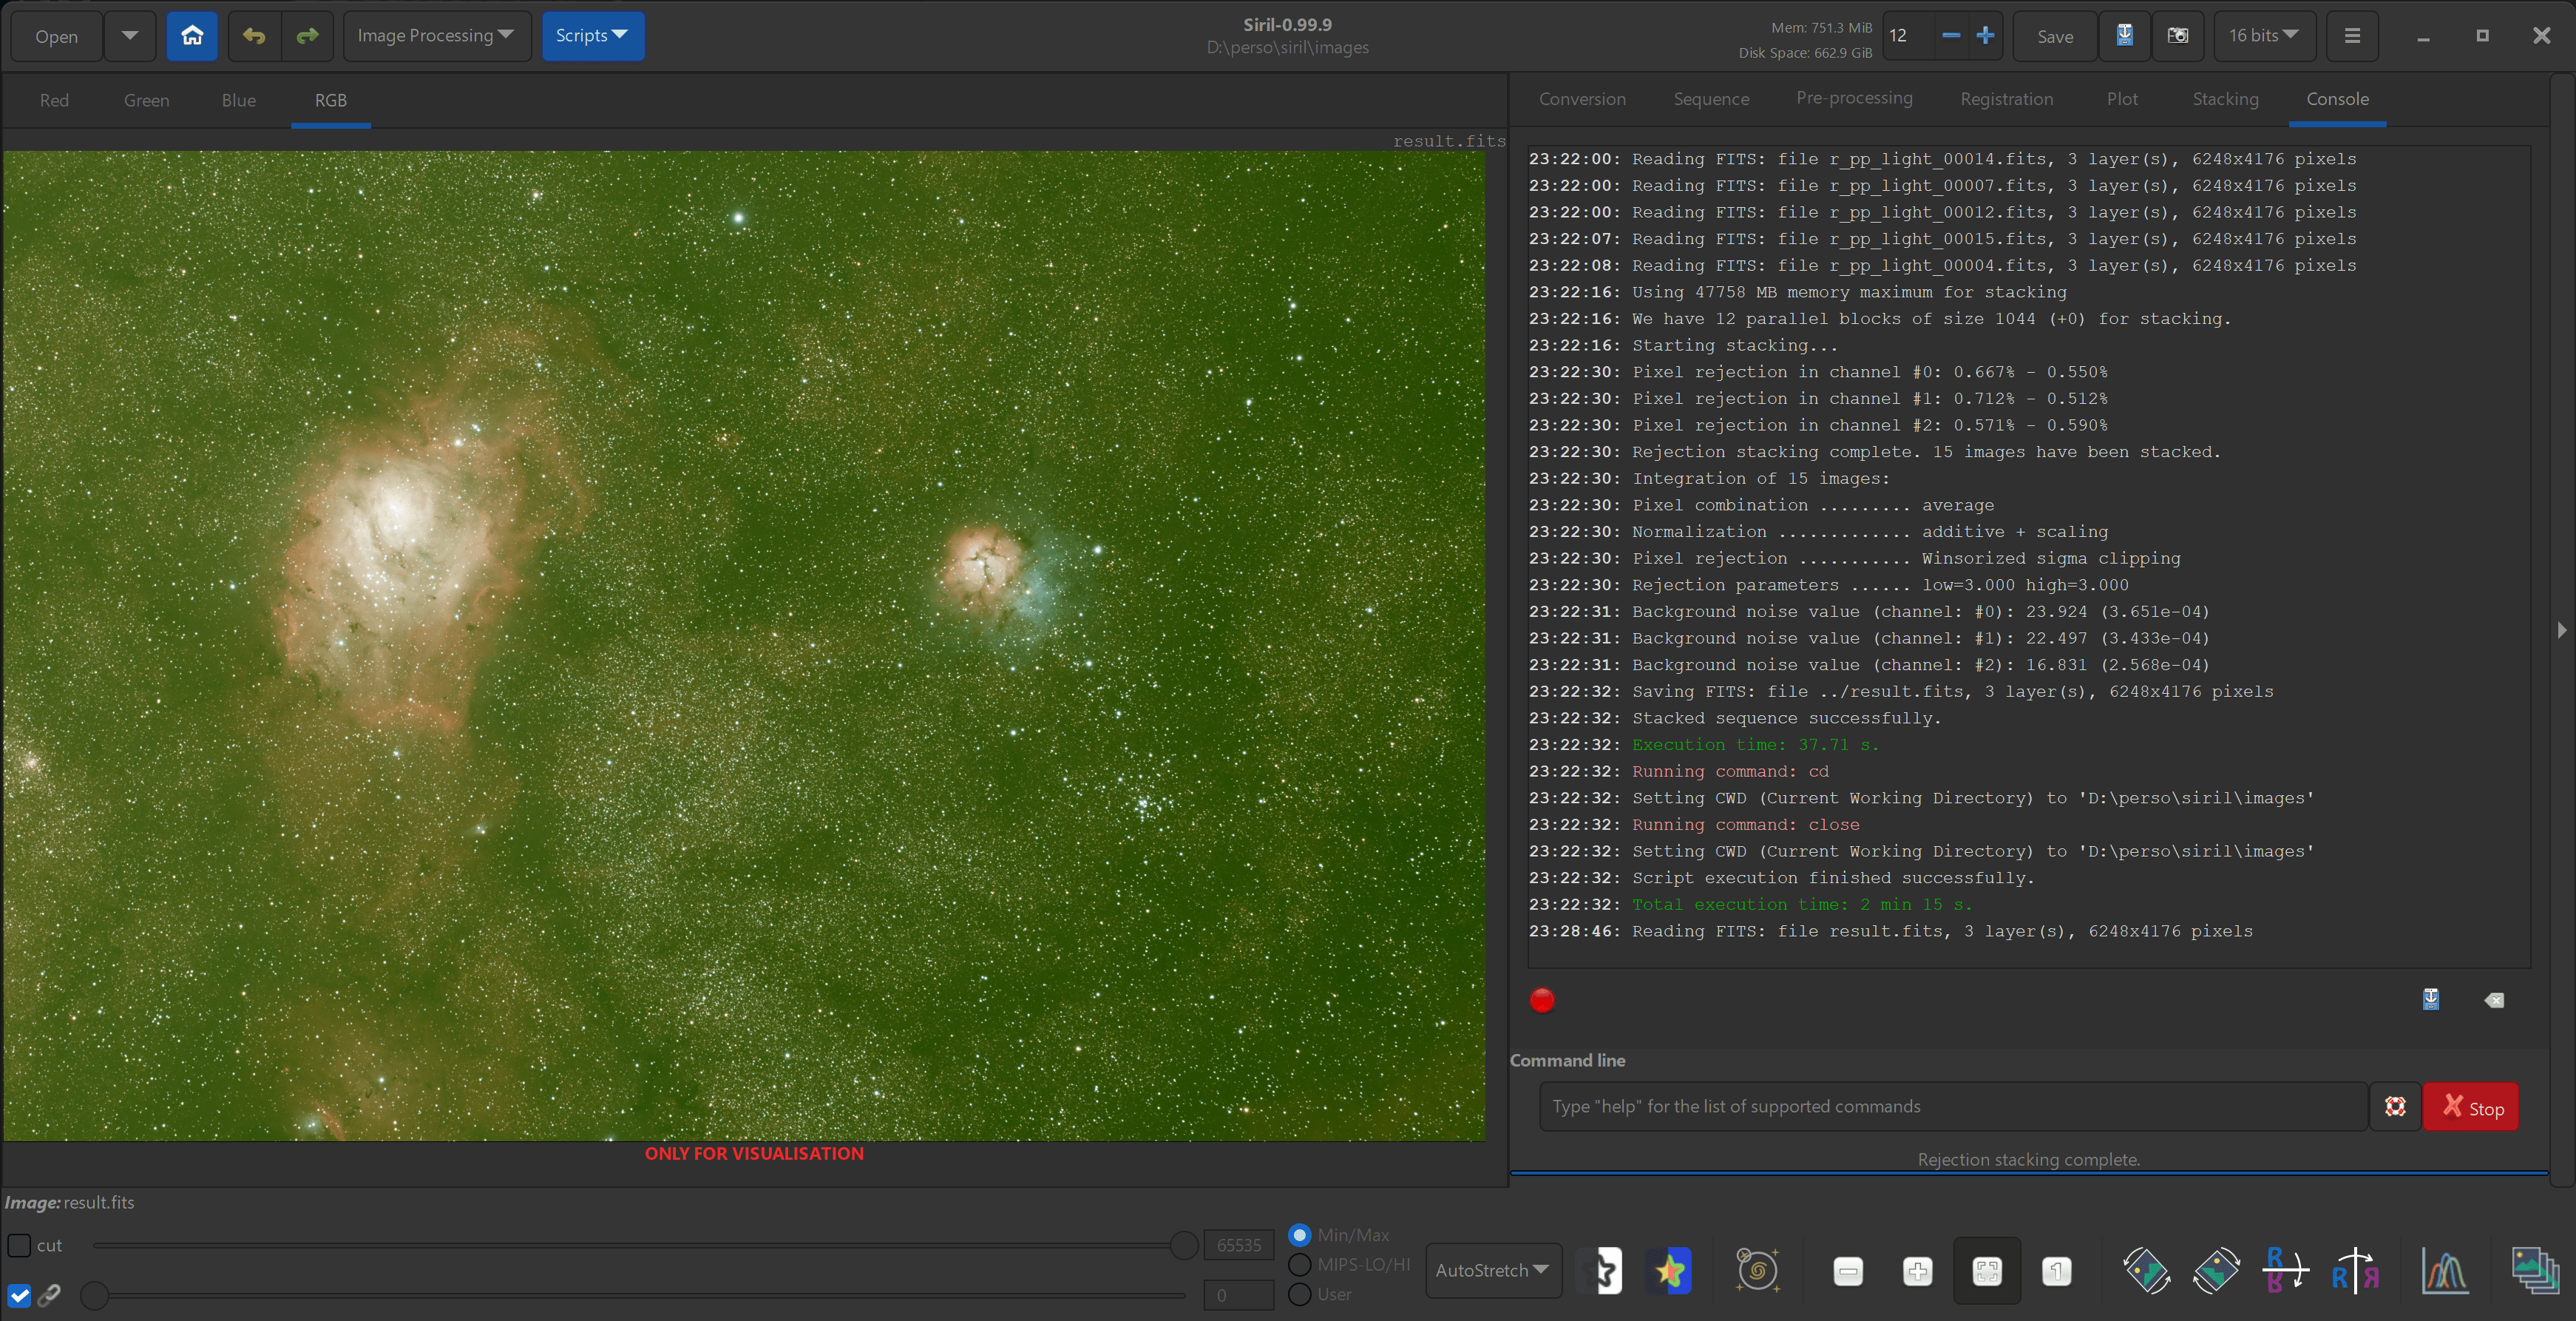
- If the image is mostly green as we see it here, don’t worry, it is normal at this step!
Let’s start processing the result #
A few notes before continuing: all image processing tools modify the current image. It may be wise to save the image at each step if you are sure of the result you got. You can also go back to the previous version if you don’t like what you have done with a tool, using the undo icon on the top-left of the window. Also, not all steps are mandatory, it depends on your images.
First operation: cropping the image #
- This is very important for the rest of the processing, because the dark bands on the sides will skew image statistics used by other processing tools. However, since version 0.99.10, stacked image should not have dark borders.
- Trace an area in one of the
Red,GreenorBluechannel tabs with a click and drag mouse gesture - Alternatively, right click in the image, click on
Select alland resize the selection to exclude the bands on the side. Use control-click and drag to move the image around, control-wheel to zoom in or out. - Once the area is properly set, right click in the image, and on
Crop: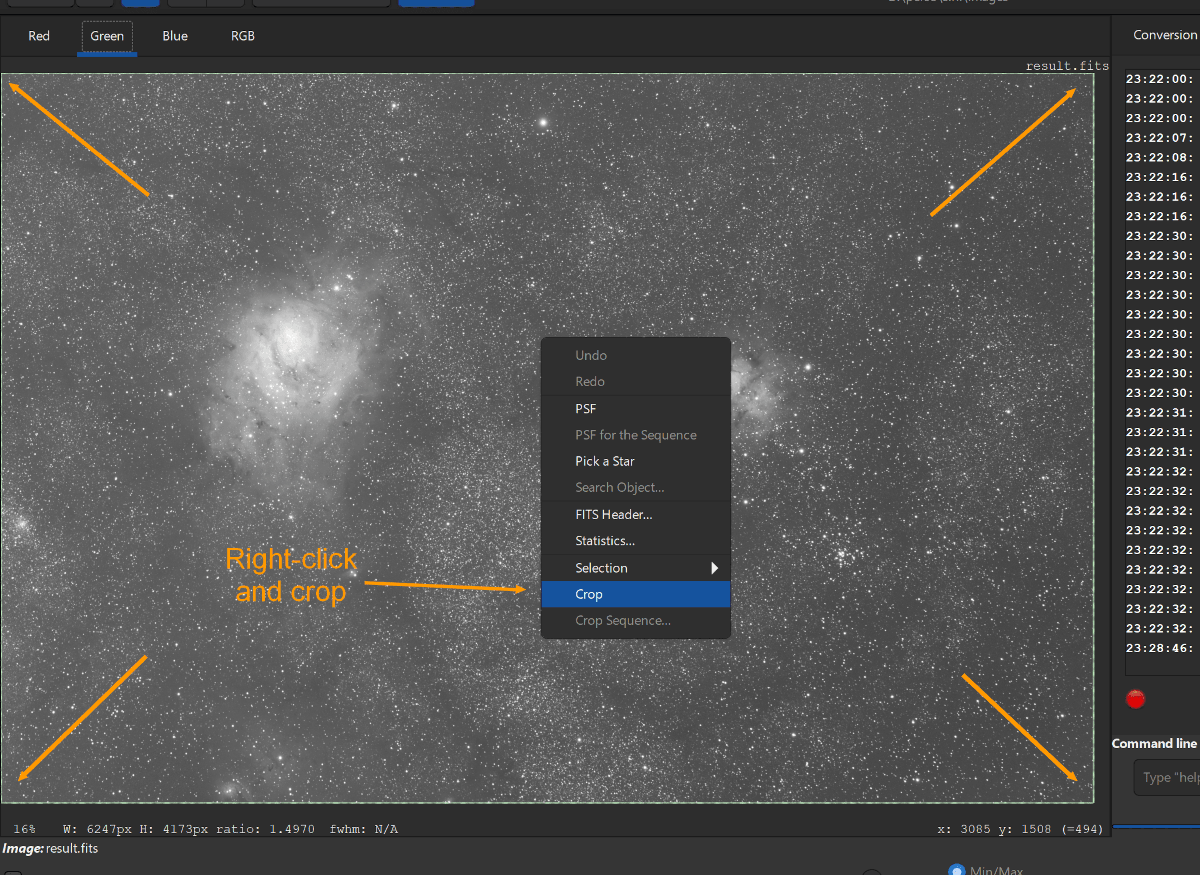
Removing background gradient #
Siril 1.1.0 introduced a new and much more powerfull tool to remove efficiently the gradient of an image or a sequence.
Additionnal details and use cases can be found in the following gradient tutorial .
- Still from one of the channel tabs, click on the
Image processingmenu, then onBackground extraction...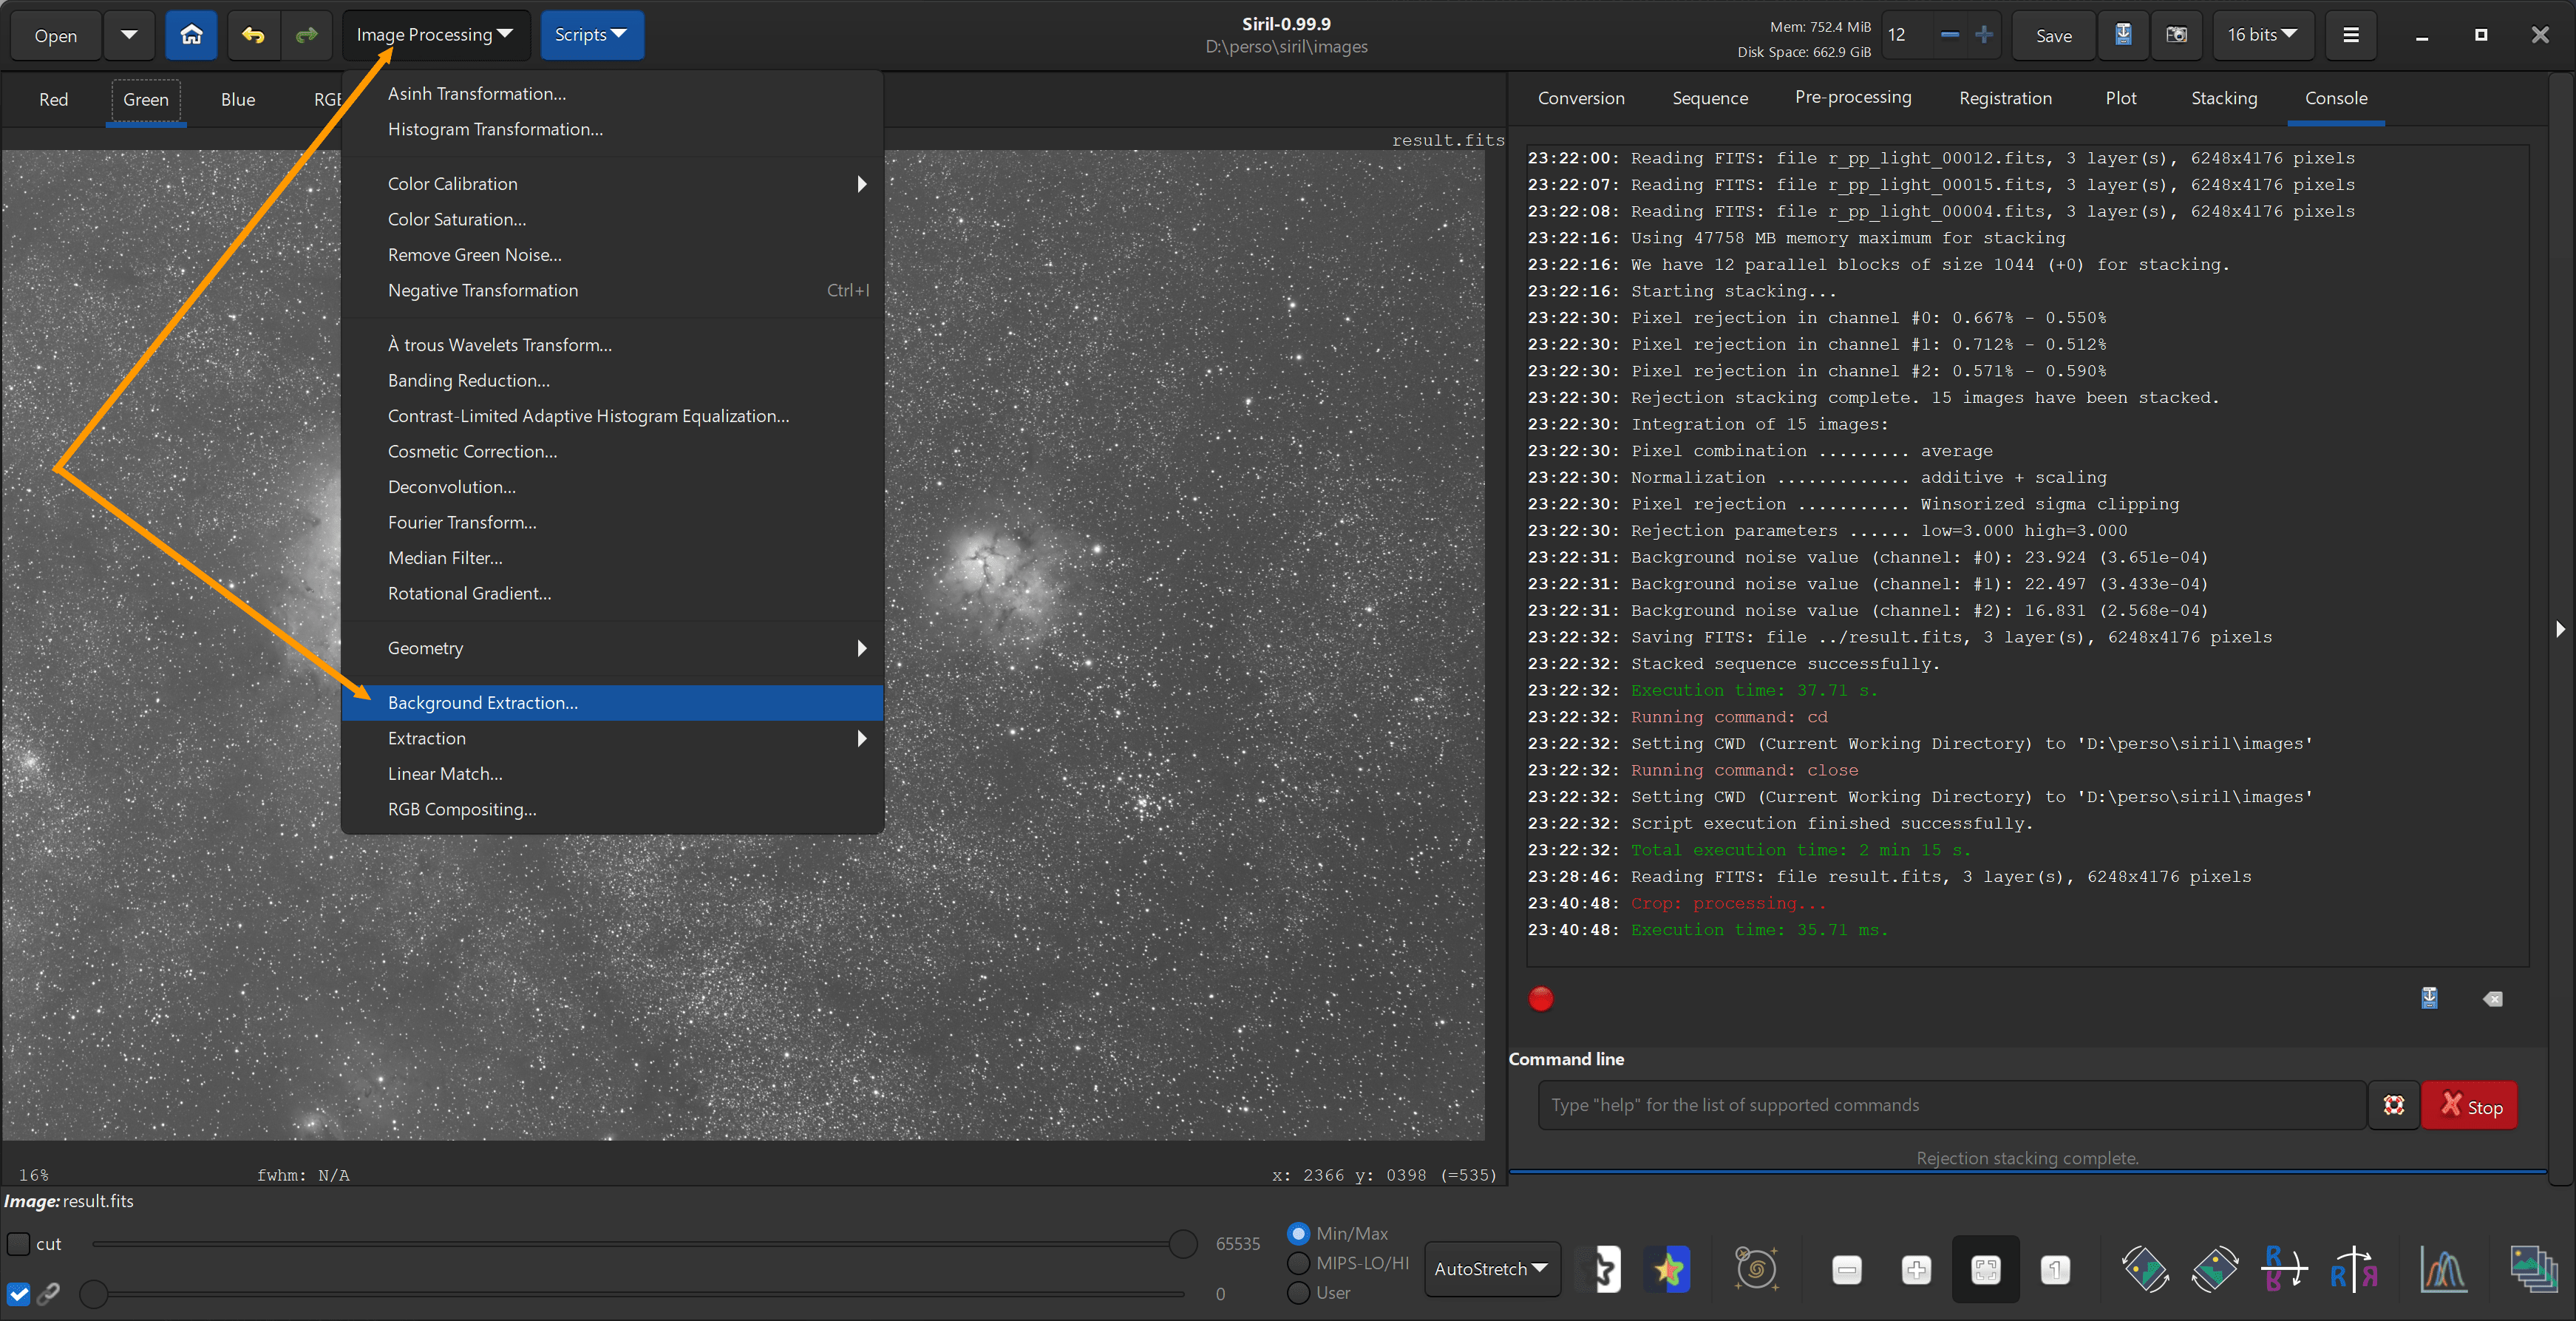
- Click on
Generate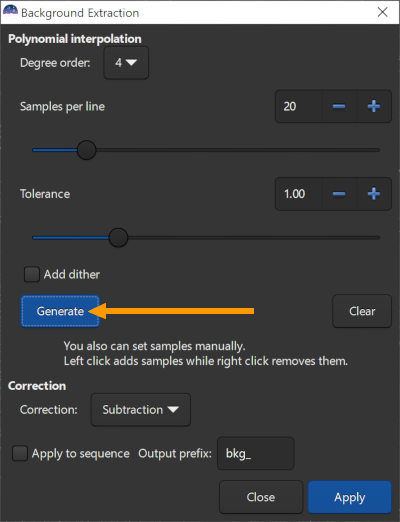
- Siril will place small green squares regularly spaced in the image, these will be the samples to compute a gradient
- If too many squares seem to be placed on nebulae or galaxies, you can either remove some of them manually by right-clicking on them, or lower the threshold value in the dialog and click again on
Generate.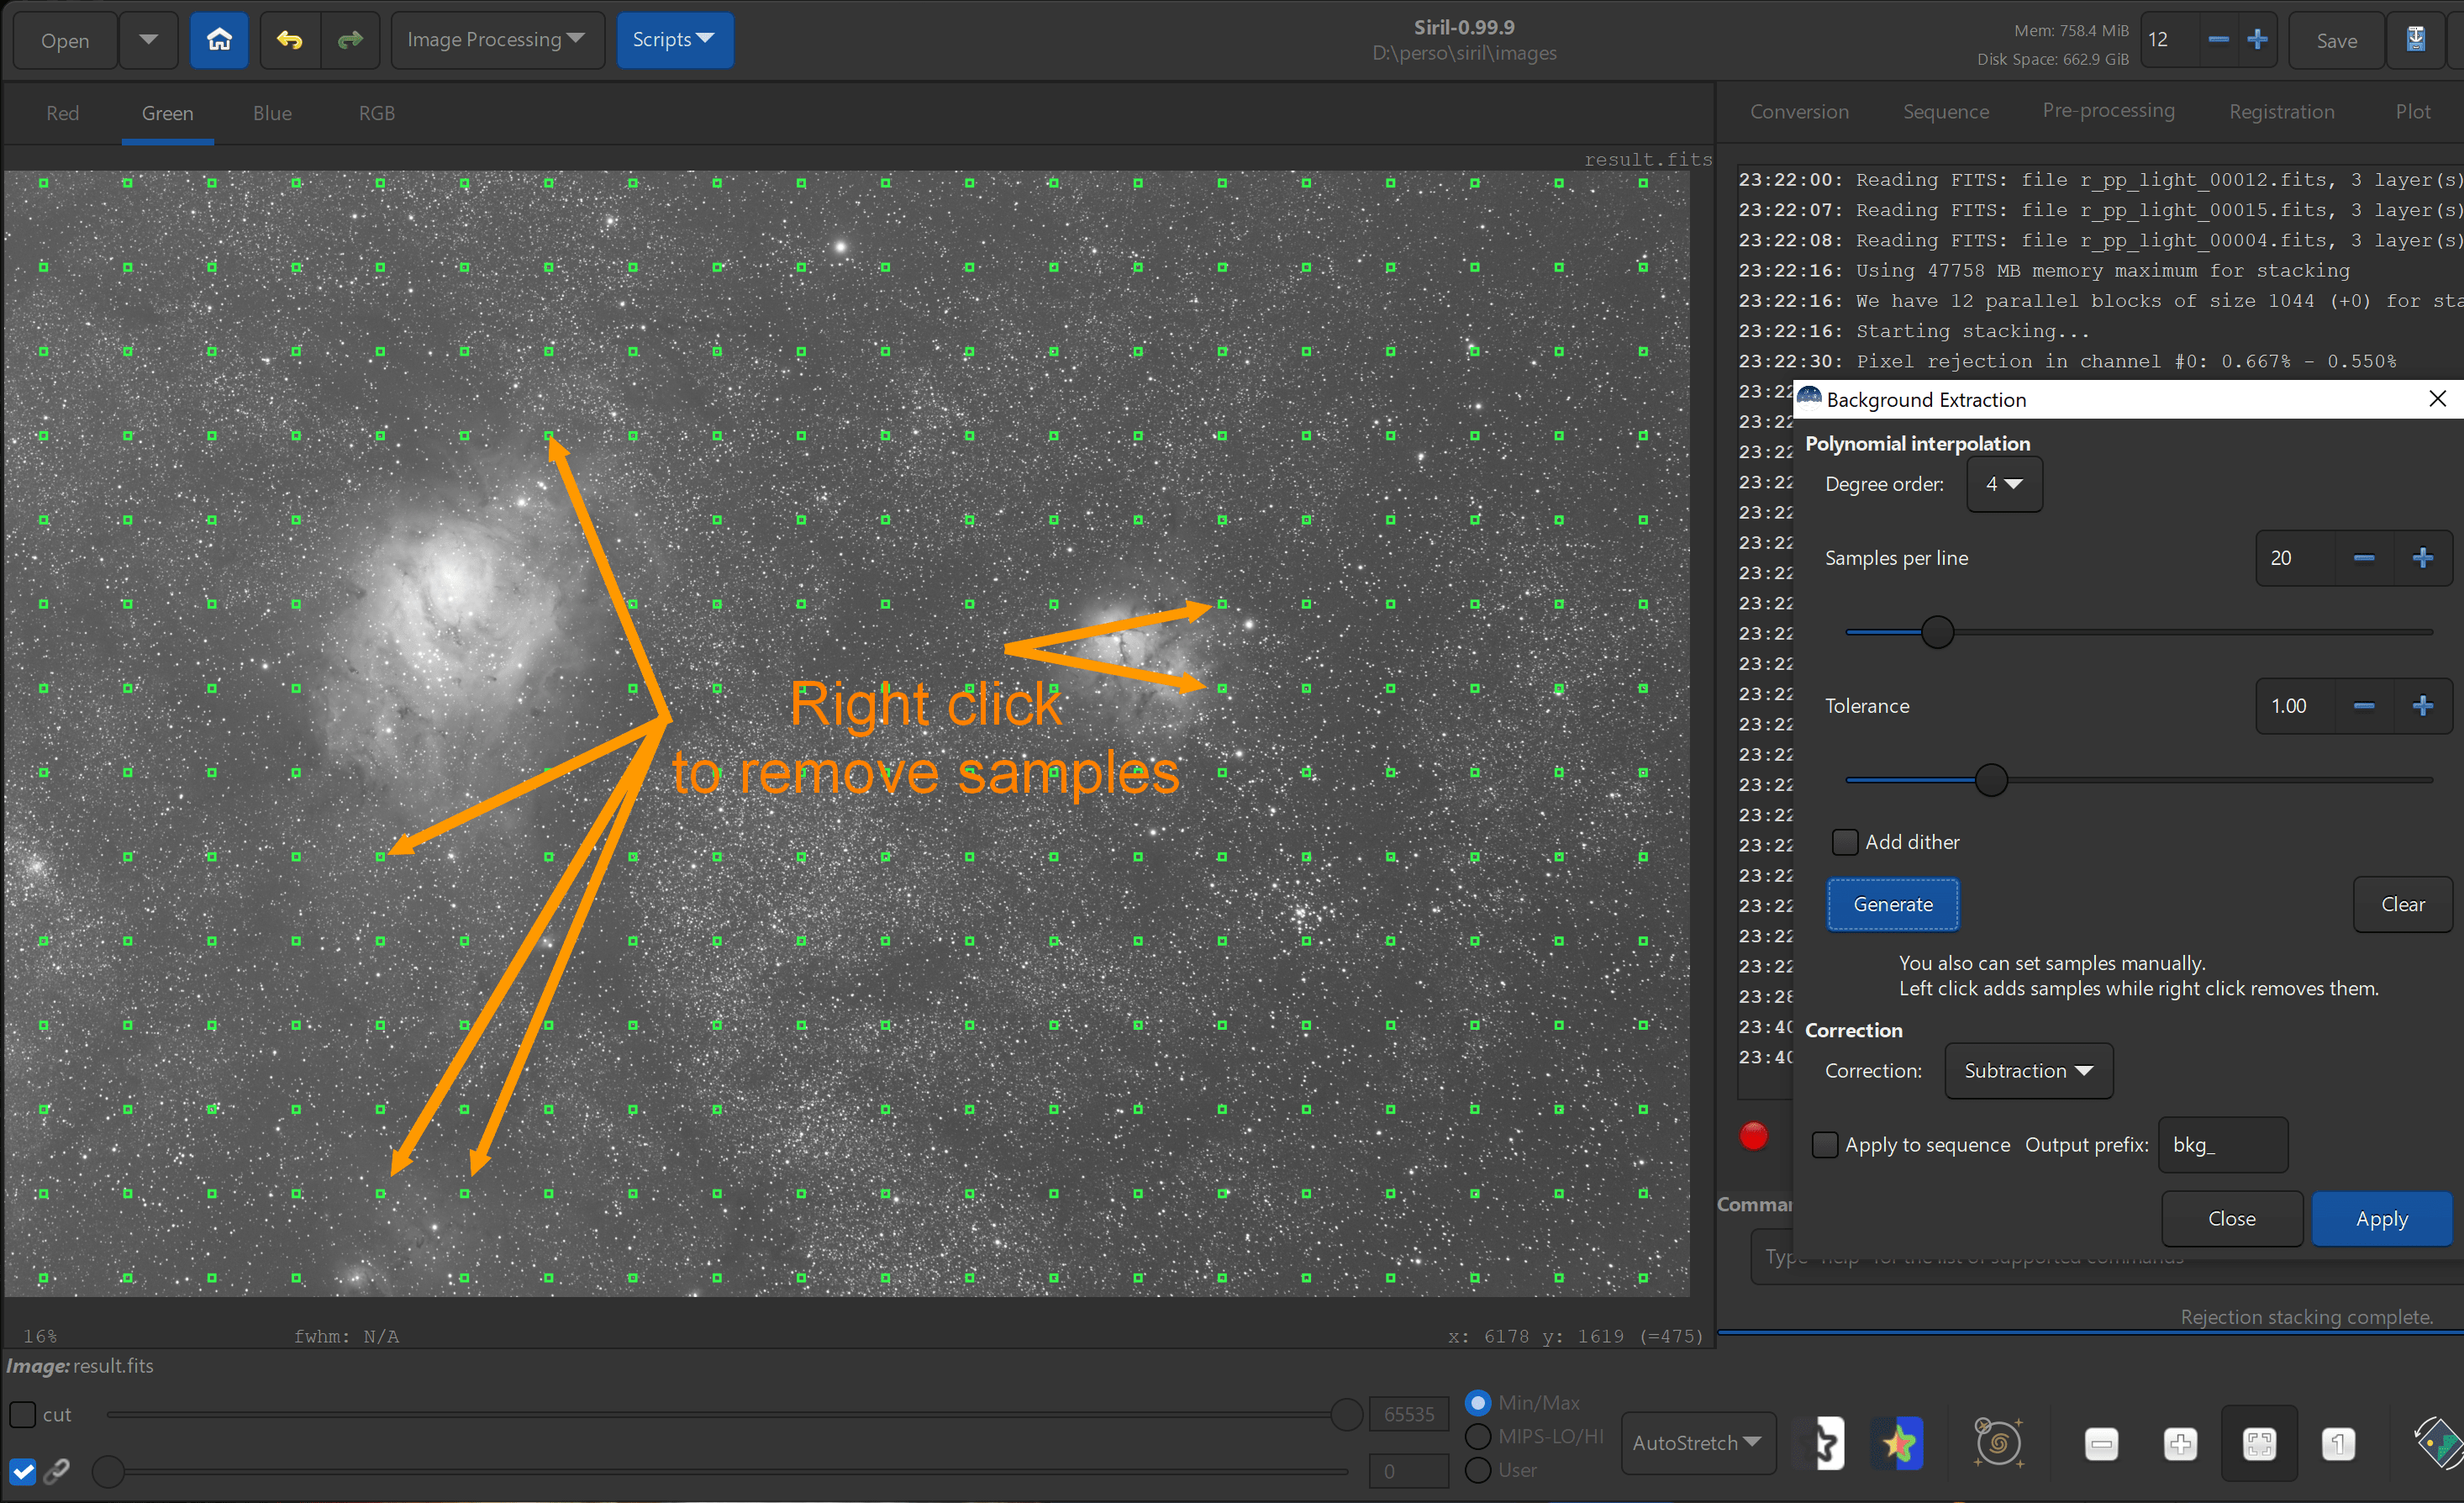
- If too many squares seem to be placed on nebulae or galaxies, you can either remove some of them manually by right-clicking on them, or lower the threshold value in the dialog and click again on
- Once you are satisfied with the positioning of the squares, click on
Apply: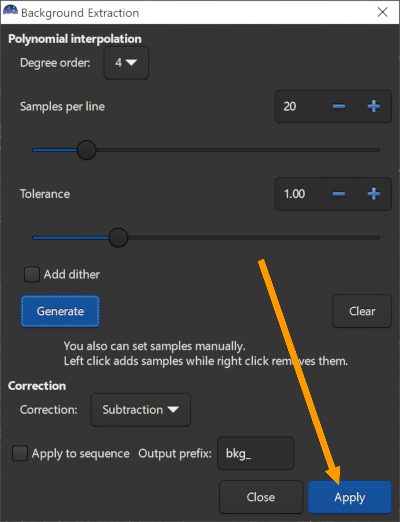
- Which after gradient extraction, gives us the following image:
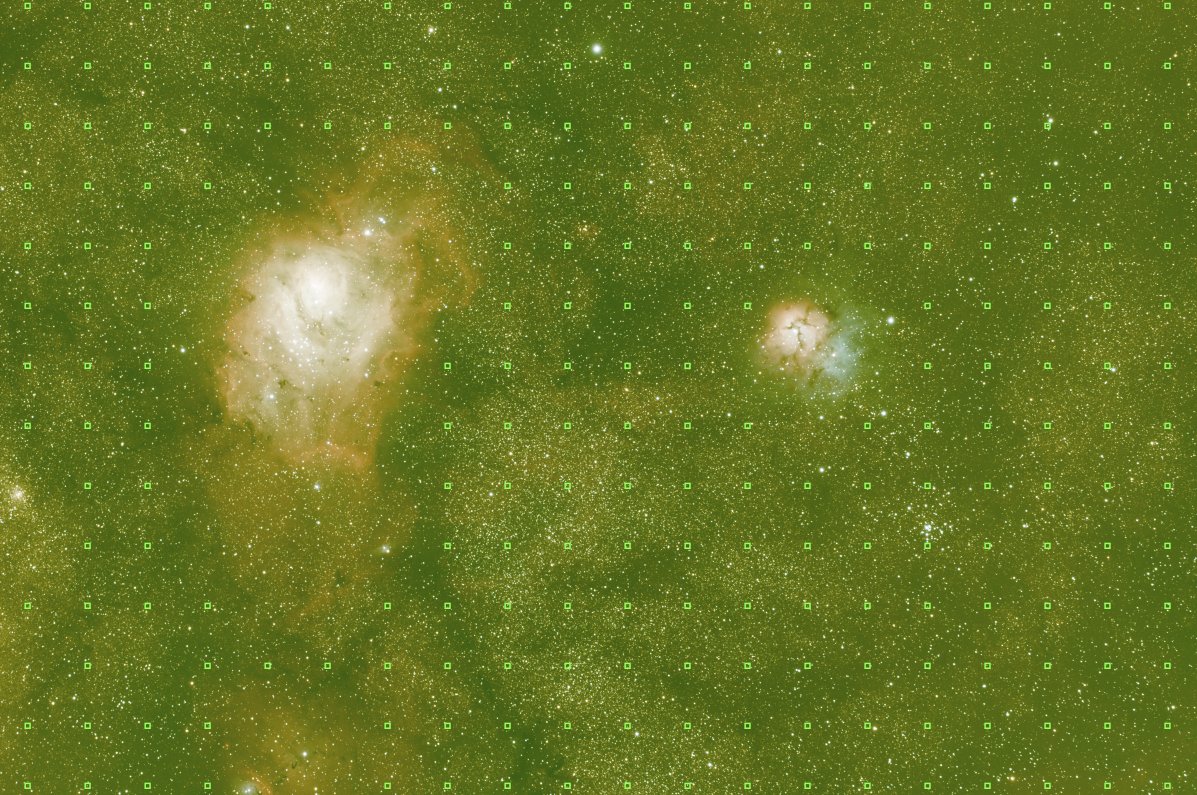
- In the case of these images, the wide field is located on an area with a lot of nebulosity and with the L-Pro filter, the background may be hardly seen by the software, so this step may be skipped.
Colour calibration using photometry #
There are two ways to calibrate colours with siril, one that does black and white balance between channels from user inputs, and the new way since Siril 0.9.11, using photometry of stars identified in the image after plate-solving, which does the same automatically. We will use the latter now:
- Click on
Image processingthenColor calibrationthenPhotometric color calibration...: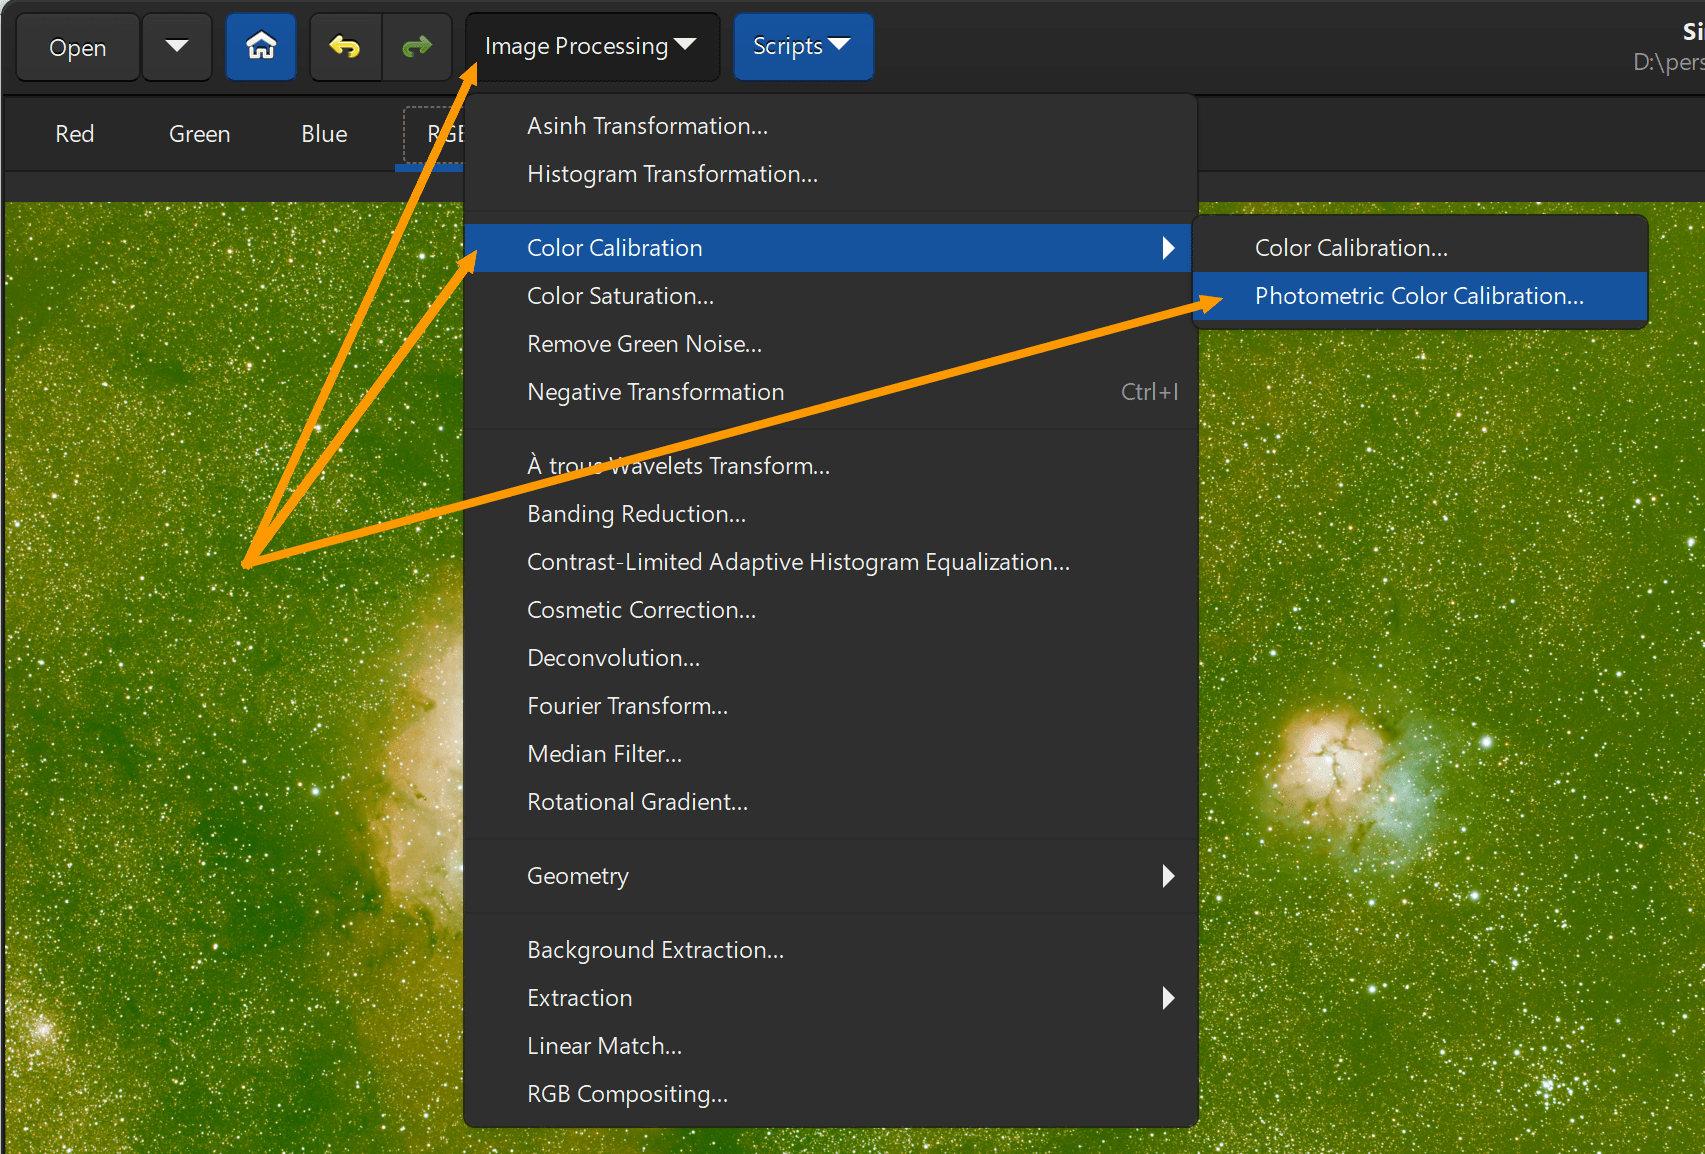
- In the search area at the top of the window, enter the name of an object that appears in the image, here
M8, then click onSearch:- Warning: you must be connected to the Internet to use this feature
- Siril will make some requests to astronomical databases and display results matching the input:
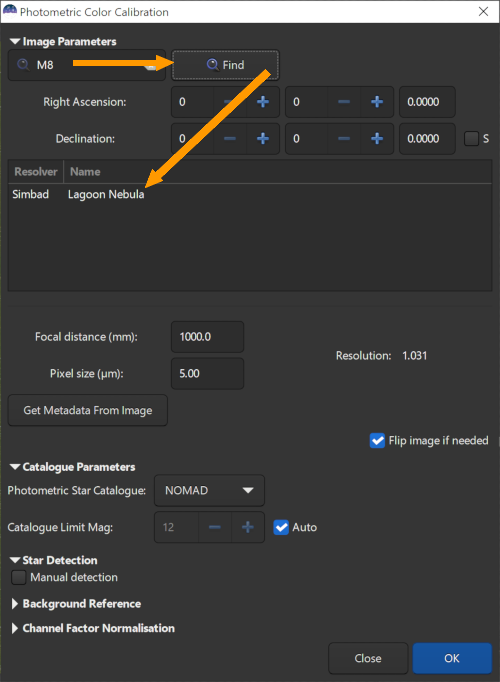
- Click on the found object in the
Simbad(orVizier) database, hereLagoon Nebula. - You can click on
Obtain metadata from the imageto get the focal length and pixel size from the image if they are available: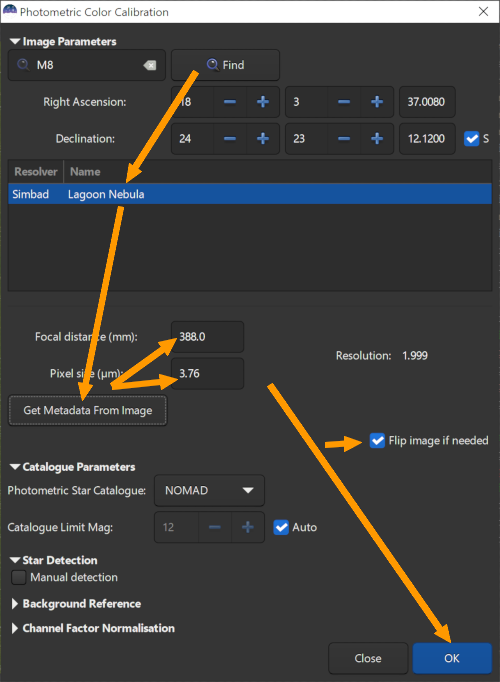
- If the metadata are not available, you will have to enter them manually
- Please note, for versions lower than 0.99.10, we recommend doubling the focal length for images stacked with Drizzle. This is no longer true because the size of the pixels has been adapted. However, sometimes it is difficult to do astrometric resolution on a stacked image with Drizzle. In this case, a new option has been added from version 0.99.10: “Downsample image”. Click on it without changing any other values, the astrometry should be successful and faster. Checking this option does not modifiy the image, only a copy which is passed to the plate-solving algorithm.
- The pixel size can be found here for DSLR or on the manufacturer’s Web site for astronomy cameras
- Since Siril 1.2.0, even if your image has already been plate solved, you can force Siril to compute once again the WCS parameters:

- Notice that the
Flip image if necessaryis checked. With this enabled, Siril will detect if the image is flipped from the plate-solving and flip it back automatically if it is the case. - Click on
OKat last - Siril will plate-solve the image (this can take a few minutes), identify some stars in the image and get their colour profile, then adjust the image’s relation between colour channels to make a new white and black balance.
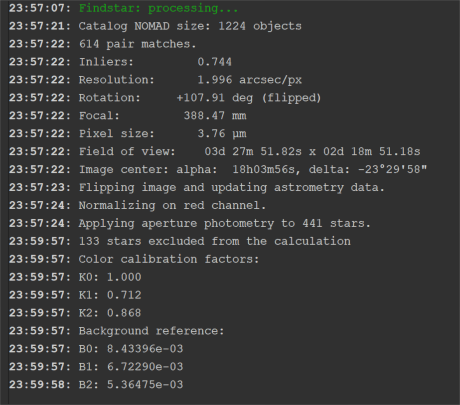
- If plate-solving did not succeed, try to change the focal length.
- If after a few tries with various focal lengths it still fails, try to search another object visible in the image, maybe a star, close to the centre.
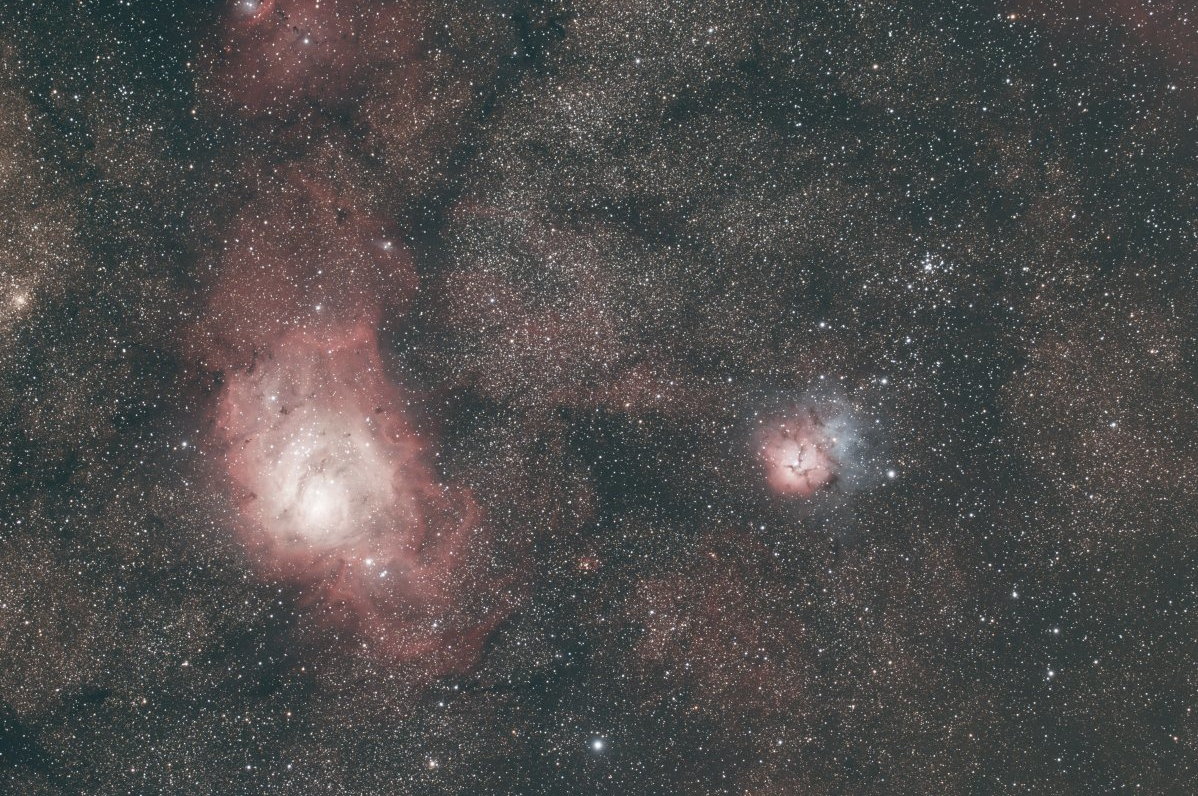
- This give us this colour image after photometric colour calibration:
A little deconvolution to continue #
Deconvolution will improve the shape of stars, the overall sharpness of the image and bring out more details in nebulosities. Although some prefer to use this tool after histrogram stretching, it is better to do it at this stage to avoid increasing noise too much.
- Click on the
Image processingmenu, thenDeconvolution...: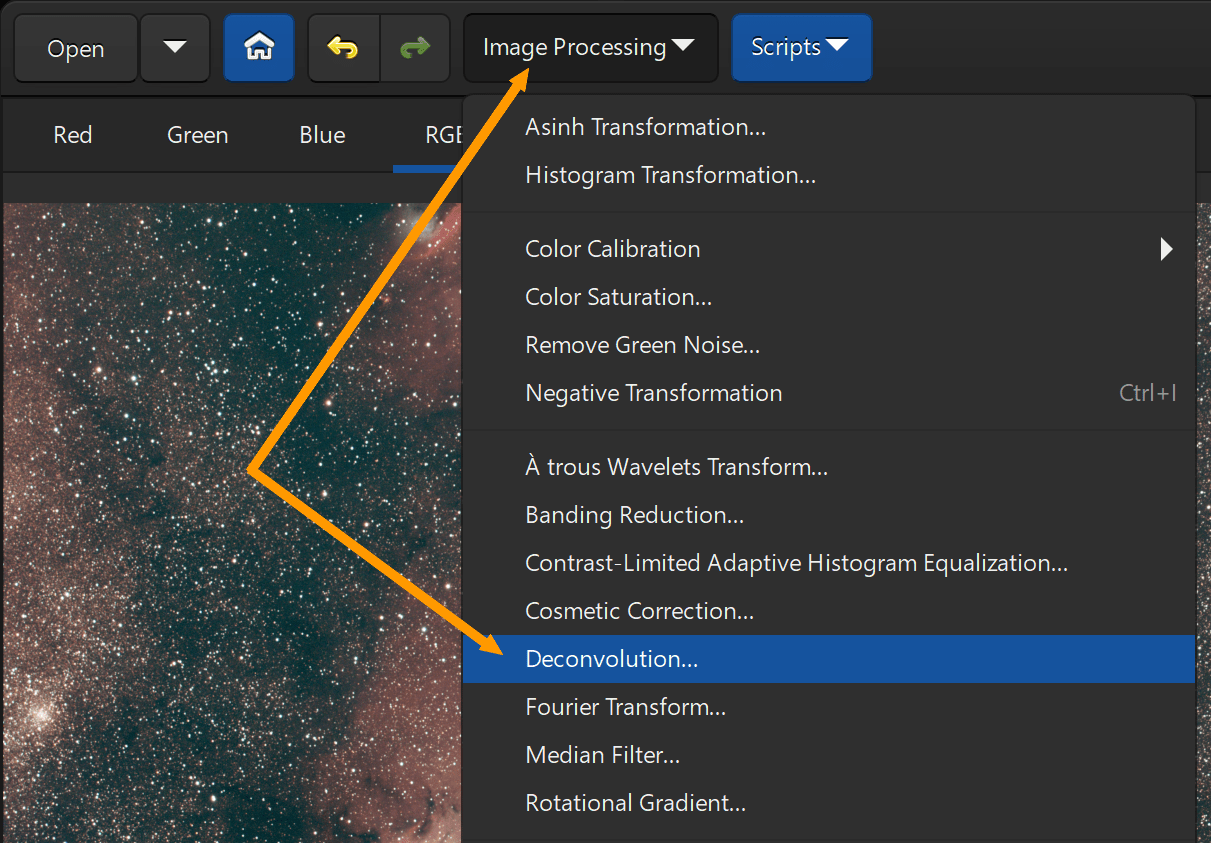
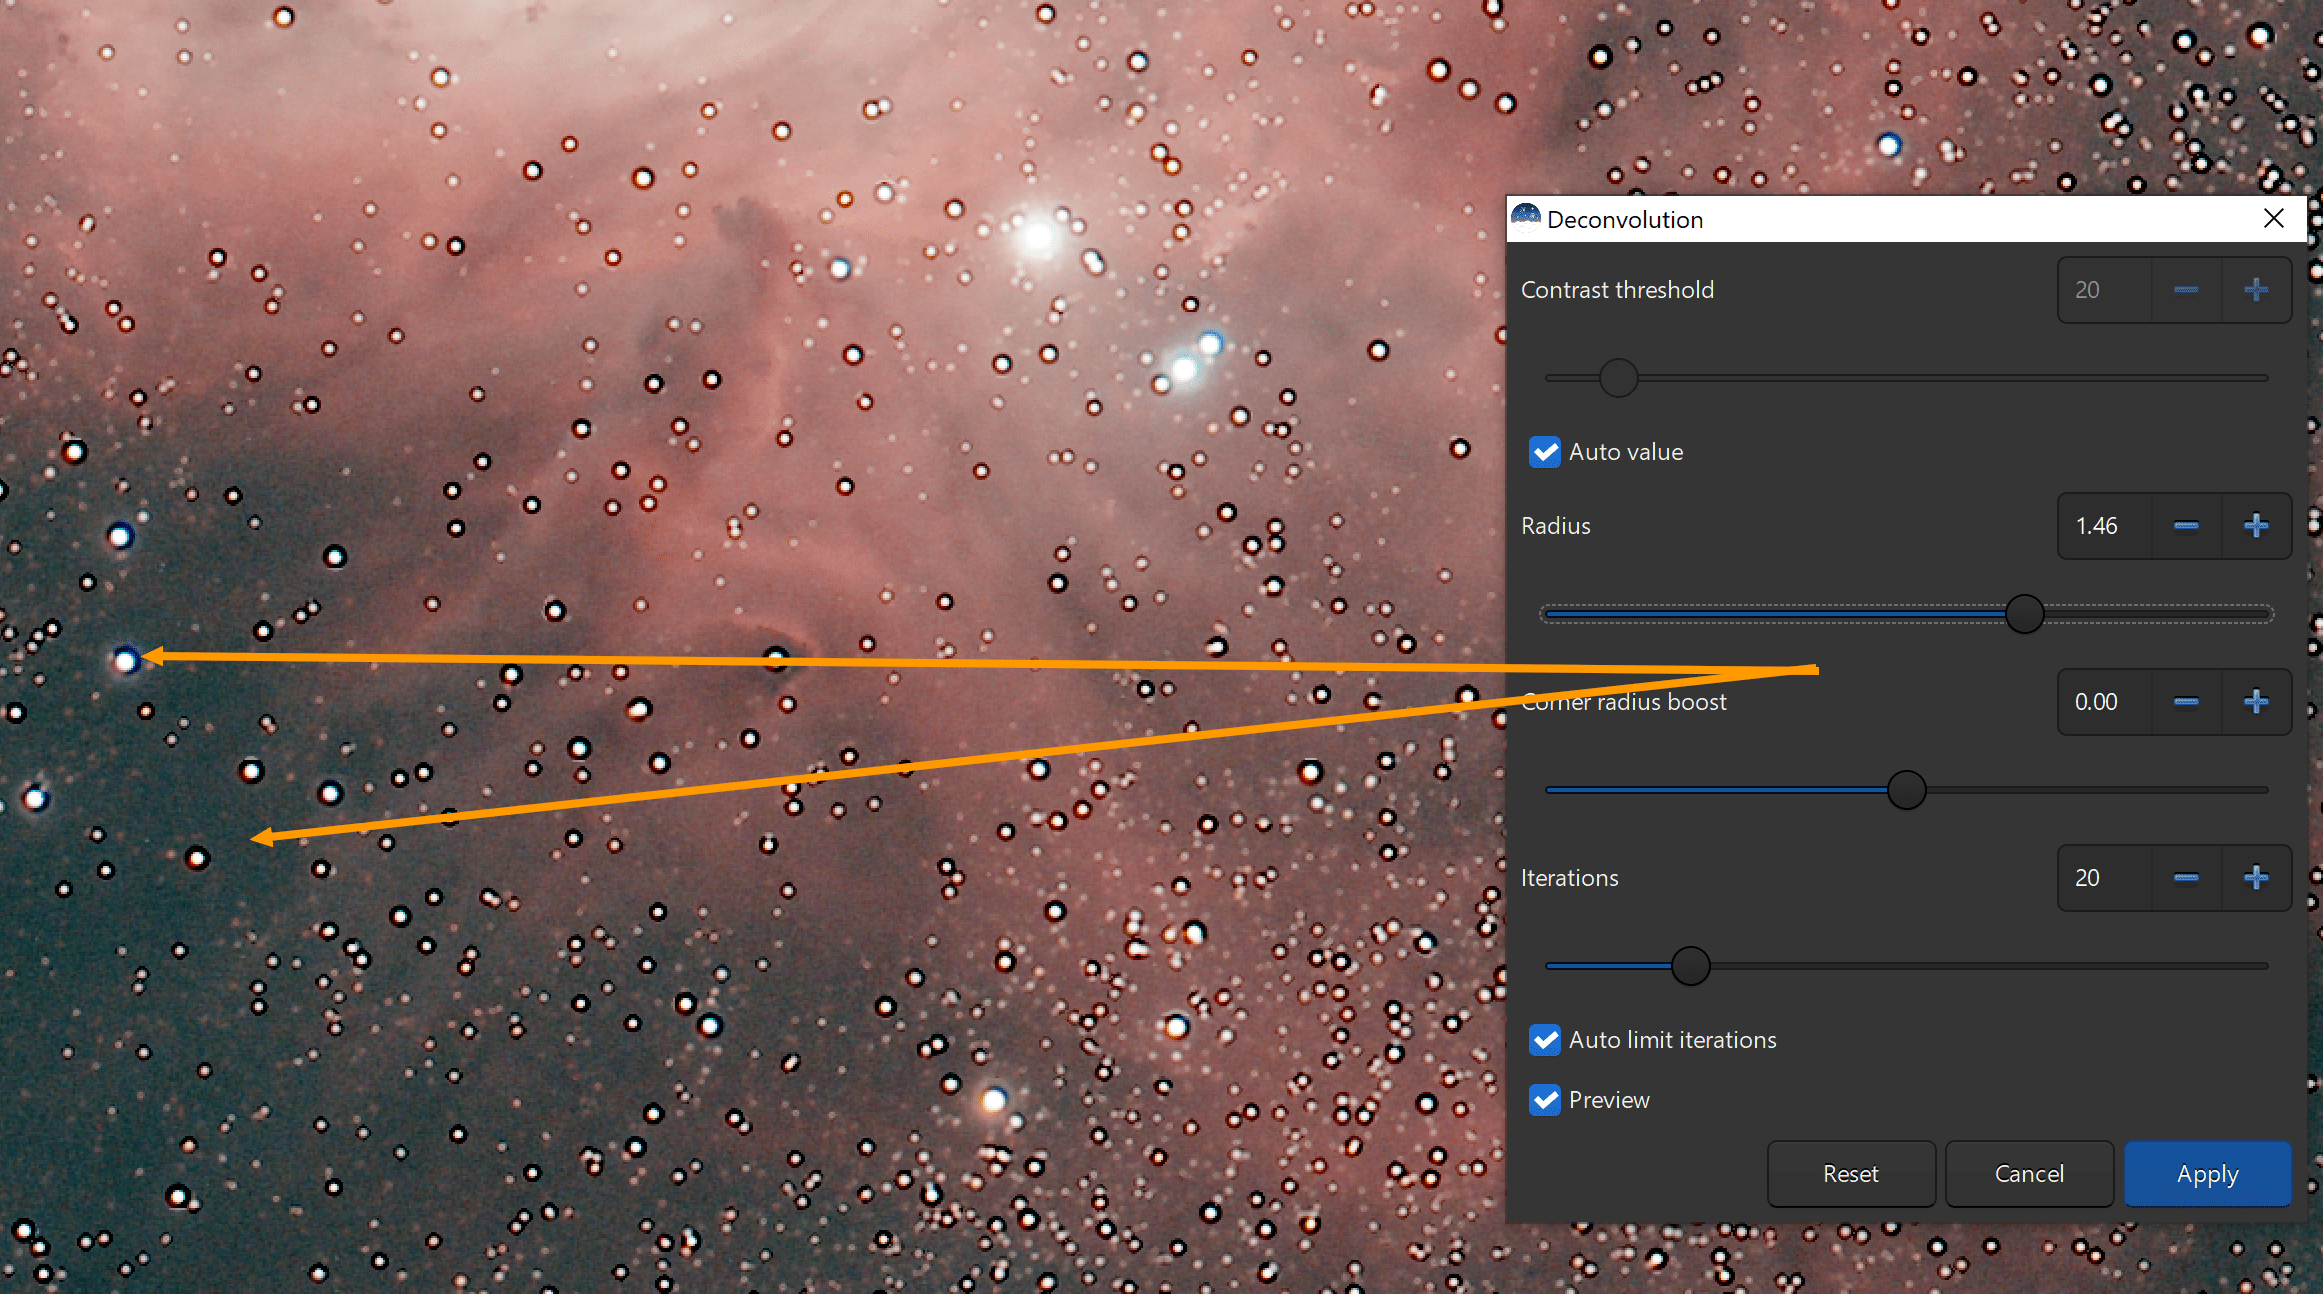
- In the deconvolution window, set the radius and booster while looking carefully at the image at a 100% zoom (control-wheel, or click the
1button in the toolbar):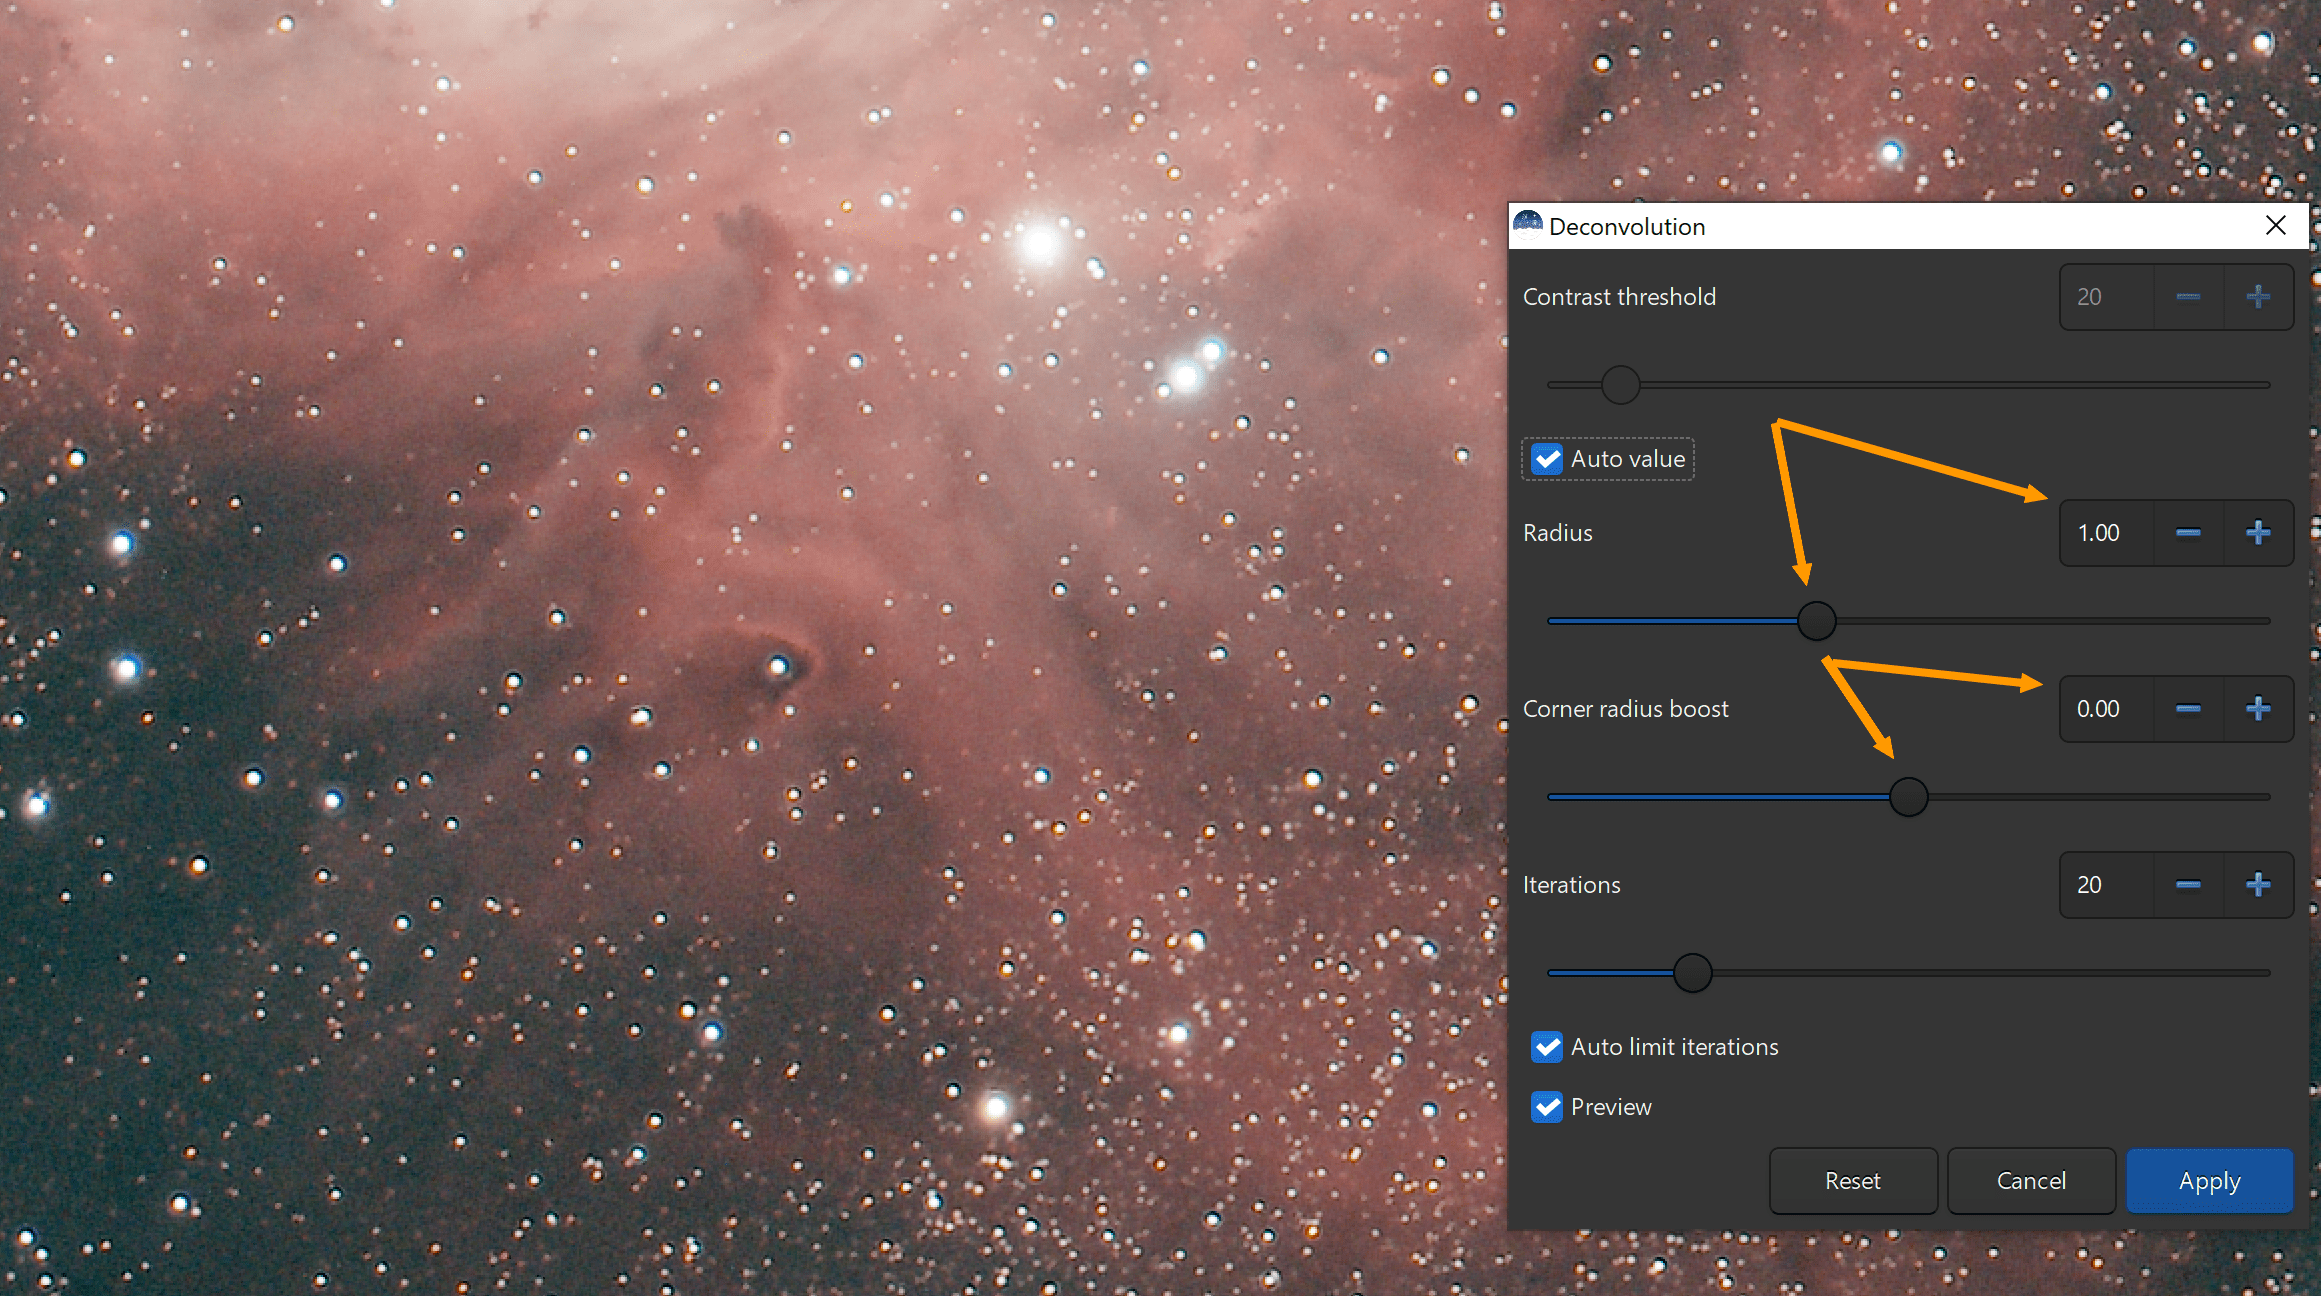
- Be careful not to overdo it becase it easily brings artefacts and noise like that:
- Click on
Applyto finalize the operation once the way stars and the image in general look suits you.
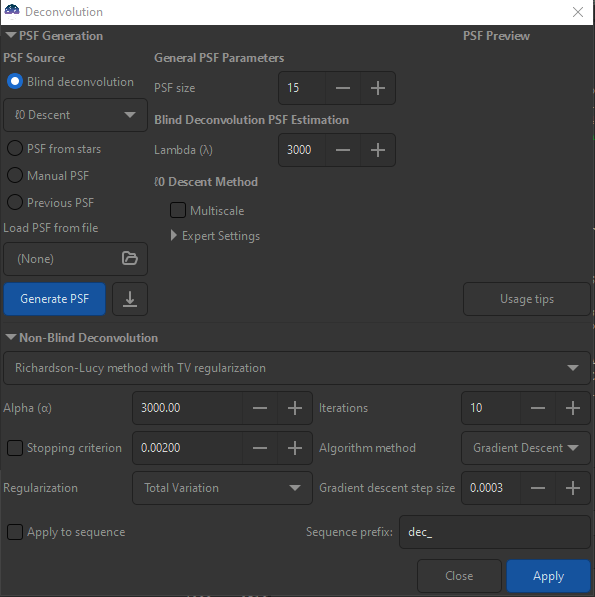
The deconvolution tool described above can be replaced by the new one introduced in Siril 1.2.0.
Starting to stretch the histogram with the asinh function #
Even if the asinh tool is still present in the menu as described here, it can be superseeded by the Generalised Histogram Transform (GHT) wich is much more powerfull.
There are several ways to stretch the histogram in Siril and as we will see, we can use them in successively. We will start with the asinh (named from the inverse hyperbolic sine function), which preserves colours a bit better than the regular histogram tool and avoids burning the bright areas of nebulae or galactic nuclei.
Stretching the histogram is about changing the pixel values of the image to make it look as bright as you like. At the beginning, we changed the rendering mode to Autostretch. This did not change the pixel values, just the way the image is displayed. Here we want to do a similar effect, but on actual image data, otherwise saving the image will result in a very dark image.
- Change the rendering mode to
Linearand set the upper cut-off cursor to the highest value (65535), to see the image as it really is: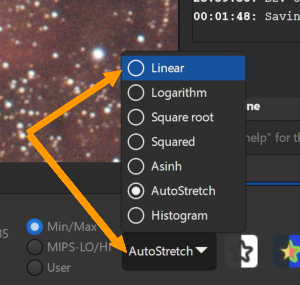
- Click on the
Image processingmenu, thenAsinh transformation...
- Adjust the stretching factor and the black spot, looking at the image at the same time to make is come out of the darkness slowly and not get too bright at once
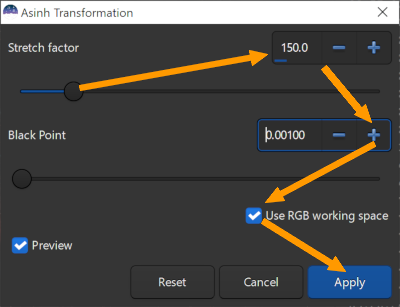
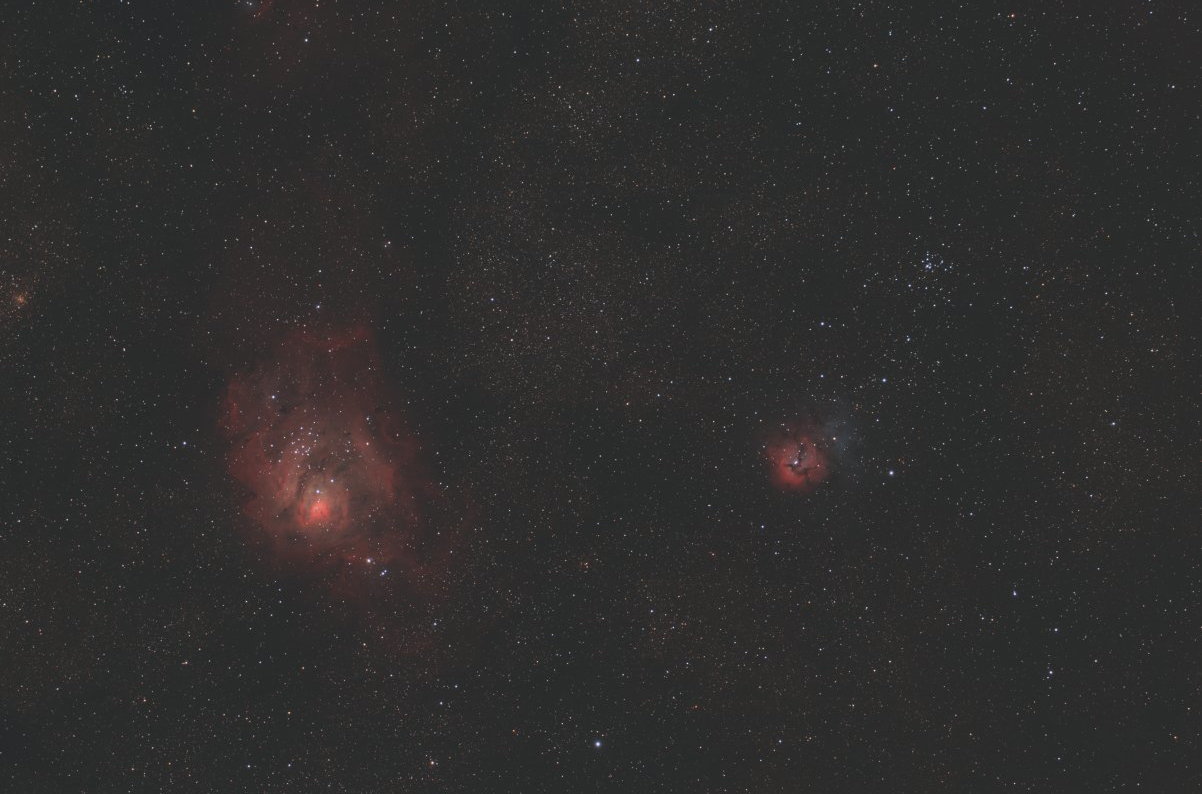
- With the above values, this gives us:
Completing histrogram stretch with the histogram tool #
Make sure you are still using the Linear rendering mode and that the high cut-off cursor is set to the maximum value (65535), like in the previous step, before continuing.
- Click on the
Histogramicon or theStretch histogramentry in theImage processingmenu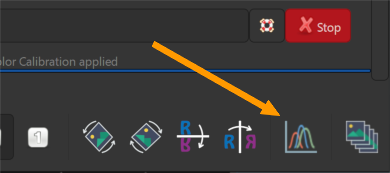
- In the histrogra window, click on the
+button to zoom in the graph and click on the toothed wheel to mimic the auto-stretch behaviour: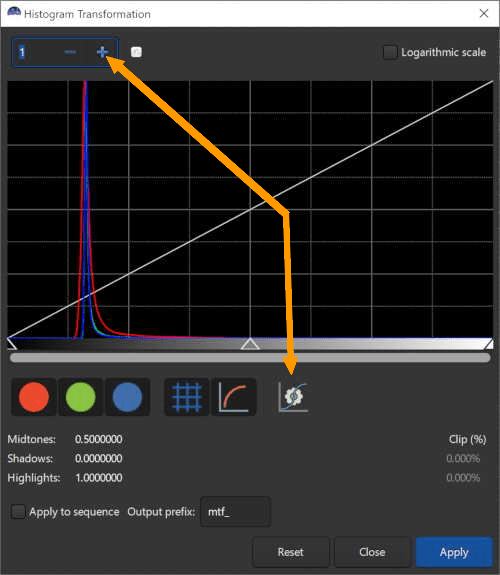
- Make sure that the loss value indicator does not display a value above 0.1% in the lower right, adjust the dark tones cursor until this becomes fine
- If the loss is much higher than 0.1%, make sure you have removed all black areas on the orders of the image during the first processing step
- Now you can adjust the middle tones cursor to improve image contrast
- The light tones cursor must always be at the maximum value, (at the extreme right of the graph)
- Click on
Applywhen you reached a result that pleases you, and close the window.
Removing the green noise #
This tool is equivalent to the HLVG filter found as a Photoshop plug-in. Normally, this step is not required when the photometric colour calibration is used.
- Click on the
Image processingmenu, thenGreen noise removal (SCNR)...: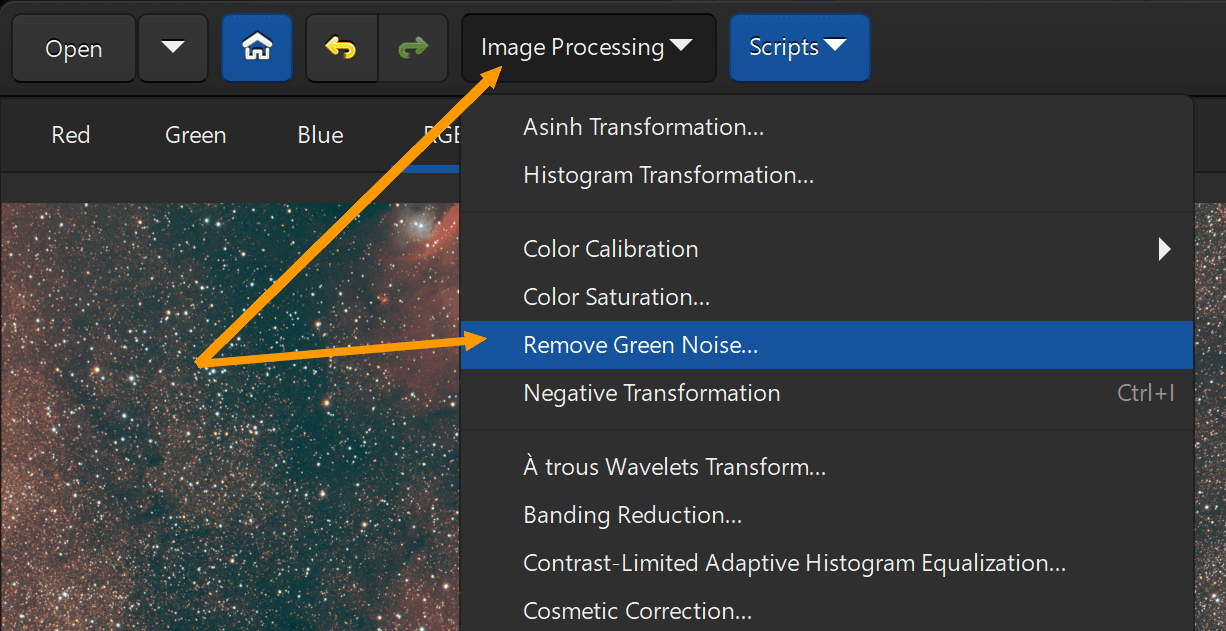
- The default values should be fine, click on
Apply: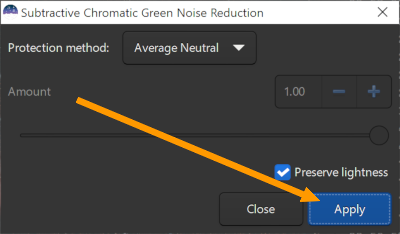
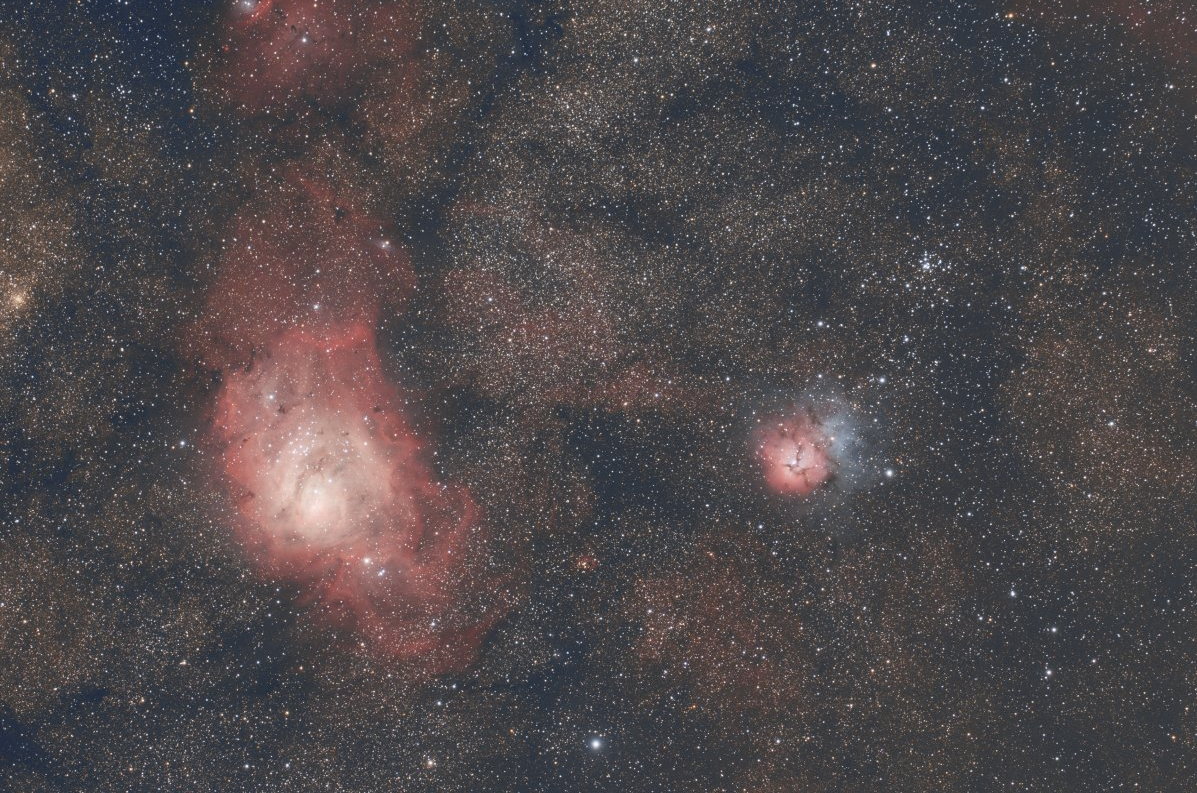
- Look at the result on your image:
- Close the window
Change colour saturation #
- Again in the
Image processingmenu, click onColor saturation...: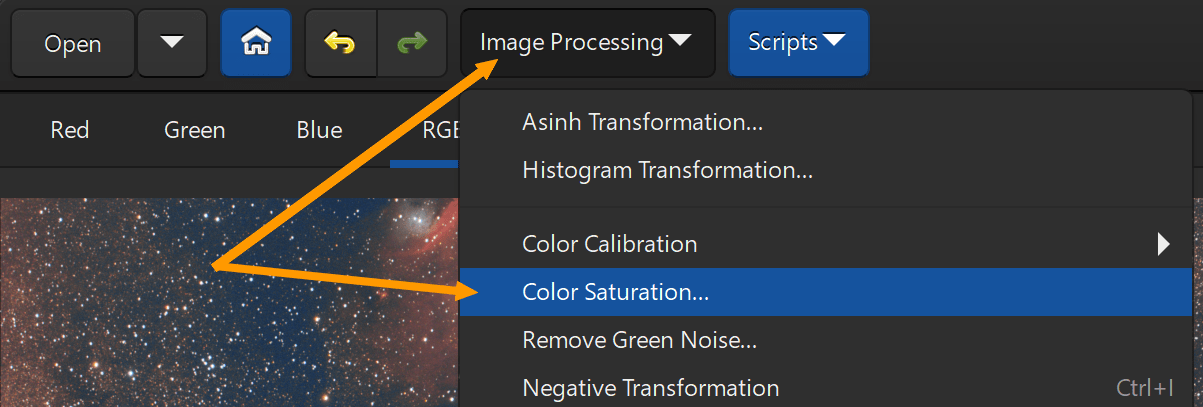
- A value above 0 will increase colour saturation, a value below will decrease it. In general, people want to increase it at this step, a value between 0.25 and 0.5 should be fine:
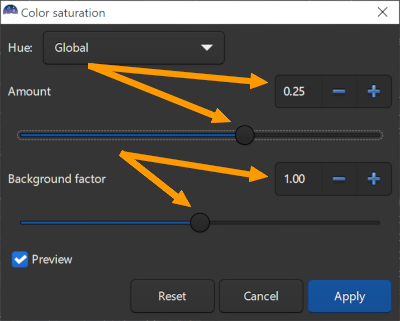
- The
background factorallows the sky background to be protected from colour saturation, which in general would mean colouring the noise. Increasing the value means that only bright enough pixels will have their colour saturation changed. - Look at the result on your image:

- Click on
Applywhen you are happy with the result and close the window.
And finally, save the image #
Choose the image file format depending on what you want to do with your image next:
- If you want to open it in another astronomy image processing software, or even in
GIMP, save it asFITS, - If you want to open it in Photoshop, save it as
TIFF, - If you want to publish it as is, for a library or the Web, save it as
JPEGorPNG.
There are two methods to save your image:
- First method, more simple but only possible for colour images:
- Right-click in the RGB image, and click on
Save RGB image as...: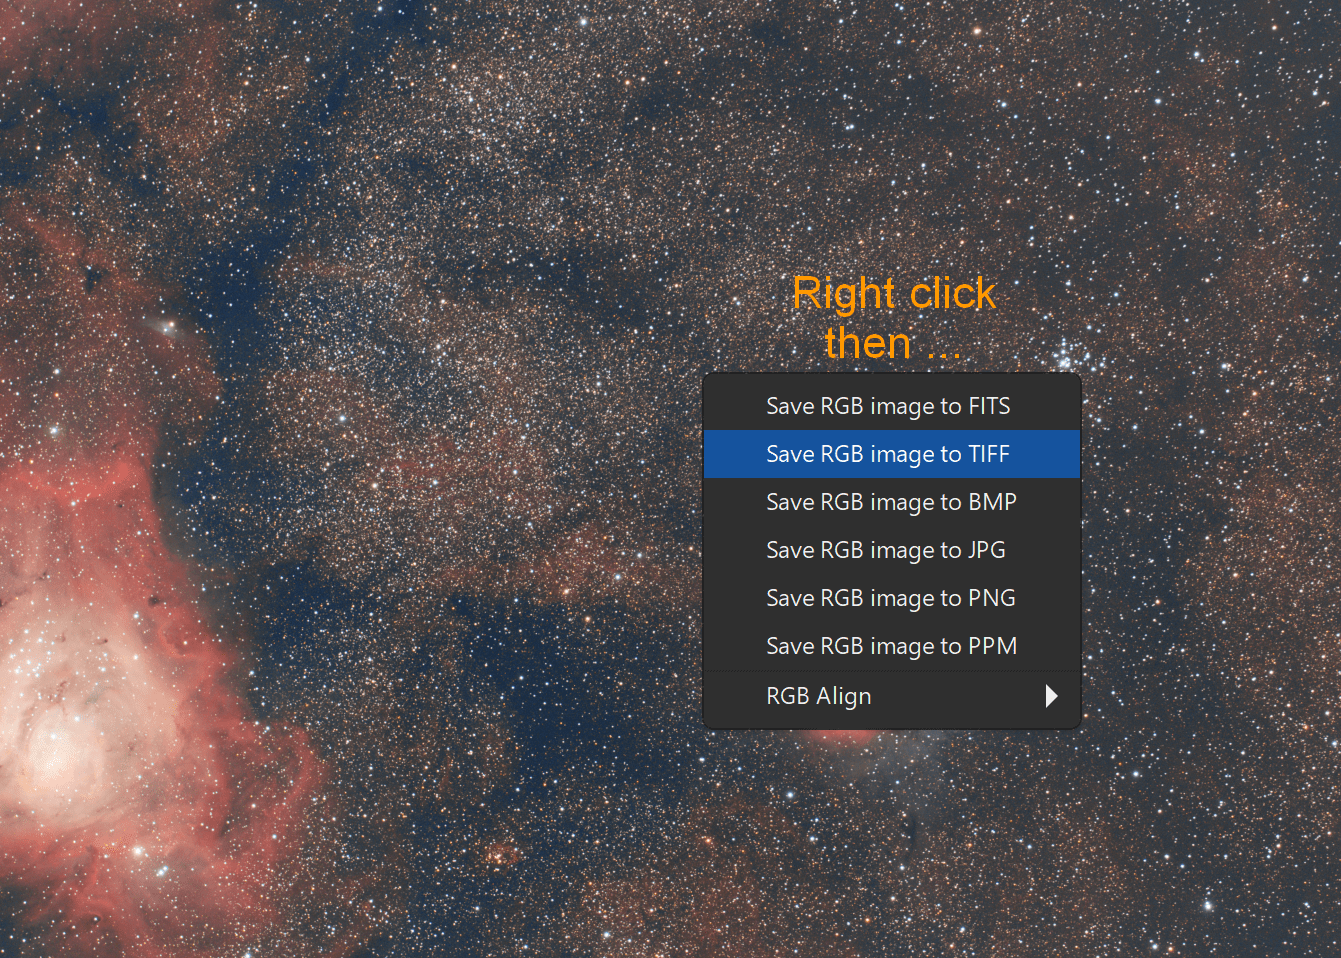
- In this tutorial we will consider the processing over and save the image as
JPEGto publish it below. - Give a name to the image, adjust the JPEG compression value and click on
Save: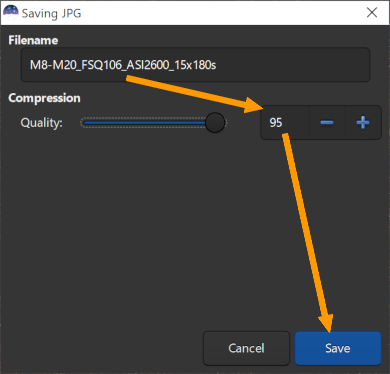
- Right-click in the RGB image, and click on
- Second method, more comprehensive
- Click on the
Save asicon:
- Click on
Supported Image Filesand select the desired file format, or alternatively, specify an image name with a file extension: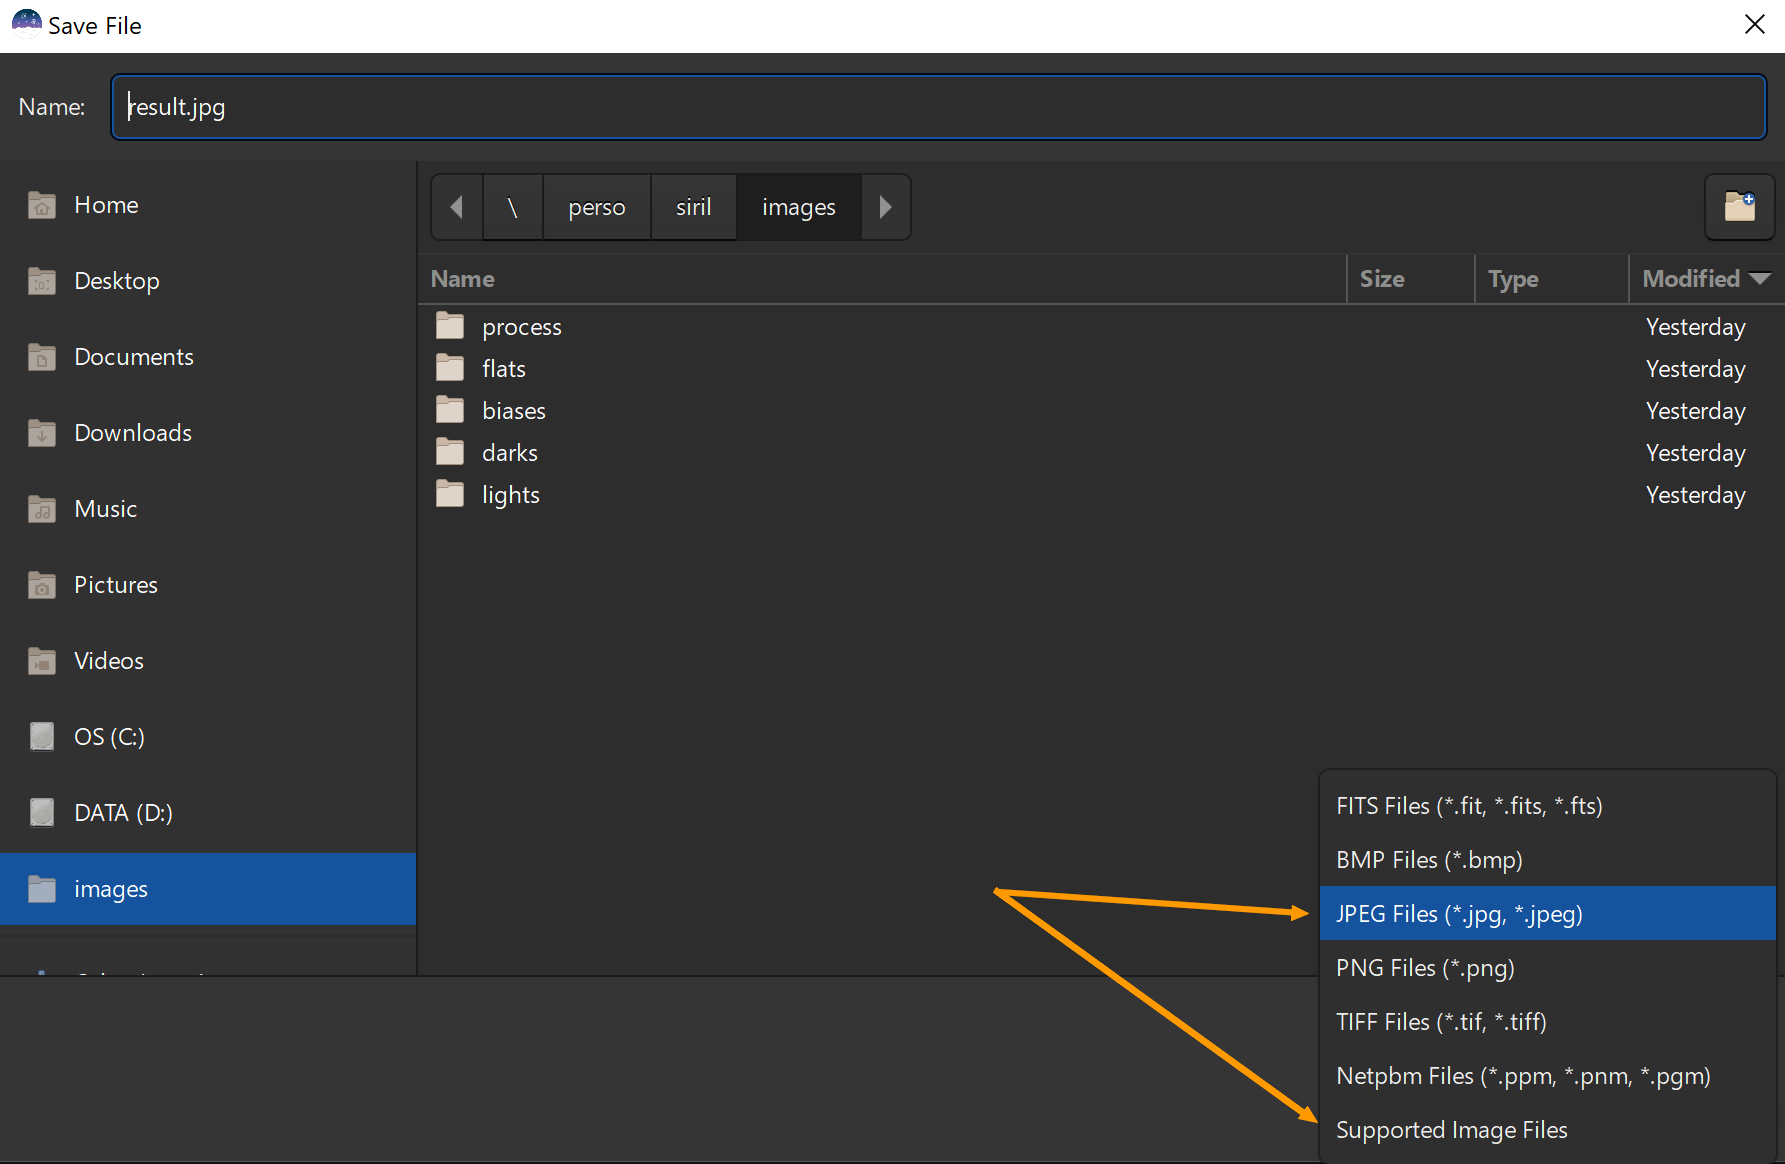
- Give a name to your image and click on
Save(you can also change the output directory):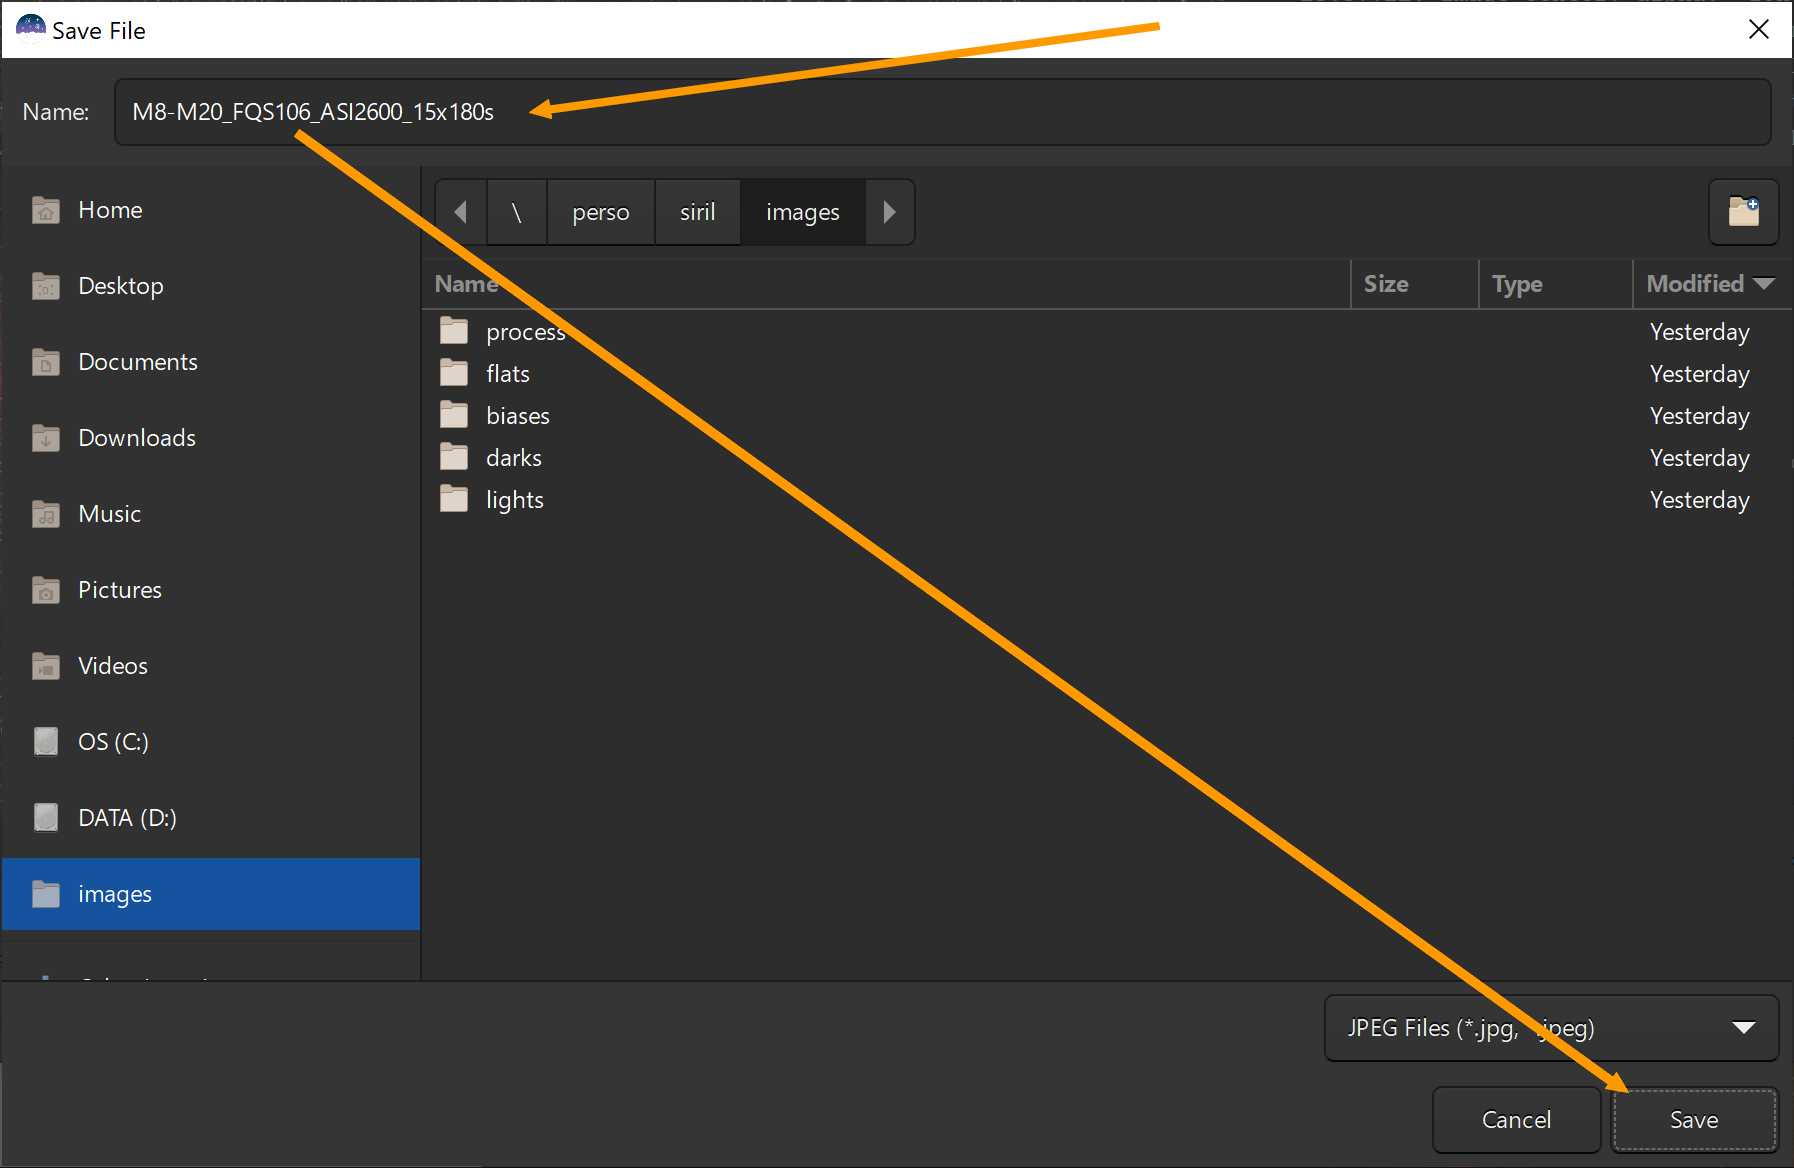
- Adjust the compression level and click on
Save: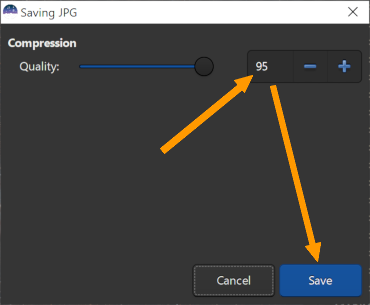
- Click on the
This is the end! #
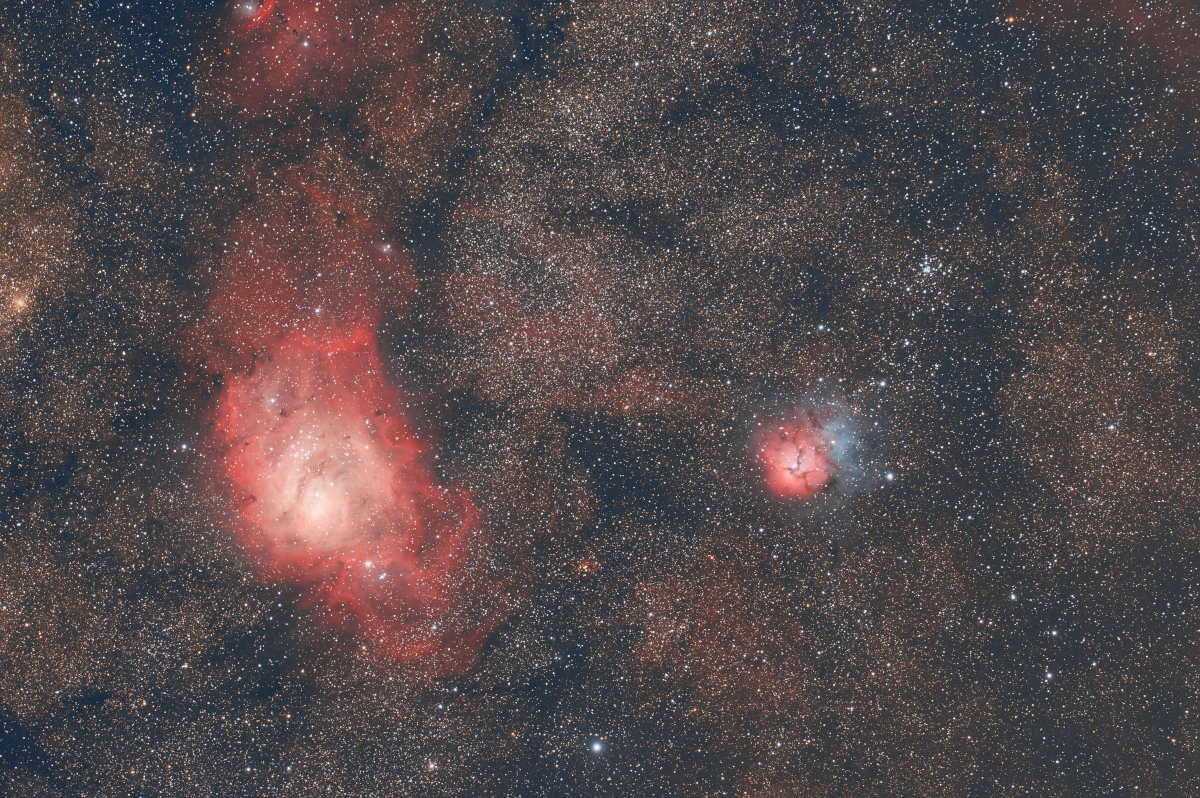
Here is the result! First the single exposure raw image, then the processed image, made from 15 x 3-minute exposures. Doesn’t it look great for 45 minutes of combined exposure? You can see the full size image here
.

This is the end of this tutorial that used scripts and the provided image improvement tools. It will likely be enough for most users, but if you want to go a bit deeper, you can start by looking at other tutorials , or learn how to improve the scripts .