Sirilic
Table of Contents
Introduction #
Genesis #
In June 2018, with version 0.9.9 of Siril appeared a new feature: the scripts. They made it possible to chain processes. For my personal needs and taking inspiration from the first script, I wrote a first program in python that allowed to generate scripts with options (thresholds, and so on). I introduced the small tool to my astronomy club: @LaLoucheDuNord was immediately thrilled and I shared it on the web. After some improvement, I posted on Webastro (French) in August 2018 a first version under the name Conv2Siril which later became Sirilic. I chose this name because it is the acronym of “Siril’s Interactive Companion” and in French, Sirilic has a consonance close to the Cyrillic word. And after many exchanges on the Webastro forum and many improvements, version 1.0 of Sirilic was released in June 2019.
What is Sirilic? #
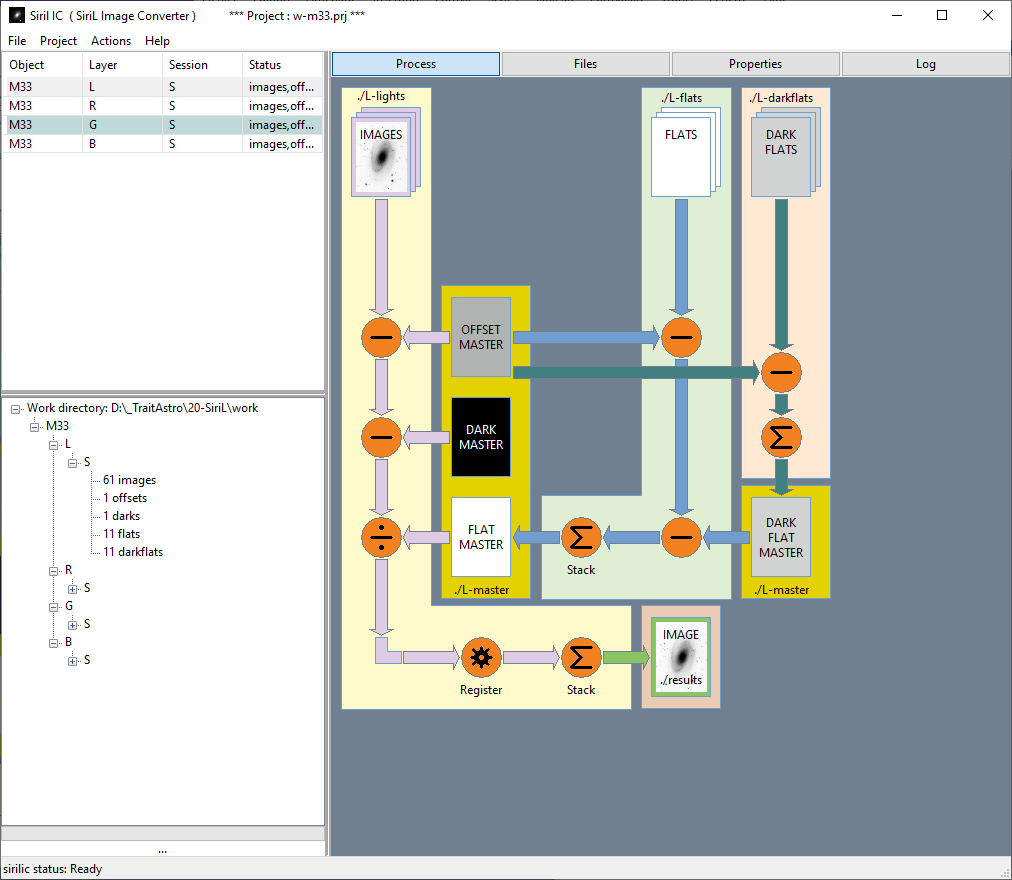
It is an interactive graphical software tool for automating the pre-processing of astronomical images using the Siril software. It will create the master files (Offset, Flat, Dark and Dark-Flat) associated with an image sequence, calibrate each raw image, align them, and stack them. The improvement over Siril is that is does not require a predefined set of input files, and also supports processing several sessions or filters acquisitions. It graphically displays the current process for each layer.
Why Sirilic? #
Initially, Sirilic was created to easily build custom scripts in a few clicks and some sources of images (DSLR, mono CCD, etc …) and options chosen. To help beginners, a graphical display has been added. It shows script operations based upon the checked options.
What exactly is Sirilic doing? #
It does mainly 4 things:
- Organizing the Siril working directory by structuring it in sub-folders
- Copying
Raw,Offset,DarkorFlatfiles into subfolders - Generating a Siril script adapted to the files that are placed inside the folders and selected options
- Starting to process images: Siril is run in script mode in the background
It processes indifferently the images coming from DSLR, color and monochrome CCD / CMOS camera. With a monochrome CCD camera, Sirilic is able to manage the following layers:
L, R, V, B, Halpha, SII, OIII, Hbeta
It can handle multiple objects at once and manages the multi-session per layer, that is, it pre-processes each session separately then groups them into a single folder, aligns and stacks all the images. What DSS did on a layer, Sirilic does it on several layers and objects at a time.
What Sirilic does not do #
It does not do the final processing:
- Channel compositing
- Color calibration
- Background extraction
It does not process encapsulated images in a video file (avi). Sirilic remains a generic tool covering most use cases. For specific cases, you have to directly use Siril.
Advice for beginners #
Before using Sirilic, it is necessary to understand the basic operations of the pre-process of astronomical images. Doing all stages of image processing at least once in Siril is probably a good idea.
The software #
Sirilic is written in python and uses the wxwidget GUI. Sirilic’s main challenge was to build a readable interface and at the same time, to offer the maximum of options. It works on the following OS: GNU/Linux / Mac-OS / Windows 10.
It is developed under LGPL-v3 license and is hosted in the free-astro group on Gitlab .
Installation #
Download #
The latest version is available here: https://gitlab.com/free-astro/sirilic/-/releases
Prerequisites #
On linux, the python software must be installed, preferably a version >= 3.5 (ideally 3.7). Note that the python version 2.7 (which is no longer maintained since January 2020), is not supported by Sirilic.
It is also necessary to install the wxpython graphical package.
On Debian or Ubuntu:
$ sudo apt install python3
$ sudo apt install python3-wxgtk4.0
$ sudo apt install python-is-python3
On Arch Linux
$ sudo pacman -S wxpython
Under Windows, no prerequisite is necessary because the software is delivered as a standalone package.
Linux installation #
Here is an example on 2 GNU/Linux distributions:
On Debian or Ubuntu #
$ sudo apt install ./python3-sirilic_1.13.0-1_all.deb
On Arch Linux #
$ sudo pip install sirilic-1.13.0-py3-none-any.whl
To start Sirilic, click on the Sirilic icon in the education sub-menu. Alternatively, from the command line, the name of the installed command will be sirilic.
From sources #
On linux, download the sources from the git repository by cloning it:
$ git clone https://gitlab.com/free-astro/sirilic.git
The Sirilic folder contains the following files:
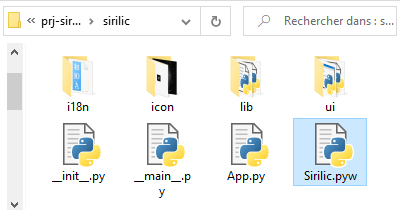
It is necessary to make the file sirilic.pyw executable or to launch it in command line in a terminal:
either
$ python sirilic.pyw
or
$ python3 sirilic.pyw
You can also associate the \*.pyw extension with the python program (/usr/bin/python) in your file browser. Then, a single or double click on the file will run the application.
Windows Installation #
Download the latest version and unzip the archive.
Warning: the archive has a password because some antivirus do not allow executables in zips. The password is: sirilic.
Launch by double clicking on the executable:

User manual #
The first steps with Sirilic #
At the first start of Sirilic, the interface looks like this:
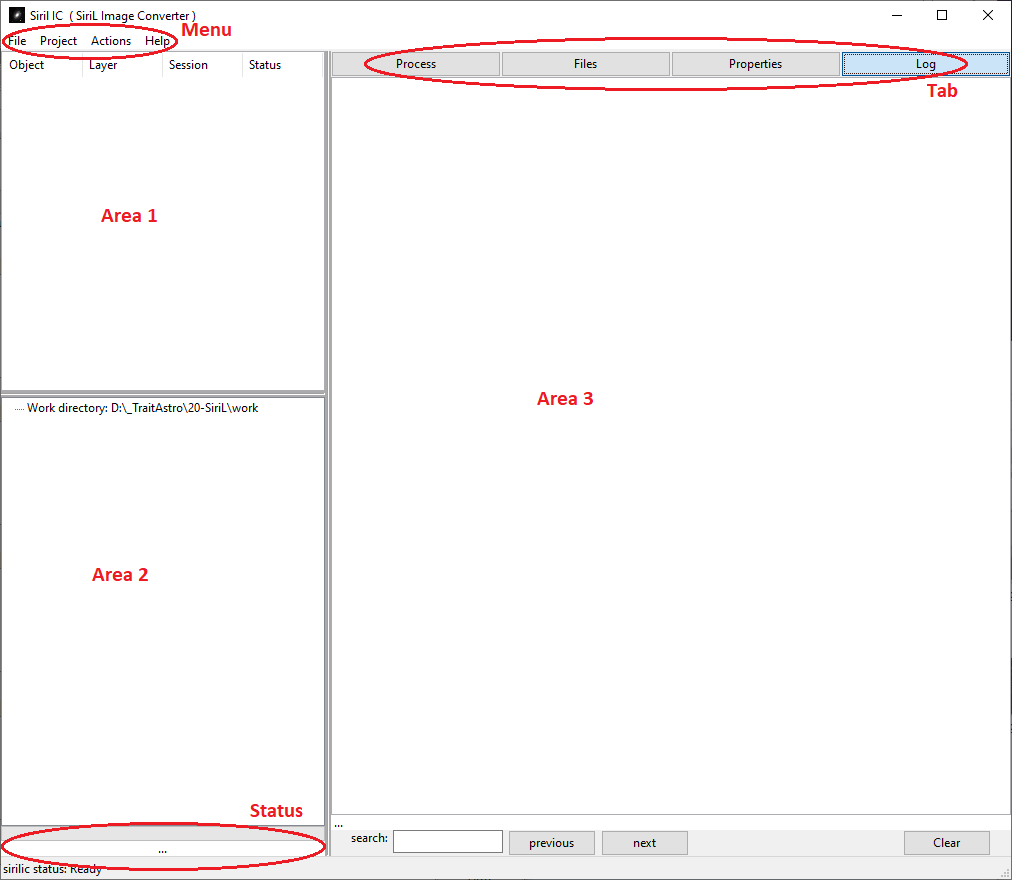
First execution of sirilic
It is split into 3 areas, 1 menu and 1 status bar:
- 1st area: project images list
- 2nd area: project tree in Siril’s working directory
- 3rd area: process visualization tabs, adding files and processing parameters.
Tooltips pop up and give some help on most input fields or buttons.
Before starting the first processing, it is necessary to configure the software by setting its preferences:
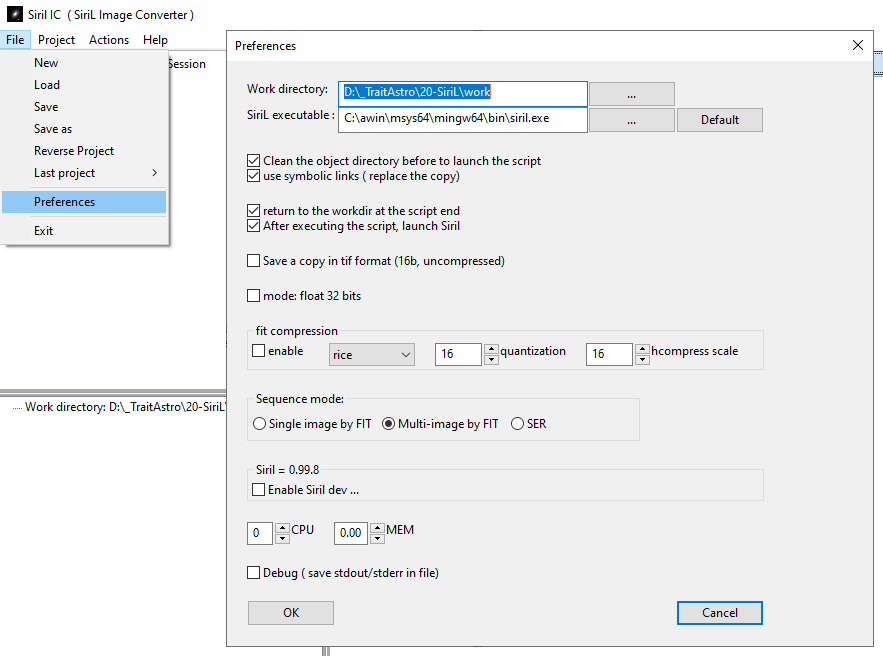
Sirilic configuration
The fields to be completed are:
-
The working directory of
Siril -
The location of the
Siril.exeexecutable (siril-clion other OS) -
Cleanupoption: it will destroy the\*.fitfiles of the sub-directories (-flats,-darks,-offsets,-images) before making the copy (it is recommended to leave the option checked, it will avoid side effects if consecutive processings are done in the same folder). -
Symbolic linksoption: Sirilic offers the possibility of not copying the images of the working folder but to use symbolic links instead. It allows to enhance the speed and space disk compared to the copy of the files. Note that to use the symbolic links on Windows10, it is necessary to check the developer mode:Settings → Update and Security → Developer ZoneSymbolic links do not work on FAT32 partitions. For Windows 7 & 8, the developer mode does not exist. You have to run Sirilic in Administrator mode.
-
Return to work folderoption goes back to the working directory at the end of the script. -
After executing the script, launch Siriloption allows to start Siril at the end of the script. -
Sequence modeoption: It allows you to choose the file format Siril will use for file sequences during the processing:- Single image by FITS: a sequence is composed of individual FITS files
- Multi image by FITS: a sequence is composed of a FITS file which integrates all the images
- SER: a sequence is composed of a SER file which integrates all the images
-
The
CPUandMemory Ratiooptions allow you to force Siril’s default settings. A value of zero will make the option ignored.
Creating a project #

To illustrate the procedure, I took pictures of M31 from a digital camera (EOS 1200D). The first step is to create a project. To do this, click on the menu File then New to make the following dialog box:
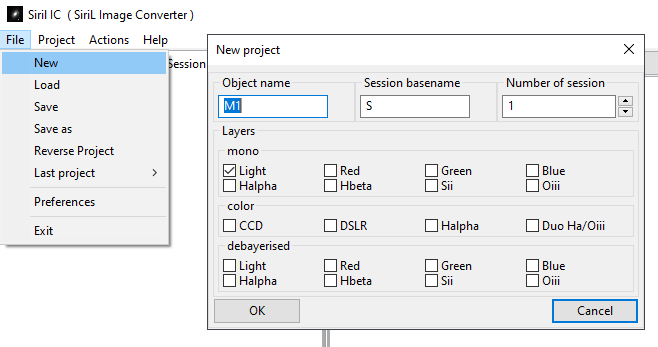
New project creation
Enter the name of the main object in the picture, the name of the session and check the layer(s) to be processed and validate the dialog box. A line will appear in the upper left area. Its status is marked uninitialized.
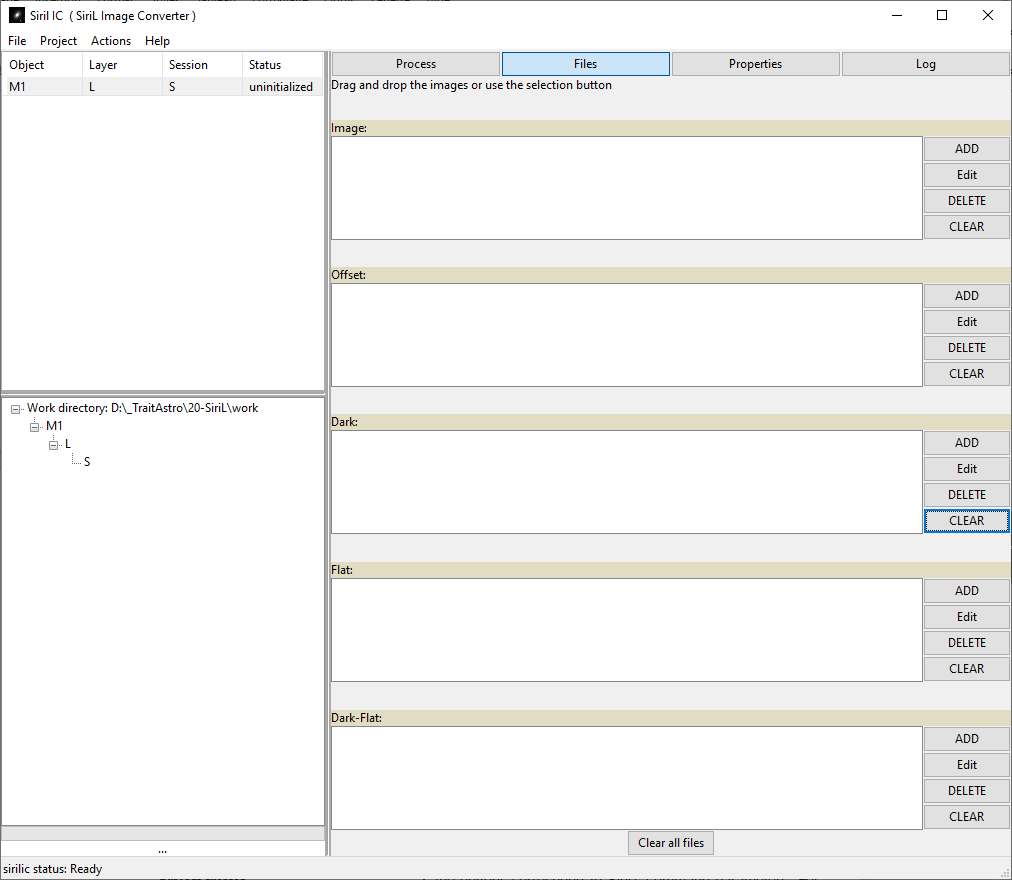
Created project
Additional objects or layers can be added or edited via the project menu.
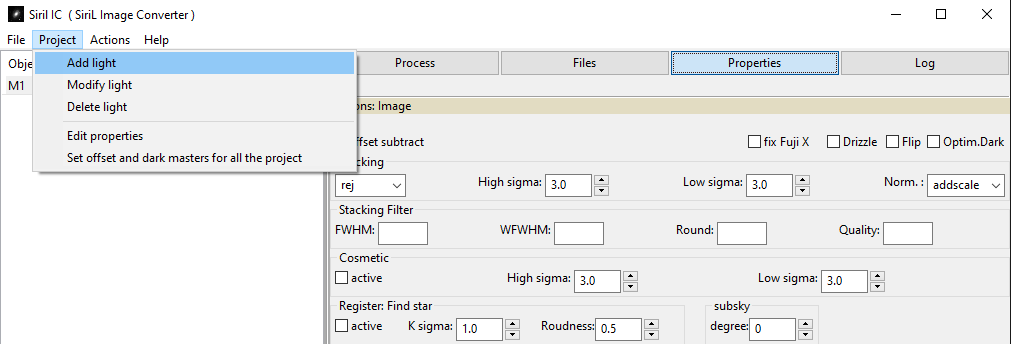
Adding a new object or layer
Adding images, flats, darks to each layer #

Select the line named M31, then click the Files tab in the right area of the interface. Then you must fill in the list of files (Image, Offset, Dark, Flat, Dark-Flat) of each layer of the project.
There are different ways to add the files:
- by clicking on the
ADDbutton - by using the file manager and the
Drag'n Droptechnique - by editing a line and putting a pattern (ex:
C:/images/L*.fit)
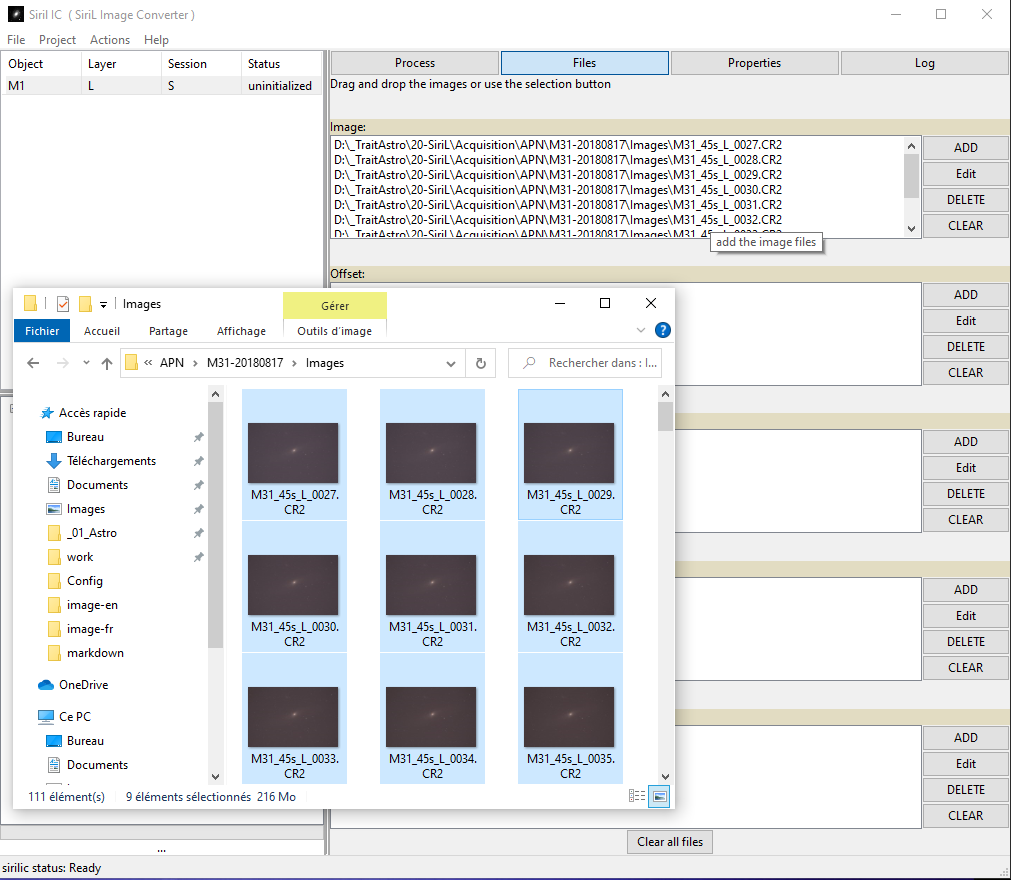
Adding files
Note: The detection of masters is automatic. Indeed, if we put only one file in Offset, then Sirilic will consider that it is a master offset (same for Dark, Flat and DarkFlat).
Configuration of each layer of the project #

The next step is now to select the Properties tab in the right area of the interface. It allows to choose various options and parameters for each type of image (Light, Dark, Flat and DarkFlat):
- Type of stacking,
- Thresholds,
- Type of normalisation,
- Removing biases or not,
- and more…
The options correspond to Siril’s command parameters. For more information, refer to Siril’s commands documentation .
Note: The option copy library by siril is for a very specific use. In most cases, it will be left unchecked. It should be checked only if the master library does not exist at the launch of the script but will be created by the previous layer. So Siril will copy the library into the master folder of the current layer.
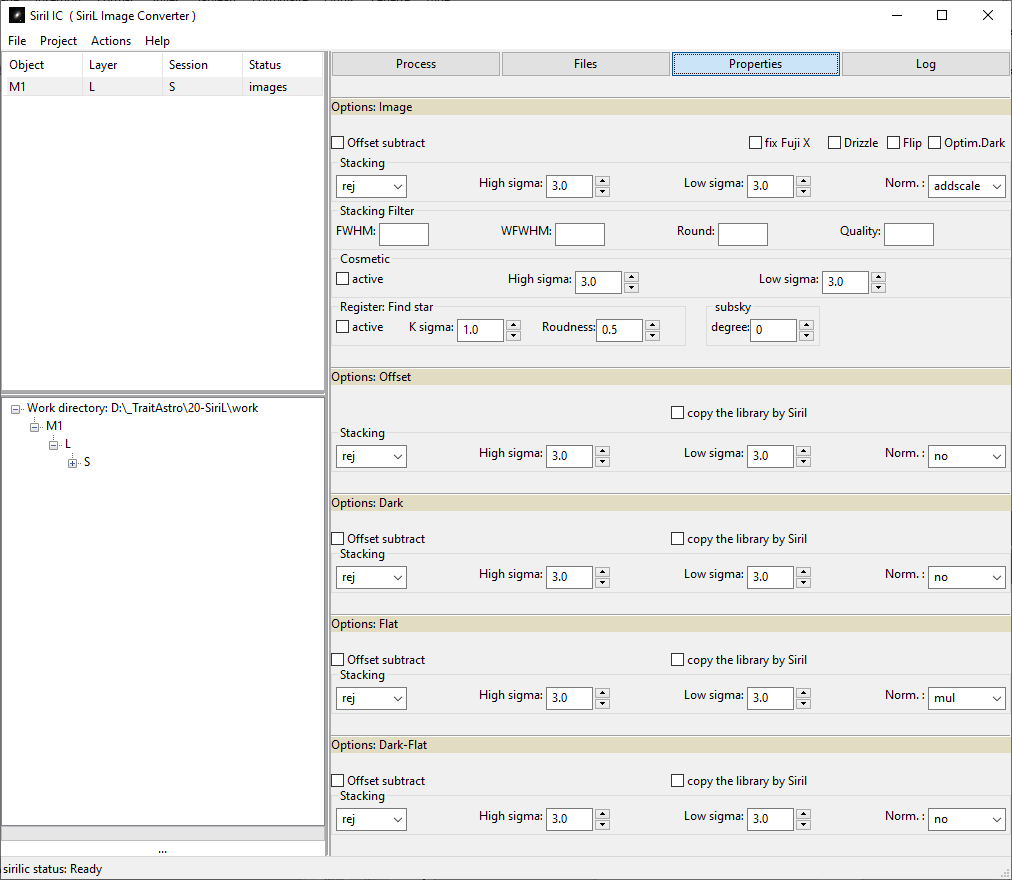
Setting process options
The first tab named process is just to visualize graphically the process that is applied to the selected layer. It allows the beginner to understand the processing that will perform with the script on the layer.
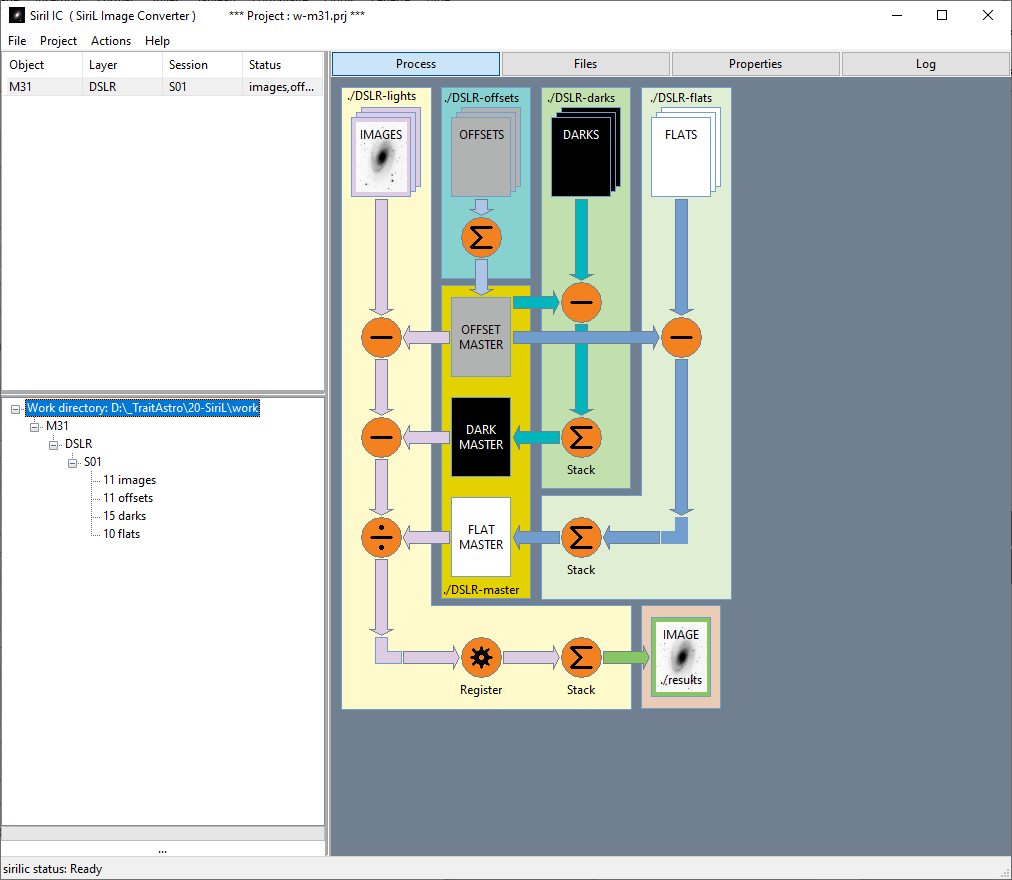
Process visualization
Global parameters of the project #

The last step before running the script will be to populate the global properties of the project.
You must select the Project → Property Editions menu to access it.
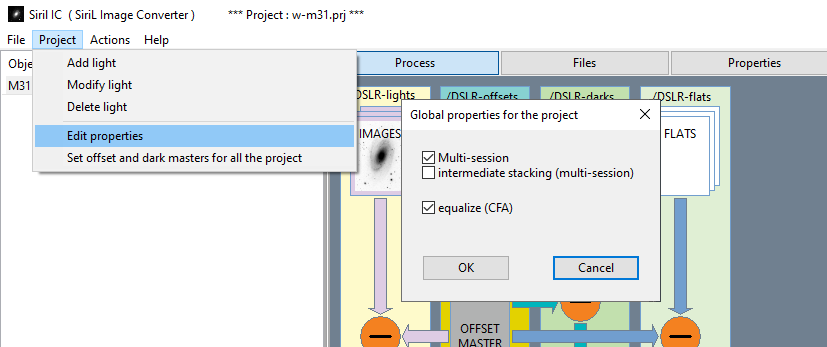
In our example (DSLR), the Equalize parameter will be checked.
Sirilic can process images of the same object taken across several nights in the same conditions: with roughly the same framing, same image dimensions, same filter used if any, but the camera was moved between the two nights so flats had to be remade, possibly the temperature was different too and a different set of darks was made… We call these nights sessions. The Multi-session option has no effect on processing when there is only one session. The following table explains what effect the combination of Multi-Session and Intermediate Stacking has.

Before continuing, it could be useful to save the project by selecting via the File and Save menu.
Structuring folders and copying images #

The project being configured, it is necessary now to:
- Build the directory tree in the working folder
- Clean the files of a previous process before copying it
- Copy the files or create links on images
Click on step 1 in the Actions menu.
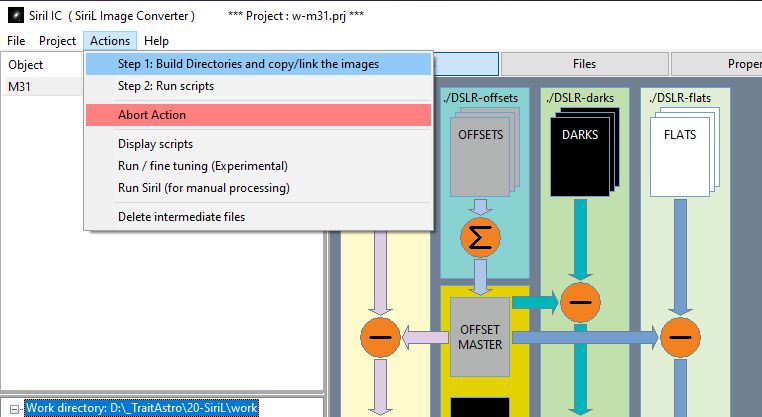
Building directories and copying images
The workflow is displayed in the log window:
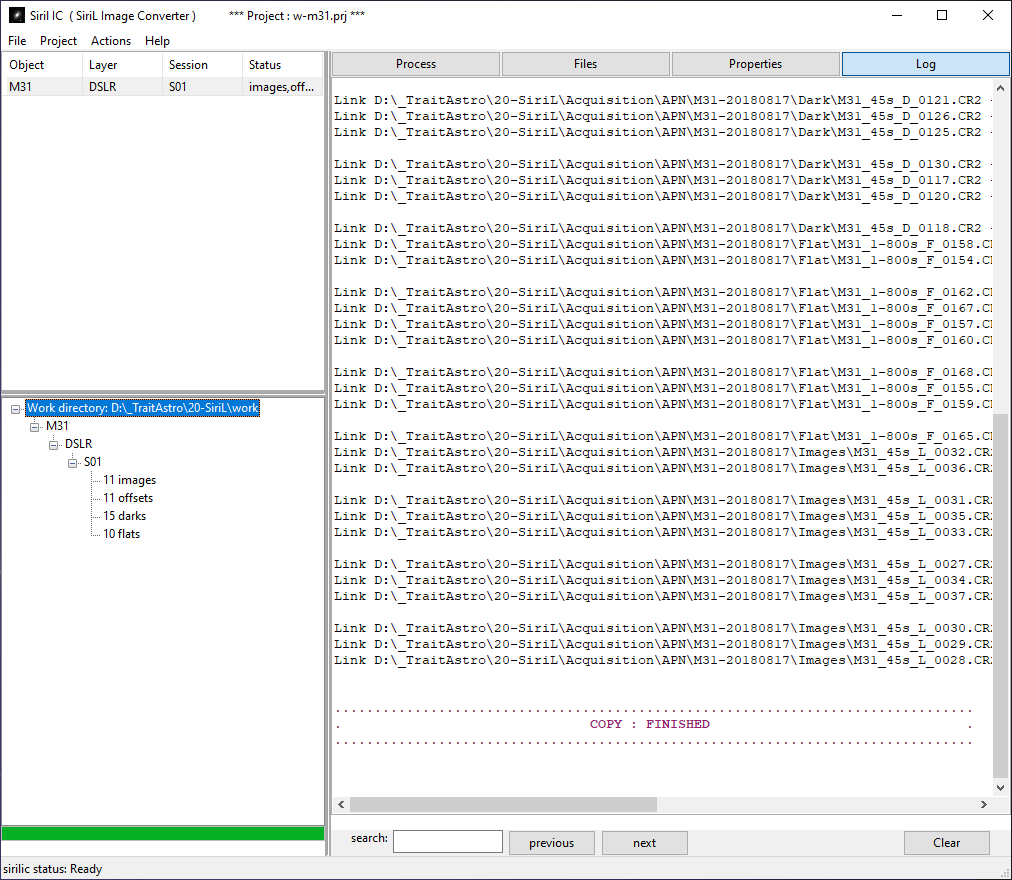
Image processing #

This is the final step: you have to click on step 2 of the Actions menu.

Running Siril script
Siril’s image processing will be displayed in the log window. It is done in several stages:
- Creation of a script
sirilic-part1.ssfstored in thescriptsub-folder of the working directory - Run the script
sirilic-part.ssf:- It will create the masters and pre-process all images
- In the case of a layer with a single session, it will register and stack them
- For layers with multiple sessions:
- It will group all sessions of a layer into one (Merge)
- It will perform registration and stacking on the merged sessions
- For a monochrome CCD camera, it will align the layers L, R, V, B, Ha… So they will be ready to be combined with Siril to form the final color image.
- The result of the processing is stored directly in the
objectsub-folder (in our case, it isM31) at the root of the working directory of Siril .
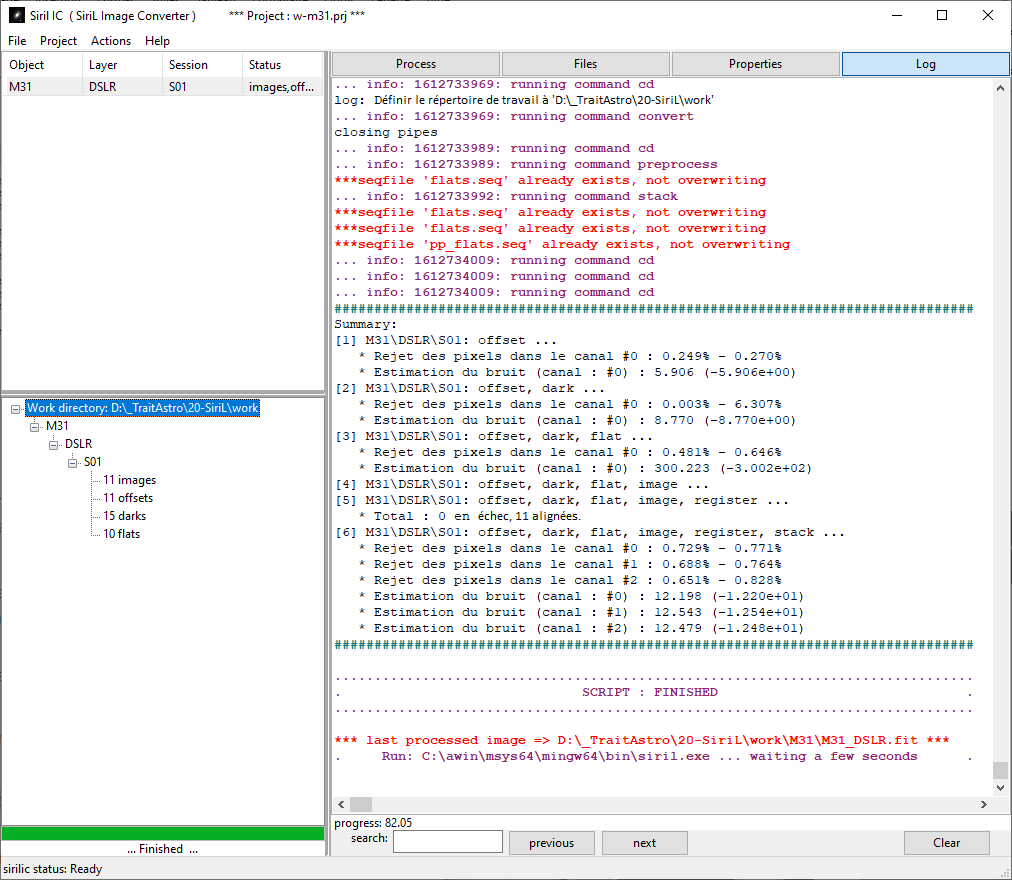
Displaying Siril sequence processing
If the option After executing the script, launch Siril is checked in the preferences, then Siril will be launched automatically at the end of the script and will open the result image if there is only one.
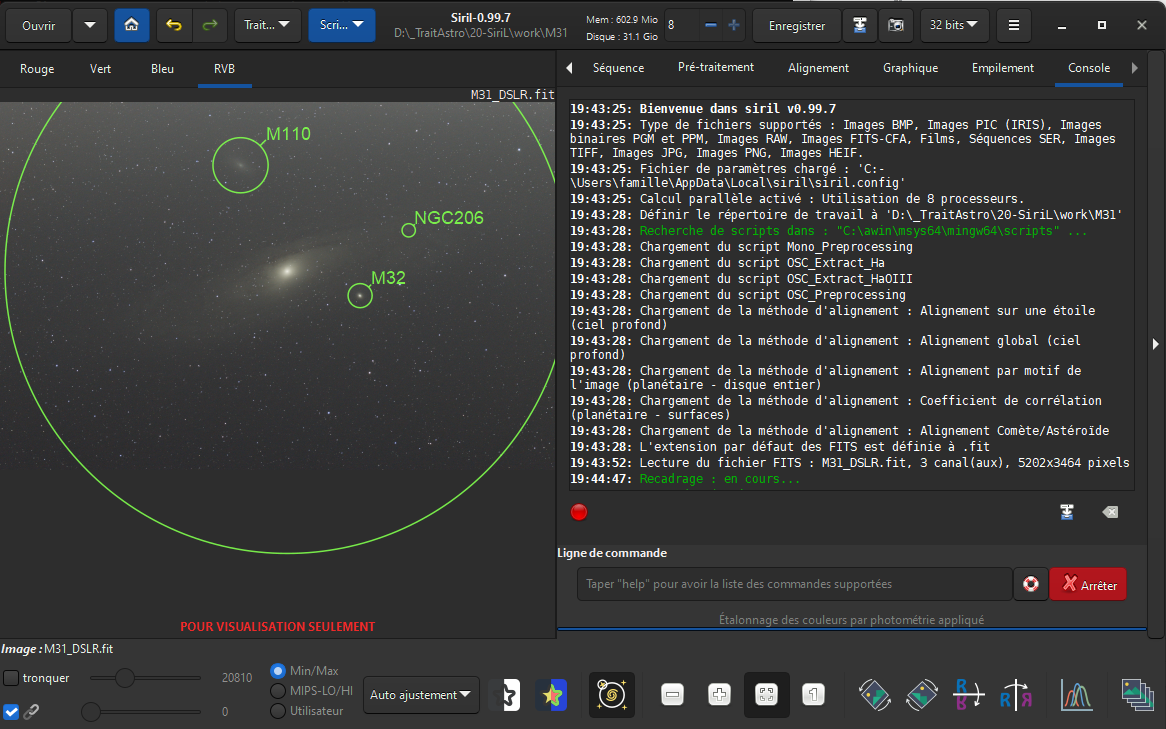
Final step: launching Siril
Multi-session mode #
The operation is quite simple, just check the multi-session mode in the project options and create a layer with multiple sessions. The layers merge automatically before aligning the images.
For example, the NGC281 project below has 2 sessions for its L and Ha layers.
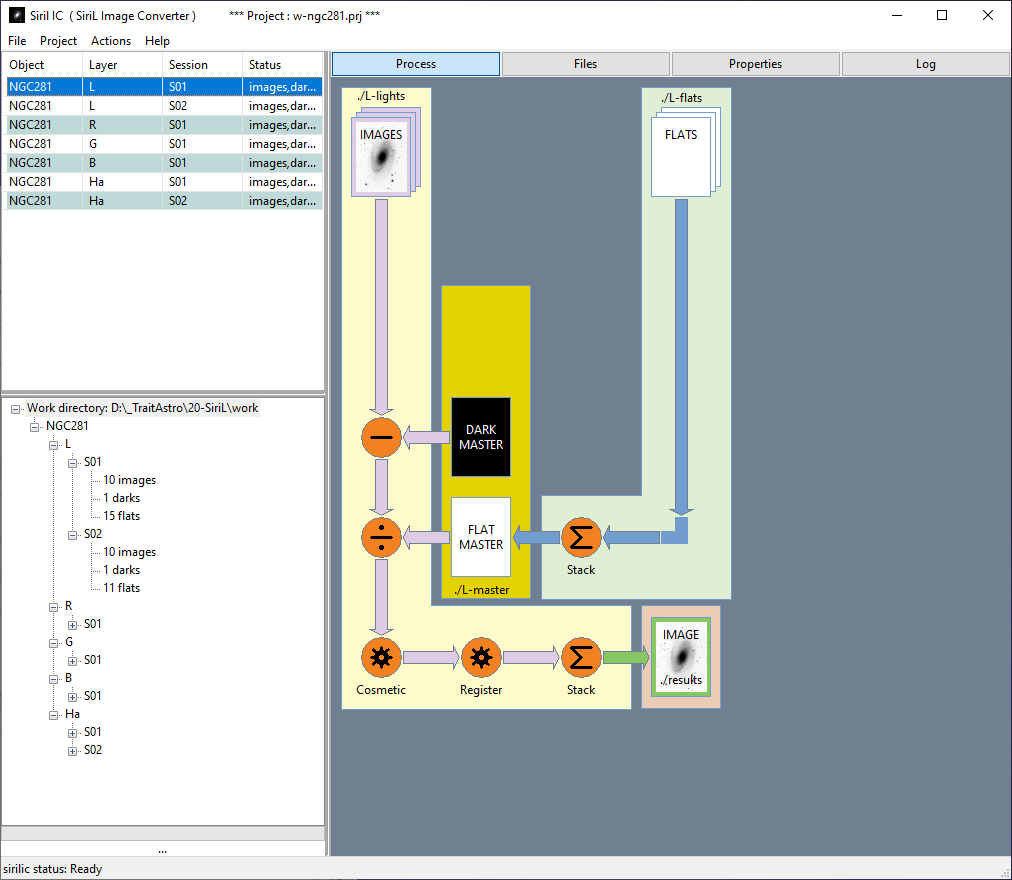
Mulitiple sessions example
The Group folder of the layer Ha (or L) contains all the images of the 2 sessions S01 and S02.
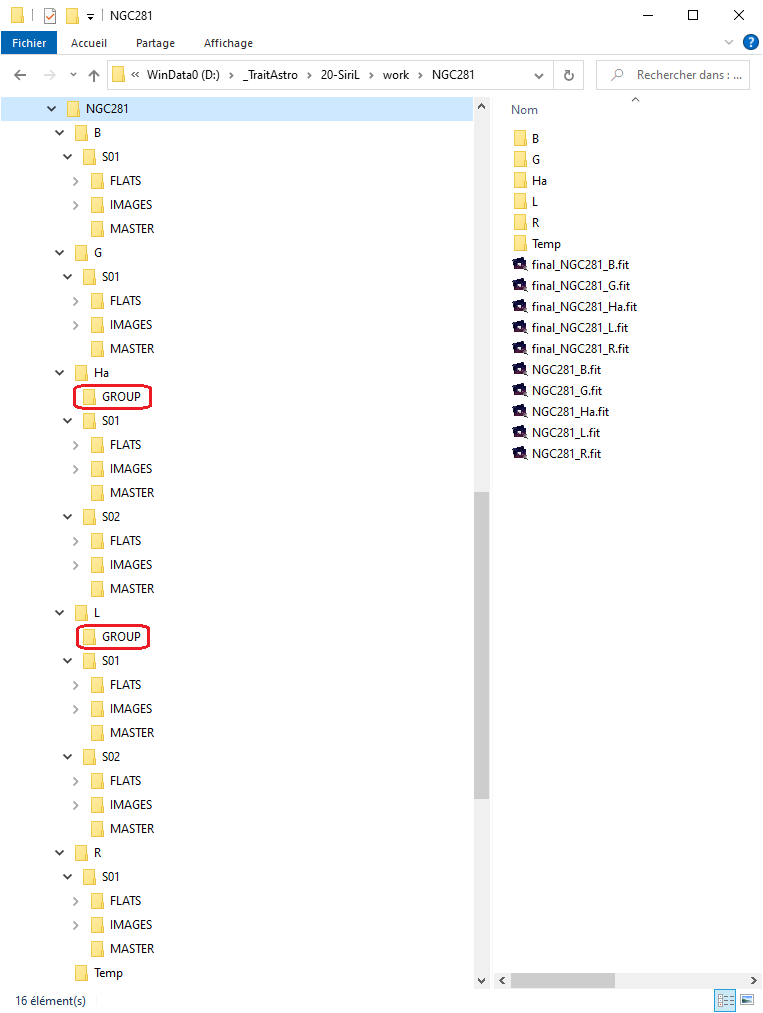
Tree structure of a multiple session